Build Your Own Hydroponic Wheel

Hydroponics is an effective way of growing plants indoors through the use of water medium and artificial lighting. It often involves having a system to raise and lower the water level around the plants to let the roots breathe, however this can require some non-trivial plumbing. [Peter] wanted to instead explore the realm of wheel hydroponics to grow some ingredients for salad.

The idea is to have pods mounted on a rotating assembly, similar to the carriages on a Ferris Wheel. By rotating the wheel slowly, each pod spends a certain amount of time submerged, and a certain amount of time in free air. This allows the water level to remain constant and only the pods need to move.

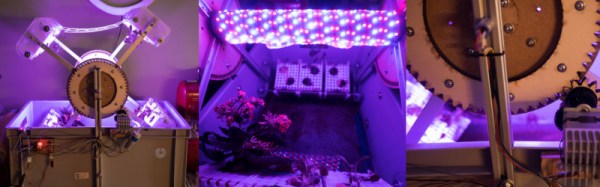
The tank for the build is a simple plastic storage bin from a local hardware store, with the wheel assembled from various odds and ends and laser cut components, making this a build very possible for those with access to a hackerspace. A stepper motor provides the motive power, with the assembly completing approximately one rotation per hour.

[Peter] has run the device for several months now, noting that there are issues with certain plants maintaining their hold to the wheel, as well as algae growth in the water medium. There’s room for development but overall, it’s a great build and we hope [Peter] will be serving up some delicious fresh salads soon.

For another take, perhaps you’d like your hydroponics solar powered?

[Thanks Nils!]

Git Shell Bypass, Less Is More

We’ve always been a fans of wargames. Not the movie (well, also the movie) but I’m referring to hacking wargames. There are several formats but usually you have access to an initial shell account somewhere, which is level0, and you have to exploit some flaw in the system to manage to get level1 permissions and so forth. Almost always there’s a level where you have to exploit a legitimate binary (with some shady permissions) that does more than what the regular user thinks.

In the case of CVE-2017-8386, less is more.

[Timo Schmid] details how the git-shell, a restricted shell meant to be used as the upstream peer in a git remote session over a ssh tunnel, can be abused in order to achieve arbitrary file read, directory listing and somewhat restricted file write. The git-shell basic idea is to restrict the allowed commands in an ssh session to the ones required by git (git-receive-pack, git-upload-pack, git-upload-archive). The researcher realized he could pass parameters to these commands, like the flag –help:

$ ssh git@remoteserver "git-receive-pack '--help'"

GIT-RECEIVE-PACK(1)            Git Manual             GIT-RECEIVE-PACK(1)

NAME
 git-receive-pack - Receive what is pushed into the repository
[...]

What the flag does is make the git command open the man page of git, which is passed on to a pager program, usually less. And this is where it get interesting. The less command, if running interactively, can do several things you would expect like searching for text, go to a line number, scroll down and so on. What it can also do is open a new file (:e), save the input to a file (s) and execute commands (!). To make it run interactively, you have to force the allocation of a PTY in ssh like so:

$ ssh -t git@remoteserver "git-receive-pack '--help'"

GIT-RECEIVE-PACK(1) Git Manual GIT-RECEIVE-PACK(1)

NAME
 git-receive-pack - Receive what is pushed into the repository

 Manual page git-receive-pack(1) line 1 (press h for help or q to quit)
 

Press h for help and have fun. One caveat is that usual installations the code execution will not really execute arbitrary commands, since the current running login shell is the git-shell, restricted to only some white listed commands. There are, however, certain configurations where this might happen, such as maintaining bash or sh as a login shell and limit the user in ways that they can only use git (such as in shared environments without root access). You can see such example here.

The quickest solution seems to be to enable the no-pty flag server-side, in the sshd configuration. This prevents clients from requesting a PTY so less won’t run in an interactive mode.

$ man less

LESS(1) General Commands Manual LESS(1)

NAME
less - opposite of more

Ironic, isn’t it?

Quick And Dirty Shock Gloves

[JLaservideo] has created some cool high-voltage gloves and uploaded a video on YouTube showing you how to get your mitts on a pair of your own. Using some very simple parts, he manages to make some decent sparks.

At the heart of this project is one of those new-fangled arc lighters which normally use some type of voltage multiplier circuit to function. The rest of the build is just wire, glue, aluminum foil, a switch, and paintball gloves.

Using the tip of each finger as an electrode, anything he touches will complete the circuit, creating high-voltage arcs. The demo of burning through paper is pretty neat, although we’ll admit we’re at a loss to think of what other tricks you could pull off with electrified fingertips. Anyone?

Continue reading “Quick And Dirty Shock Gloves”

Pool Playing Robot Destined For Trouble In River City

You’d think pool should be an easy game for a robot to play, right? It’s all math — geometry to figure out the angles and basic physics to deal with how much force is needed to move the balls. On top of that, it’s constrained to just two dimensions, so it should be a breeze.

Any pool player will tell you there’s much, much more to the game in real life, but still, a robot to play pool against would be a neat trick. As a move toward that goal, [BVarv] wisely decided on a miniature mockup of a pool-playing robot, and in the process reinvented the pool table itself. Realizing that a tracked or wheeled robot would have a tough time maneuvering around the base of a traditional pool table, his model pool table is a legless design that looks like something from IKEA. But the pedestal support allows the robot to be attached to the table and swing around in a full circle, and this allowed him to work through the kinematics as shown in the charming stop-action video below.

[BVarv] has gotten as far as motion control on the swing axis, as well as on the arms that will eventually hold the cue. He plans overhead image analysis for identifying shots, and of course there’s the whole making it full-size thing to do. We’d love to play a game or two against a bot, so we hope he gets there. In the meantime, how about a little robo-air hockey?

Continue reading “Pool Playing Robot Destined For Trouble In River City”

Hackaday Prize Entry: Modular Rail Lighting

When operating any kind of hydroponic farming, there are a number of lighting solutions — few of them inexpensive. Originally looking for an alternative to the lighting of IKEA’s expensive hydroponics system, [Professor Fartsparkle] and their colleague prototyped a rail system that allows clip-on LED boards for variable lighting options.

Taking inspiration from wire and track lighting systems, the key was the 5mm fuse holders mounted on the bottom of the LED boards. Snipping off their stopping clip makes them easy to install and remove from the mounting rails. The rails themselves double as power conduits for the LED boards, but keeping them out of the way is easily done with the variety of 3D printed hangers [Professor Fartsparkle] has devised. Lighting is controlled by a potentiometer on the power injection board, as well as any home automation control via an ESP8266.

[Professor Fartsparkle] asserts that the boards can be slid along the rails without any noticeable flickering, but they do suffer from heat dissipation issues. That aside, the prototype works well enough that the 3W LEDs can be run at half power.

This is an ingenious — and cheap — workaround for when sunlight isn’t an option, but you are still looking for a solution capable of automation.

Designing For Fab: A Heads-Up Before Designing PCBs For Professional Assembly

Designing pcbs for assembly is easy, right? We just squirt all the footprints onto a board layout, connect all the traces, send out the gerbers and position files, and we’re done–right?

Whoa, hold the phone, there, young rogue! Just like we can hack together some working source code with variables named after our best friends, we can also design our PCBs in ways that make it fairly difficult to assemble.

However, by following the agreed-upon design specs, we’ll put ourselves on track for success with automated assembly. If we want another party to put components on our boards, we need to clearly communicate the needed steps to get there. The best way to do so is by following the standards.

Proper Footprint Orientation

Now, for a momImage Credit: https://encrypted-tbn2.gstatic.com/images?q=tbn:ANd9GcQBEztpnSxpN_IRjq3y8GbetrMHKuoSu_s6myiFOHilL2FlQKyLrgent, let’s imagine ourselves as the tip of a vacuum pickup tool on a pick-and-place machine. These tools are designed to pick up components on the reel from their centroid and plunk them on their corresponding land pattern. Seems pretty straightforward, right? It is, provided that we design our footprints knowing that they’ll one day come face-to-face with the pick-and-place machine.

To get from the reel to the board, we, the designers, need two bits of information from out part’s datasheet: the part centroid and the reel orientation.

The part centroid is an X-Y location that calls out the center-of-mass of the part. It basically tells the machine: “pick me up from here!” As designers, it’s our responsibility to design all of our footprints such that the footprint origin is set at the part’s centroid. If we forget to do so, the pick-and-place will try to suck up our parts from a location that may not stick very well to the package, such as: the corner.

Continue reading “Designing For Fab: A Heads-Up Before Designing PCBs For Professional Assembly”

Friday Hack Chat: Tenaya Hurst From Arduino

Join us this Friday at noon PDT for a Hack Chat with Tenaya Hurst of Arduino. If you’ve been one of the big Maker Faires over the last few years (or innumerable other live events) and stopped by the Arduino area you’ve probably met Tenaya. She is the Education Accounts Manager for Arduino and loves working with wearable electronics.

Come and discuss maker education and the role Arduino is playing in getting our students excited about electronics, and STEAM education in general. Tenaya will also be discussing a new wearable tech kit she’s been working on. We hope to see the gear in person at Bay Area Maker Faire next week.

Here’s How To Take Part:

join-hack-chatOur Hack Chats are live community events on the Hackaday.io Hack Chat group messaging.

Log into Hackaday.io, visit that page, and look for the ‘Join this Project’ Button. Once you’re part of the project, the button will change to ‘Team Messaging’, which takes you directly to the Hack Chat.

You don’t have to wait until Friday; join whenever you want and you can see what the community is talking about.