This will be an experience shared by all 3D printer owners; a long print is mostly done, and something goes wrong. Result: most of the print and a heap of plastic vermicelli, or worse still, a print with an obviously offset layer in it.
[Simon Merrett] had a large part running on his printer, and 2.5 hours in to a 3 hour print the nozzle caught the edge of what he had already done, and as a result he was extruding into thin air (He told us in his tip email that his machine build was the likely culprit). Being fortunate enough to see it happening, he was able to hit the stop button in his Repetier software and bring the calamity to a swift halt.
How he rescued the situation is an interesting tale which he’s recorded in the screen capture video we’ve placed below the break, it involved using a spreadsheet to analyse the G-Code and remove the lines for the part he had already printed before inserting a new set of Z-axis dimensions to start the remaining section of print from the bed upwards. A few further fixes, and he was able to print the rest of his part, which he could then glue to the unfinished top of the section he had already printed. He points out in his YouTube description that he emailed the Repetier folks, and they told him a quicker way to deal with the Z-axis: using the G92 command to reset it.
You might ask why if he was prepared to spend this amount of time he didn’t simply reprint the entire part. But he points out, in that event the print could well have failed again at exactly the same point.
If you’re not able to pick up a failed print to finish it, how about recycling your failed prints?


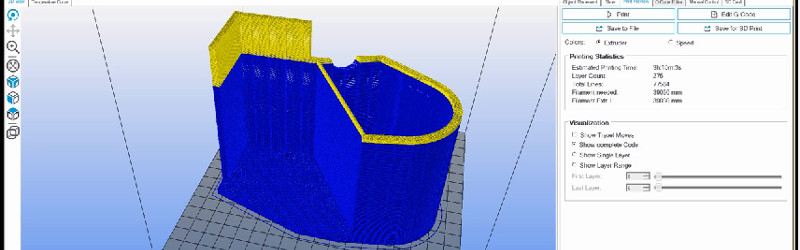
Some slicers (Slic3r and S3D definitely do, not sure about Cura) and most 3d design tools allow you to cut a print at a specific height, so it might be easier to use the slicer (that you’re already using) to cut the print at the failure height, hit Slice, and print the resulting gcode. That way settings like higher first layer bed temperatures or layer heights (for adhesion purposes) are applied correctly to the top part, no gcode editing required.
Cura allows you to cut off a specified height from the bottom. I’ve used it to print models not optimized for 3D printing and don’t have nice flat bottoms. This usually means just a mm or so, but it works for whatever offset you feed it.
S3D has the option to start printing at a specific height. I have a process set up specifically to resume printing on failed prints, assuming the part is still attached from the bed, you just turn off bottom layers and set it to print at roughly the same height as it failed and it just continues the same print, adhesion isn’t an issue and the part usually only has a very small seam.
given the rather crappy print volume on my printer i usually break out the slice tool and break a model down into assemblies, boolean in few screw holes and re assemble.
this technique likely only works in a few specific situations, and then you are left with the problem of re-attatching two severed parts. sticking a piece of filament into my dremel and use it as a welder works wonders sometimes. if you are printing in abs you can just use acetone i suppose. goof off is also really good at turning abs into putty.
Weld-On 16 is a great DCM-based glue. Works for ABS, PLA, PET, and lots more plastics, and since it’s solvent-based, once dry it’s the strongest bond in your 3D printed assembly. It’s way nicer than futzing about with acetone.
Same here, slice into sections, and use an old soldering iron to plastic weld together. (Use old support material to fill)
Texture looks a little off, but no issues if finishing /Not seen.
Isn’t it easier to just remove the section of the gcode that has already been printed and run the remaining gcode. This way the printer will continue to print ontop of the part that is already on the bed. I did this couple of times and it worked in most of the cases. Before starting the rest of the print i just had to clean the top of the first part with a razor blade.
The problem with that is if you have auto bed leveling, when you restart the print it needs to probe the bed, and if there’s a print on the bed it’s not going to work. One could try only homing x and y and eyeball the z axis moving it into plate, reset it using G92 Z0 and start printing (without the skirt). Pre extruding some material might be needed to get the filament flow started or it will print a weak joint.
If the contact area is too small, like in the post above, I’d also opt for printing it separately and use glue (probably use a two component epoxy glue because it can fill the area for extra strength.
I use auto bed leveling and was able to rehome the print and set z in the top left corner no problem. You obviously cannot do a mesh leveling, and a properly level bed is necessary. Just like Filip stated, just shave off the abnormal layers, use the nozzle to locate your last successfully printed layer, obtain z height, edit the sections of the code out that are already printed, remove bed leveling and homing code and away it goes.
It may also work with the latest Marlin build, in theory, it supports fading of the irregularities of the bed. Still, I think restarting from the point where it failed printed on the bed and gluing it together would be my preferred method.
In my case the PEI sheet is clipped to the aluminium heated bed. The base of the print warps, pulling the PEI up slightly and allowing the print to tilt slightly. On tall prints this is what leads to the nozzle collision and I don’t think I could have successfully restarted the print with such a wobbly print.
The idea of reslicing part of the way up the print is a good one that’s new to me, thanks for the tips.
Why aren’t you using a sheet of 3m 468MP to adhere your bed? It’s cheap and works great as long as your plate is thick enough to not deform.
Because I have an 8mm thick aluminium heated bed plate which takes little time to heat up from the mains but a long time to cool down, so I have (an inadequate number and placement of) bulldog clips holding the PEI sheet down. When the print is finished I can unclip the sheet for fast removal of the print.
When I’ve run into this problem, I’d generally scrap it or print the top partial and plastic weld them together. Very clever!
How many print failures would be prevented if the printer could detect missed steps or other root causes and correct?
Detecting missed steps does not allow recovery.
You only start missing steps after something has gone wrong. Either you’ve crashed into the print or you’ve built such a massive rats nest of extruded filament that the motors are no longer strong enough to keep the printer moving.
I actually cannot think of a situation where an axis is fucked enough to jam a servo but the print is still intact.
If you lose belt tension then the sprocket won’t drive the axis, or if you forget to lube linear bearing then the carriage don’t move. Either way, amonitor comparing encoder pulses to belt teeth movement would be a nice innovation to stop the print.