Fail Of The Week: Good Prosthetic Hand Design Goes Bad

Is this a case of a good design gone wrong in the build phase? Or is this DIY prosthetic arm a poor design from the get-go? Either way, [Will Donaldson] needs some feedback, and Hackaday is just the right place for that.

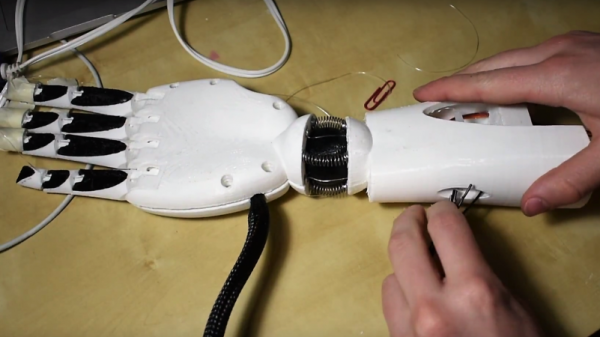
Up front, we’ll say kudos to [Will] for having the guts to post a build that’s less than successful. And we’ll stipulate that when it comes to fully articulated prosthetic hands, it’s easy to fail. His design is ambitious, with an opposable thumb, fingers with three phalanges each, a ball and socket wrist, and internal servos driving everything. It’s also aesthetically pleasing, with a little bit of an I, Robot meets Stormtrooper look.

But [Will]’s build was plagued with print problems from the start, possibly due to the complex nature of the bosses and guides within the palm for all the finger servos. Bad prints led to creaky joints and broken servos. The servos themselves were a source of consternation, modified as they were for continuous rotation and broken apart for remotely mounting their pots in the hand’s knuckles. The video below relates the tale of woe.

There’s a lot to admire with [Will]’s build, but it certainly still has its issues. He’s almost to the point of other more successful DIY hand builds but just needs a little help. What say you in the comments line? Continue reading “Fail Of The Week: Good Prosthetic Hand Design Goes Bad”

Edge-lit Pendants Show Two Layers Are Better Than One

Engraved acrylic lights up nicely with LED lighting. Simply engrave clear acrylic with a laser engraver, then edge-light the acrylic and watch the engraving light up. This badge made by [Solarbotics] shows how they used this principle when creating some pendants for an event that performed particularly well in the dark.

The pendants they created have two engraved acrylic panels each, and that’s about it. Two LEDs and a CR2032 battery nestle into pre-cut holes, and the engraved sides are placed face-to-face, so the outer surfaces of the pendant are smooth. By using some color-cycling RGB LEDs on one panel and blue LEDs on the other panel, the effect is that of an edge-lit outer design with a central element that slowly changes color separately from the rest of the pendant.

The design stacks the LED leads and coin cells in such a way that a simple wrap of tape not only secures things physically, but also takes care of making a good electrical connection. No soldering or connectors of any kind required. [Solarbotics] found that CR2032 cells would last anywhere between a couple of days to a week, depending on the supplier.

This design is great for using a minimum of materials, but if that’s not a priority it’s possible to go much further with the concept. Multiple layers of edge-lit acrylic were used to make numeric 0-9 display modules as well as a full-color image.


Quick Hack Cleans Data From Sump Pump

Nobody likes to monitor things as much as a hacker, even mundane things like sump pumps. And hackers love clean data too, so when [Felix]’s sump pump water level data was made useless by a new pump controller, he just knew he had to hack the controller to clean up his data.

Monitoring a sump pump might seem extreme, but as a system that often protects against catastrophic damage, the responsible homeowner strives to take care of it. [Felix] goes a bit further than the average homeowner, though, with an ultrasonic sensor to continually measure the water level in the sump and alert him to pending catastrophes. Being a belt and suspenders kind of guy, he also added a float switch to control the pump, but found that the rapid cycle time made his measurements useless. Luckily the unit used a 555 timer to control the pump’s run time after triggering, so a simple calculation of the right RC values and a little solder job let him increase the on time of the pump. The result: a dry basement and clean data.

We recently discussed the evolution of home automation if you want to know more about the systems that sensors and actuators like these can be part of. Or for a more nuts and bolts guide to networking things together, our primer on MQTT might help.

Arduino Vs. Arduino: Musto Out, Banzi In

Federico Musto, who until two days ago owned the largest part of Arduino AG has been bought out, having today been replaced by a combination of Massimo Banzi and Fabio Violante.

This should bring to a close the saga that began with a fork where two companies called themselves “Arduino” and bizarrely continued for almost a year after the reconciliation of the two was announced. What remains today is one corporation called Arduino AG, now captained by Massimo Banzi as Chairman and CTO, and Fabio Violante as CEO.

Massimo Banzi was one of the original founders of Arduino and one side of the trademark litigation during the period in which there were two companies. With the buyout of Musto, Banzi moves back to the top spot. This change in leadership occurred as a company called BCMI bought all shares of Arduino AG. BCMI was started by four of the original Arduino co-founders; you could say the old gang rides again.

Arduino AG is in essence a hardware company, manufacturing and selling the officially branded Arduino boards. But right now they still maintain the official codebase which most people see as belonging to the community. Despite changes at the top, the proof will still be in the pudding. When will we see the Arduino Foundation come to life and take control of the Arduino IDE? Hackaday will continue to look into it and provide updates.


Stealing Joules From An Aluminium-Air Battery

While batteries are cheap and readily obtainable today, sometimes it’s still fun to mess around with their less-common manifestations. Experimenting with a few configurations, Hackaday.io user [will.stevens] has assembled an aluminium-air battery and combined it with a joule thief to light an LED.

To build the air battery, soak an activated charcoal puck — from a water filter, for example — in salt-saturated water while you cut the base off an aluminium can. A circle of tissue paper — also saturated with the salt water — is pressed between the bare charcoal disk and the can, taking care not to rip the paper, and topped off with a penny and a bit of wire. Once clamped together, the reaction is able to power an LED via a simple joule thief.

Continue reading “Stealing Joules From An Aluminium-Air Battery”

Where A Wood Shop Goes, A Hackerspace Follows

The 2×4 Contest at my local hackerspace captured my interest. The challenge was to build something cool out of a single eight-foot 2×4 with the winner getting free wood storage in the space. I had half an idea for a project, but I ran out of time and never even started it. My idea was to cut the board into half-thickness strips and glue them edge-to-edge with some biscuits holding them together — to basically make wider, thinner boards to do… something cool with it.

One of the entries is pictured above. [Jon Alt] designed this clock and phone charger that includes a capacitive charger for his smart watch. He makes use of the 2×4’s grain to make a gorgeous enclosure, carving away the rear of the front panel so only a credit-card’s thickness of wood remained, allowing the 7-segments to shine through. The other entries were great as well and I especially liked the 2×4 guitar.

Mostly what interested me about the contest was what it showed about the wood shop: thanks to the volunteers and board, that is a wood shop doing well. Stuff is going on! A sad wood shop doesn’t hold contests. By extension, when the shop is doing well, that means the hackerspace is also doing well.

A wood shop is one of those areas of a hackerspace that is tool-driven. It’s not just a gathering place for like-minded folks; people go to use a specific tool or tools they can’t afford, and let’s face it, there’s always tools to buy that costs a bunch of money.

I’ve seen this particular shop begin as an empty concrete room with a cheap drill press and someone’s old bandsaw. Pretty soon worktables, shelving, and storage were built. More tools arrived, some donated, some loaned, some purchased with dues. So how can other spaces replicate this wood shop success story?

Continue reading “Where A Wood Shop Goes, A Hackerspace Follows”

OpenEMS Makes Electromagnetic Field Solving… Merely Difficult

To ordinary people electronics is electronics. However, we know that the guy you want wiring your industrial furnace isn’t the guy you want designing a CPU. Neither of those guys are likely to be the ones you want building an instrumentation amplifier. However, one of the darkest arts of the electronic sects is dealing with electromagnetic fields. Not only is it a rare specialty, but it requires a lot of high-powered math. Enter OpenEMS, a free and open electromagnetic field solver.

We would like to tell you that OpenEMS makes doing things like antenna analysis easy. But that’s like saying Microsoft Word makes it easy to write a novel. In one sense, yes, but you still need to know what you are doing. In fairness, though, the project does provide a good set of tutorials, ranging from a simple wave guide to a sophisticated phased array of patch antennas. Our advice? Start with the waveguide and work your way up from there.

The software uses Octave or MATLAB for scripting, plotting, and support. You can download it for Windows or Linux.

If you want to start with something more intuitive for electromagnetic field visualization, this might help. If you prefer your models more concrete and less abstract, perhaps you should work at Lincoln Lab.