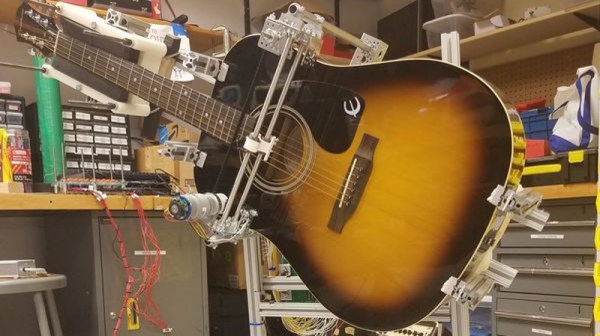
Not only does the GuitarBot project show off some great design, but the care given to the documentation and directions is wonderful to see. The GuitarBot is an initiative by three University of Delaware professors, [Dustyn Roberts], [Troy Richards], and [Ashley Pigford] to introduce their students to ‘Artgineering’, a beautiful portmanteau of ‘art’ and ‘engineering’.
The GuitarBot It is designed and documented in a way that the three major elements are compartmentalized: the strummer, the brains, and the chord mechanism are all independent modules wrapped up in a single device. Anyone is, of course, free to build the whole thing, but a lot of work has been done to ease the collaboration of smaller, team-based groups that can work on and bring together individual elements.
Some aspects of the GuitarBot are still works in progress, such as the solenoid-activated chord assembly. But everything else is ready to go with Bills of Materials and build directions. An early video of a strumming test proof of concept used on a ukelele is embedded below.
If you’re a fan of outdoor hacker camps, or if you’re a SHACamp attendee who’s still coming down from the event high, you may already know about the upcoming BornHack 2017 hacker camp on the Danish island of Bornholm, from the 22nd to the 29th of this month. It’s a smaller camp than many of the others on the calendar, but it makes up for that with a quite reasonable ticket price, a much longer duration, and a location that is a destination in itself.
Today we have news of the BornHack badge announcement, and though the details are a little sketchy it’s safe to say that there should be plenty there to keep attendees occupied. The irregularly-shaped PCB contains a Silicon Labs “Happy Gecko” EFM32 ARM Cortex M0 microcontroller, a 128×64 pixel OLED display, and the usual array of I/O lines. There is no information about its connectivity as it seems the BornHack folks prefer to run a teaser campaign, but we’d be surprised if there wasn’t some kind of wireless module on the reverse.
Barring a transportation miracle it’s unlikely that any of the Hackaday team will be making it to BornHack, but that’s our loss. It may not be one of the larger camps, but it looks to offer no less of the atmosphere you’d expect from a European hacker camp. At the time of writing there are still BornHack tickets to be had, so head on over to their website if you fancy a week at a hacker camp on a Danish island.
Magnets are great stuff and everyone loves them, there are so many things you can do with them, including creating a model of the crystalline structure of solids, just as [Cody´s Lab] did using a bunch of magnets inside a pair of plexiglass sheets.
Many materials have their atoms arranged in a highly ordered microscopic structure — a crystal — including most metals, rocks, ceramics and ice, among others. The structure emerges when the material solidifies looking for the minimum energy configuration. Every atom interacts with its neighbors via microscopic forces forming several patterns depending on the specific material and conditions.
In his macroscopic world, [Cody´s Lab] used the magnets as his “atoms” and the magnetic repulsion between them represent the microscopic forces. Confining the magnets inside two transparent walls, one can see the formation of the crystal structure as magnets are added one by one.
This is an excellent teaching resource and also a fun way to play with magnets if you want to give it a try. Or if you want another magnet hack, we have tons of them, including implanting them in your body, or making your own with 3D printing.
[WolfCat] of Wolfcatworkshop is creating a hand-animated split-flap animation. But what do you use to test your animation once it’s on the split-flaps? Well, to test it out, [WolfCat] used a drill to give it motion. DoodlersAnonymous has some pics and an interview with [WolfCat] about his animation and there are some pictures on his Instagram page.
Technically, what [WolfCat] wanted to make is a “mutoscope,” a hand-cranked precursor to the movie projector that had its heyday in the late 19th and early 20th century. Originally installed in penny arcades and the like, mutoscopes were single-viewer apparatus. The viewer cranks the handle and the animated cards inside rotate around, stopped briefly by a bit of metal at the top in order to show a frame. The basic idea is similar to the way split-flap clocks or signs work.
[WolfCat] hand drew the animation for his movie and then scanned and printed out each frame. The frames were then transferred to a pair of flaps. [WolfCat] wanted to see how it would look when animated, but didn’t have any plans at the time for a case or a hand crank, so he found the closest tool that would do the job – a cordless drill. Attaching the drill and using a bit of card or wood as a stopper, [WolfCat] could see how the end result would look and could then start work on the case and crank.
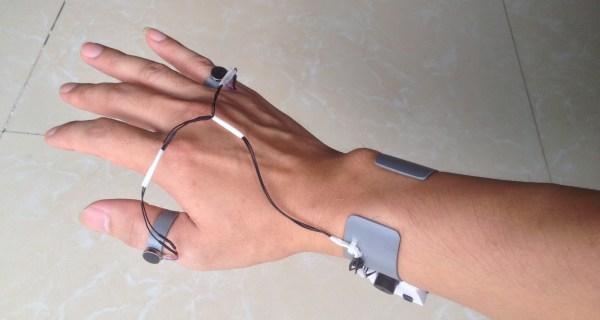
The World Health Organization estimates that around 90% of the 285 million or so visually impaired people worldwide live in low-income situations with little or no access to assistive technology. For his Hackaday Prize entry, [Tiendo] has created a simple and easily reproducible way-finding device for people with reduced vision: a bracelet that detects nearby objects and alerts the wearer to them.
It does its job using an ultrasonic distance sensor and an Arduino Pro Mini. The bracelet has two feedback modes: audio and haptic. In audio mode, the bracelet will begin to beep when an object is within 2.5 meters. And it behaves the way you’d expect—get closer to the object and the beeping increases; back away and it decreases. Haptic mode involves two tiny vibrating disk motors attached to small PVC cuffs that fit on the thumb and pinky. These motors will buzz differently based on the person’s proximity to a given object. If an object is 1 to 2.5 meters away, the pinky motor will vibrate. Closer than that, and it switches over to the thumb motor.
To add to the thriftiness of this project, [Tiendo] re-used other objects where he could. The base of the bracelet is a cuff made from PVC. The nylon chin strap and plastic buckle from a broken bike helmet make it adjustable to fit any wrist. To keep the PVC cuff from chafing, he slipped small pieces from an old pair of socks on to the sides.
It’s easy to see why this project is a finalist in our Best Product contest. It’s a simple, low-cost assistive device made from readily available and recycled materials, and it can be built by anyone who knows a little bit about electronics. Add in the fact that it’s lightweight and frees up both hands, and you have a great product that can help a lot of people. Watch it beep and buzz after the break. Continue reading “Hackaday Prize Entry: A Bracelet For The Blind”→
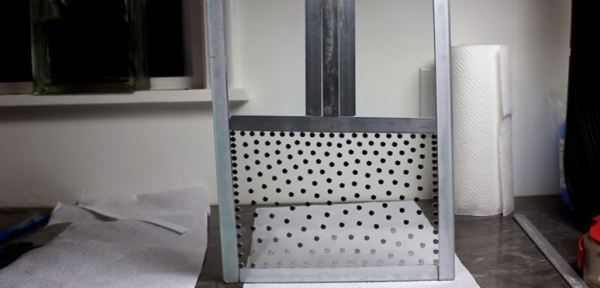
Let’s face it — the design of most home foundries leaves something to be desired. Most foundries are great at melting metal, but when it comes to pouring the melt, awkward handling can easily lead to horrific results. That’s why we appreciate the thought that went into this electric melting pot foundry.
Sure, electric foundries lack some of the sex-appeal of gas- or even charcoal-fueled foundries, but by eschewing the open flames and shooting sparks, [Turbo Conquering Mega Eagle] was able to integrate the crucible into the foundry body and create what looks for all the world like a Thermos bottle for molten aluminum.
The body is a decapitated fire extinguisher, while the crucible appears to just be a length of steel pipe. An electric stove heating element is wrapped around the crucible, PID control of which is taken care of by an external controller and solid state relay. Insulated with Pearlite and provided with a handle, pours are now as safe as making a nice cup of 1200° tea.
You’ll perhaps recall that [Turbo Conquering Mega Eagle] has a thing for electric foundries, although we have to say the fit and finish of the current work far exceeds his previous quick-and-dirty build using an old electric stove.
As ever, I am fighting a marginally winning battle against my 1991 Mazda MX-5, and this is the story of how I came to install a wideband oxygen sensor in my Japanese thoroughbred. It came about as part of my ongoing project to build myself a viable racecar, and to figure out why my 1990s Japanese economy car engine runs more like a late 1970s Malaise-era boat anchor.
I’ve always considered myself unlucky. My taste for early 90s metal has meant I’ve never known the loving embrace of OBD-2 diagnostics, and I’ve had to make to do with whatever hokey system was implemented by manufacturers who were just starting to produce reliable fuel injection systems.
Narrowband oxygen sensor voltage output. The output is heavily dependent on sensor temperature and highly non-linear, making these sensors unsuitable for delivering a true AFR reading.
This generally involves putting in a wire jumper somewhere, attaching an LED, and watching it flash out the trouble codes. My Mazda was no exception, and after putting up with a car that was running rich enough to leave soot all over the rear bumper, I had to run the diagnostic.
It turned up three codes – one for the cam angle sensor, and two for the oxygen sensor. Now, a cam angle sensor (CAS) fault will normally prevent the car running at all, so it’s safe to assume that was an intermittent fault to keep an eye on.
The oxygen sensor, however, was clearly in need of attention. Its job is to allow the engine control unit (ECU) to monitor the fuel mixture in the exhaust, and make sure it’s not too rich or too lean. As my car was very obviously running too rich, and the diagnostic codes indicated an oxygen sensor failure, a repair was in order.
I priced up replacement sensors, and a new oxygen sensor could be had for under $100. However, it wasn’t exactly what I wanted, as not all oxygen sensors are created equal. Cars in the 80s and 90s typically shipped from the OEM fitted with what’s called a narrowband oxygen sensor. These almost always consist of a zirconia dioxide cell that outputs a voltage depending on the difference in oxygen concentration between the exhaust gas and the free air. These sensors generally sit at 0.45 V when the fuel mixture is stoichiometric, but rapidly change to 0.1 V in a lean condition and 0.9 V in a rich condition. The response is highly non-linear, and changes greatly with respect to temperature, and thus is only good for telling the ECU if it’s rich or lean, but not by how much. ECUs with narrowband sensors tend to hunt a lot when running in closed loop O2 control – you’ll see an engine at idle hunt either side of the magical 14.7 stoichiometric air fuel ratio, never able to quite dial in on the correct number.
As I intend to switch to an aftermarket ECU in the future, I’ll need to tune the car. This involves making sure the air/fuel ratios (AFRs) are correct, and for that I need to be able to properly measure them. Just knowing whether you’re rich or lean isn’t enough, as often it’s desirable to run the engine intentionally rich or lean at certain engine loads. To get a true AFR reading requires fitting a wideband oxygen sensor. These are a little more complicated.


 Sure, electric foundries lack some of the sex-appeal of gas- or even charcoal-fueled foundries, but by eschewing the open flames and shooting sparks, [Turbo Conquering Mega Eagle] was able to integrate the crucible into the foundry body and create what looks for all the world like a Thermos bottle for molten aluminum.