Spinning CRT Makes A 360 Degree Audio Oscilloscope

A question for you: if the cathode ray tube had never been invented, what would an oscilloscope look like? We’re not sure ourselves, but it seems like something similar to this mechanical tachyscope display might worked, at least up to a point.

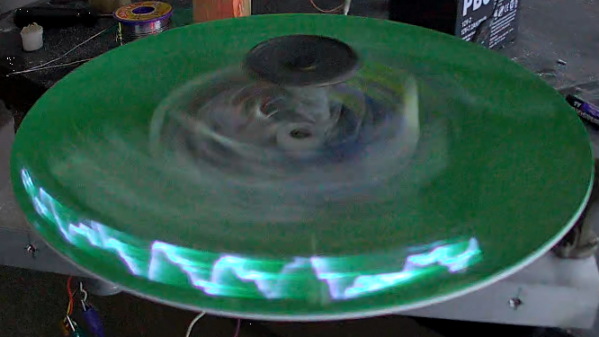
What’s ironic about this scenario is that the tachyscope [Daniel Ross] built actually uses a CRT from a defunct camcorder viewfinder as the light-up bit of what amounts to a large POV display. The CRT’s horizontal coil is disconnected while the vertical coil is attached to the output of a TEA205B audio amplifier. The CRT, its drive electronics, and the amp are mounted to a motorized plastic platter along with a wireless baby monitor, to send audio to the CRT without the need for slip rings — although a Bluetooth module appears to be used for that job in the video below.

Speaking of slip rings, you’d expect one to make an appearance here to transfer power to the platter. [Daniel] used a slip ring for his previous steampunk tachyscope, but this time out he chose a hand-wound air core transformer, with a stationary primary coil and secondary coil mounted on the platter. With a MOSFET exciter on the primary and a bridge rectifier on the secondary, he’s able to get the 12 volts needed to power everything on the platform.

Like most POV displays, this one probably looks better in person than it does in video. But it’s still pretty cool, with the audio waveforms sort of floating in midair as the CRT whizzes around. [Daniel] obviously put a lot of work into this, not least with the balancing necessary to get this running smoothly, so hats off for the effort.

Continue reading “Spinning CRT Makes A 360 Degree Audio Oscilloscope”

spinning thread extruder

Spinning Threads Put The Bite On Filament In This Novel Extruder Design

When it comes to innovation in FDM 3D printing, there doesn’t seem to be much room left to move the needle. Pretty much everything about filament printing has been reduced to practice, with more or less every assembly available off the shelf. Even the business end — the extruder — is so optimized that there’s not much room left for innovation.

Or is there? The way [David Leitner] sees it, there is, which is why he built this rolling-screw extruder (if you can get to the Thingiverse link, [David] cross-posted on reddit, too). Standard extruders work on the pinch-roller principle, where the relatively soft filament is fed past a spring-loaded gear attached to a stepper motor. The stepper rotates the gear, which either advances the filament into or retracts it from the hot end. [David]’s design instead uses a trio of threaded rods mounted between two rings. The rods are at an angle relative to the central axis of the rings, forming a passage that’s just the right size for the filament to fit in. When the rings spin, the threads on the rods engage with the filament, gripping it around its whole circumference and advancing or retracting it depending on which way it’s spinning. The video below shows it working; we have to admit it’s pretty mesmerizing to watch.

[David] himself admits there’s not much advantage to it, perhaps other than a lower tendency to skip since the force is spread over the entire surface of the filament rather than just a small pinch point. Regardless, we like the kind of thinking that leads to something like this, and we’ll bet there are probably unseen benefits to it. And maybe the extruder actually is a place for innovation after all; witness this modular nozzle swapping system.

Continue reading “Spinning Threads Put The Bite On Filament In This Novel Extruder Design”

Axe Hacks: Spinning Knobs And Flipping Switches

From a guitar hacking point of view, the two major parts that are interesting to us are the pickups and the volume/tone control circuit that lets you adjust the sound while playing. Today, I’ll get into the latter part and take a close look at the components involved — potentiometers, switches, and a few other passive components — and show how they function, what alternative options we have, and how we can re-purpose them altogether.

In that sense, it’s time to heat up the soldering iron, get out the screwdriver, and take off that pick guard / open up that back cover and continue our quest for new electric guitar sounds. And if the thought of that sounds uncomfortable, skip the soldering iron and grab some alligator clips and a breadboard. It may not be the ideal environment, but it’ll work.

Continue reading “Axe Hacks: Spinning Knobs And Flipping Switches”

Build Your Own LED Glow Poi

Spinning poi is an entertaining pastime, and LEDs can make a great addition to the experience. [MilanDer] built some LED poi of their very own, using a few maker staples along the way.

A 3D printed enclosure is first created, using “clear” PLA that in practice produces translucent white parts. This acts as a great diffuser for the APA102 LEDs inside. The LEDs are driven by an Arduino Pro Mini, which is fitted inside the enclosure along with a buck-boost converter, lithium battery and charge board. Finally, a strap is added to allow the poi to be spun easily by the user.

The visual effect is great, and through the use of an infrared receiver, the poi can be remotely controlled to deliver different RGB animations at the touch of a button. We’d love to see a group of spinners with synchronized colored poi thanks to a master controller, and this hardware would be more than capable of the task.

We’ve seen some advanced networked Poi before, too. If you’ve got a great LED build, be sure to let us know.

Energy Sipping Neodymium Sphere Keeps On Spinning

At this point we’re sure you are aware, but around these parts we don’t deduct points for projects which we can’t immediately see a practical application for. We don’t make it our business to say what is and isn’t worth your time as an individual hacker. If you got a kick out of it, great. Learned something? Even better. If you did both of those things and took the time to document it, well that’s precisely the business we’re in.

So when [Science Toolbar] sent in this project which documents the construction of an exceptionally energy efficient spinning neodymium sphere, we knew it was our kind of thing. In the documentation it’s referred to as a motor, though it doesn’t appear to have the torque to do any useful work. But still, if it can spin continuously off of the power provided by a calculator-style photovoltaic cell, it’s still a neat trick.

But how does it work? It starts by cracking open one of those little solar powered toys; the ones that wave or dance around as soon as any light hits the panel in their base. As [Science Toolbar] explains, inside these seemingly magical little gadgets is a capacitor and the classic black epoxy blob that contains an oscillator circuit. A charge is built up in the capacitor and dumped into a coil at roughly 1 Hz, which provides just enough of a push to get the mechanism going.

In the video after the break, [Science Toolbar] demonstrates how you can take those internals and pair it with a much larger coil. Rather than prompting a little sunflower or hula girl to do its thing, the coil in this version provides the motive force for getting the neodymium sphere spinning. To help things along, they’re even using a junk box zero friction magnetic bearing made up of a wood screw and a magnetized screwdriver tip.

It’s an interesting example of how a tiny charge can be built up over time, and with a nice enough enclosure this will make for a pretty cool desk toy. We’ve previously seen teardowns of similar toys, which revealed a surprising amount of complexity inside that little epoxy blob. No word on whether or not the version [Science Toolbar] cannibalized was quite so clever, however.

Continue reading “Energy Sipping Neodymium Sphere Keeps On Spinning”

OpenDeck Makes Spinning Your Own MIDI Controller Easy

These days, MIDI controllers are just plain cool. There are a million of them out there, and they’re all dressed to the nines in flashing LEDs and sporting swag like USB MIDI interfaces and sliders that just feel right. With our italics budget running out, I should get to the point – you can make your own, and the OpenDeck platform makes it easy.

The OpenDeck board. Readily apparent is the fact that it has tons of IO.

In its most refined form, the OpenDeck is a board covered in pin headers. To these, you may connect an absolute truckload of buttons, encoders, sliders, and LEDs. The OpenDeck handles all of the inputs and outputs, while you get to have fun attaching your various gizmos to the control surface/keytar/birthday cake you happen to be building. It saves you reinventing the wheel as far as reading switches and potentiometers goes, allowing you to focus on the creative side of your project. All configuration is handled through a simple web interface.

Boards are available on Tindie,  but it’s also possible to take the code and run it on various Arduinos and the like, as it’s wonderfully opensource. This gives you the power to take things to a higher level once you’re good and ready.

We’ve seen a rather cool OpenDeck build already, and if you’ve got more, you know where to reach us.


Laser Projector Ditches Galvanometer For Spinning Drum

Laser projectors like those popular in clubs or laser shows often use mirror galvanometers to reflect the laser and draw in 2D. Without galvos, and on a tight budget, [Vitaliy Mosesov] decided that instead of downgrading the quality, he would seek an entirely different solution: a spinning mirror drum.

He fires a laser at a rotating drum with twelve mirror faces, each at a different adjustable vertical angle. The laser will hit a higher or lower point on the projection surface depending on which mirror it’s reflecting off – this creates resolution in the Y direction.

Timing the pulsing of the laser so that it reflects off the mirror at a certain horizontal angle provides the X resolution.

As you can already tell, speed and timing is critical for this to work. So much so that [Vitaliy] decided he wanted to overclock his Arduino – from 16 MHz to 24.576 MHz. Since this changes the baud rate, an AVR ISP II was used for programming after the modification, and the ‘duino’s hardware serial initialization had to be hacked too.

For the laser itself, [Vitaliy] designed some nifty driver circuitry, which can respond quickly to the required >50 kHz modulation, supply high current, and filter out voltage transients on the power supply (semiconductor lasers have no protection from current spikes).

On the motor side of things, closed loop control is essential. A photo-interrupter was added to the drum for exact speed detection, as well as a differentiator to clean up the signal. Oh, and did we mention the motor is from a floppy disk drive?

We’ve actually seen builds like this before, including a dot-matrix version with multiple lasers and one made apparently out of Meccano and hot-glue that can project a Jolly Wrencher. But this build, with its multiple, adjustable mirrors, is a beauty.  Check it out in action below.

Continue reading “Laser Projector Ditches Galvanometer For Spinning Drum”