Video Killed The Radio Alarm Clock

For decades now, MTV has been on a bizarre trajectory given its original name was an acronym for Music Television. In the original days in the 80s and 90s it kept mostly true to its name, but starting around two decades ago they expanded into reality and other non-musical television programming and have now left it largely behind. Plenty of those who grew up in its heyday have an understandable amount of nostalgia for the channel as a cultural touchstone, and [Derf] used MTV archival footage to build a video alarm clock which helps him keep in tune with the past.

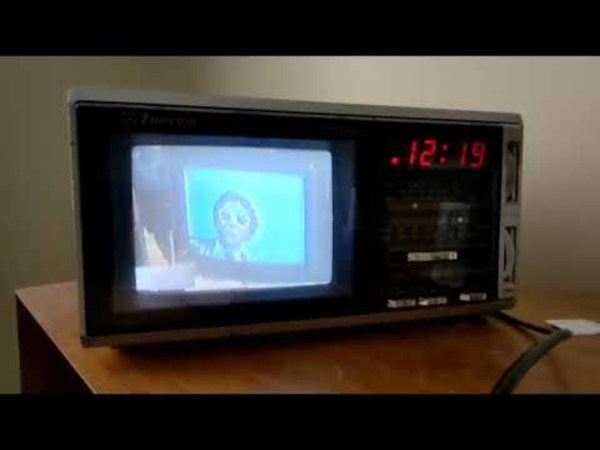
To keep the appropriate 80s aesthetic, the build uses a portable TV from the late 80s with its original CRT. The video files are hosted on more modern technology though, in this case a Raspberry Pi. The Pi is set up to run a python script which launches the VLC media player with a playlist loaded with video files, in this case a long list of MTV shows. Some configuration needs to be done to get it to output to the old CRT properly which depends on the hardware used, but once that’s in place it’s ready to be used as an alarm. [Derf] is using a smart outlet to power the TV at the appropriate time, and a cron job which starts the video player simultaneously at a somewhat random point in the playlist.

As far as retro TVs go, having one as an alarm clock is certainly a novel idea. We have seen a few others in the past, though, one to play the golden age of The Simpsons, and another that recreates the nostalgia of 90s cable television complete with a preview channel and era-appropriate commercials.

Continue reading “Video Killed The Radio Alarm Clock”

3D-Printed LED Wall Clock Does Lots With Little

This wall clock built by [Alf Müller] is lovely, using two NeoPixel rings to mark the time by casting light onto a 3D-printed ring. The blue shows the minutes, made more discrete by a grid inside the ring. The green shows the hours.  [Alf] has provided the code so you can rework the color scheme.  It might be interesting to add seconds with the red LEDs, or perhaps a countdown triggered by a touch sensor…

Continue reading “3D-Printed LED Wall Clock Does Lots With Little”

Decorative Clock Uses LED Strips To Beautiful Effect

Clocks used to be dowdy old things with mechanical hands and sometimes even little cuckoo birds that would pop out to chime the hour. [David] built something altogether more modern that uses shifting colors on LED strips to tell the time.

The core of the build is an ESP8266, which queries an NTP time server to keep itself synced up with the current time as accurately as possible. It then controls a WS2812B LED strip to display the time. The strip itself is hidden in a 3D-printed housing behind an opaque wooden ring, with the light from the LEDs diffusing out nicely on to the wall upon which the clock is mounted.

The display shows three “hands” in the colors it projects on the wall. The red second hand is projected inside and outside the ring. The minute hand is green, and projects outside the ring. Meanwhile, the hour hand is blue, and projects inside the ring. Without any numerical markings, you won’t get an exact reading of the time, but you can figure it out closely enough. As a bonus, the clock looks like a stylish light-based wall sculpture and your guests may not even realizes it tells the time.

We’ve featured [David’s] work before too, in the form of the handy ESP8266 breadboard socket. Video after the break.

Continue reading “Decorative Clock Uses LED Strips To Beautiful Effect”

Digital Light Pipes Clock various view of seven-segment display using illuminated light-pipes

LED Clock Has Its Pipes On Display

For most hackers and makers, building a clock is a rite of passage. Few, though, will be as unusual and engaging as this design by [TerraG2].

By combining addressable LEDs, light pipes and 7-segment displays, [TerraG2] has built a timepiece that looks great and will surely be a great conversation starter as well. It’s packed full of features such as automatic brightness control, an accelerometer controlled user interface, and WiFi to make sure it’s always accurate.

partial rear view of the clock showing illuminated light pipes
Partial rear view of the clock showing illuminated light pipes

The decision to leave the light pipes visible behind the main display really makes the project stand out from other clock builds, and the methods [TerraG2] has used to achieve this look will no doubt be transferable to a host of other projects.

The LEDs are courtesy of a standard 8×8 RGB matrix, with a custom 3D-printed shroud to hold the light pipes in place and a clever connector at the other end to illuminate the segments. With two LEDs per segment, seven segments per digit, and four digits, there’s even room for some extra features down the line if you can think of a use for those eight spare LEDs.

The brain of the project is an ESP8266 D1 with an MPU6050 inertial measurement unit (IMU) to detect when it’s flipped over to change the color scheme.

Full documentation is on Github, and a video of the clock in use is after the break.

Light pipes have been used to great effect in some other clock projects we’ve seen, such as this modern Nixie clock and this “clock of clocks”, as well as in this light organ that we showed recently.

Continue reading “LED Clock Has Its Pipes On Display”

A clock displaying a micro QR code

LED Clock Uses Micro QR Codes To Show The Time

As you probably know, we love our clocks here at Hackaday. Odd display technologies are always interesting to see, as are unusual encoding techniques such as binary, ternary or higher-radix number systems. Still, clocks are typically meant to be human-readable, even if their encoding might be a little eccentric.

[Kitchi] however built an LED-based clock that is not human-readable, at least not without quite a bit of training. This is because it displays the time by generating a QR code, which only becomes readable to most humans through the use of a smartphone app. Of course, this negates the need for a clock since your smartphone will already have one anyway — but whoever said a clock needs to be useful?

To be fair, the display could conceivably be read by a determined human, since the QR format used is the tiny Micro QR M2 version that measures only 13×13 pixels. It’s capable of storing ten decimal digits, just enough to hold the date and time in mmddhhmmss format. The fixed part of the QR code is made of paper, while the variable part is formed through a grid of 90 white LEDs. The LEDs are mounted on a piece of prototype board along with a PIC 16F1504 microcontroller, two TM1637 LED drivers and a DS1307 real-time clock with battery backup.

If decoding QR codes is not your thing, or you simply haven’t got your smartphone on you, then the QR clock can also be set to a more human-readable format by adding a jumper. The time will then scroll across the LED screen in ordinary decimal format.

The video in the link is in Japanese, with no automatic translation available, but the build process is clearly shown and should be understandable even if you can’t follow the cheerful robotic narrator. We’ve seen a couple of QR-code based clocks before, some with an LCD screen and some with retro styling, but all of those use the larger standard QR code which definitely no human can decode visually. Or can you? Let us know in the comments!

Thanks for the tip, [J. Peterson]!

A six digit Nixie clock on a desktop

Upcycled Nixie Clock Fit For A Friend

Building a clock from parts is a rite of passage for makers, and often represents a sensible introduction into the world of electronics. It’s also hard to beat the warm glow of Nixie tubes in a desktop clock, as [Joshua Coleman] discovered when building a Nixie tube clock for a friend.

The original decision to upcycle the chassis from an unrepairable Heathkit function generator came a little undone after some misaligned cutting, so the front panel ended up being redesigned and 3D printed. This ended up being serendipitous, as the redesigned front panel allowed the Nixie tubes to be inset within the metal chassis. This effect looks great, and it also better protects the tubes from impact damage.

Sourcing clones of the 74141 Nixie driver ICs ended up being easier than anticipated, and the rest of the electronics came together quickly. The decoders are driven by an Arduino, and the IN-4 Nixie tubes are powered by a bespoke 170 volt DC power supply.

Unfortunately four of the tubes were damaged during installation, however replacements were readily available online. The gorgeous IN-4 Nixie tube has a reputation for breaking easily, but is priced accordingly on auction sites and relatively easy to source.

The build video after the break should get any aspiring Nixie clock makers started, but the video description is also full of extra information and links for those needing help getting started.

We’re not short on clock hacks here at Hackaday, so why not check out a couple more? This retro-inspired LED clock looks like its right out of a parallel universe, or maybe this stunning Nixie clock driven by relays will strike your fancy.

Continue reading “Upcycled Nixie Clock Fit For A Friend”

A clock made with LED filaments inside clear plastic tubes

LED Filaments Make A Retro Clock Without Any Retro Parts

We love clock projects here at Hackaday, and we’ve seen many beautiful designs based on a wide variety of display technologies. There are various types of glass tubes like Nixies, Numitrons and classic VFD displays, all of which have that warm “retro” glow to them. Then there’s LEDs, which are useful for making cool pixel-based timepieces and easy to drive with low-voltage electronics. So how about combining the best of both worlds, by using LEDs to make a Numitron-like display? That’s exactly what [Jay Hamlin] did when he built a digital clock based on LED filaments.

The heart of the project consists of orange LED filaments similar to the ones used in vintage-style LED light bulbs. [Jay] bought a bunch of them online and tried various ways of combining them into seven-segment displays, eventually settling on a small PCB with a black finish to give good contrast between the LEDs and the background. To make the displays look like they’re encased in glass, [Jay] bought a set of plastic test tubes and cut them to size.

The base of the clock is formed by a slick black PCB that holds an ESP32. The segments are driven through a set of 74LV595 shift registers to keep the required number of GPIOs to a minimum. There are no buttons: thanks to a WiFi connection and the Network Time Protocol the ESP32 automatically keeps the correct time.

The end result looks remarkably like a Numitron display at first glance, and remains a beautifully-made clock even if you notice that there’s no glass to be found. If you’re into LED filament clocks (and who isn’t?), check out this analog wall clock, or this spiderweb-like digital clock.

Continue reading “LED Filaments Make A Retro Clock Without Any Retro Parts”