Giving The Hexbug Spider A Set Of Eyes

spider

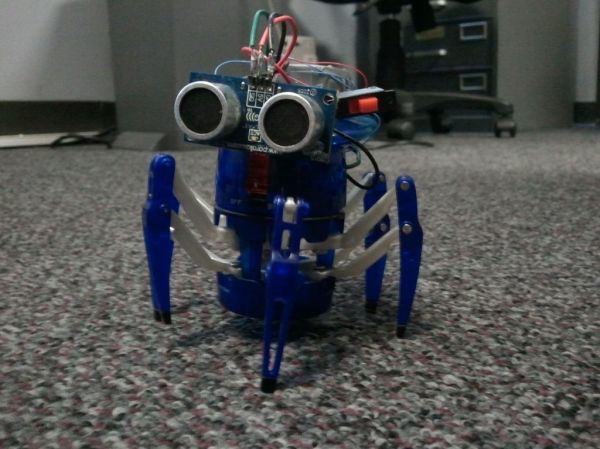
The Hexbug Spider is a neat little robot toy available at just about any Target or Walmart for about $20. With a few extra parts, though, it can become a vastly more powerful robotics platform, as [eric] shows us with his experiments with a Hexbug and OpenCV.

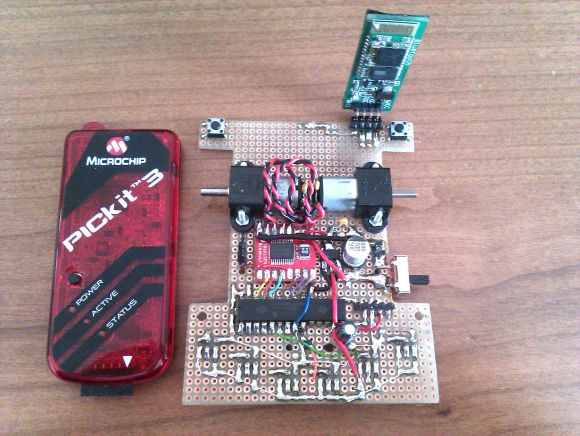
Previously, we’ve seen [eric] turn a Hexbug spider into a line following robot with a pair of IR LEDs and a drop-in replacement motor driver. This time, instead of a few LEDs, [eric] turned to an Android smartphone running an OpenCV-based app.

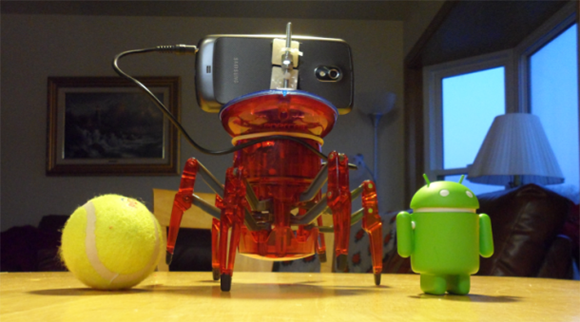
The smartphone app detects a user-selectable hue – in this case a little Android toy robot – and sends commands to the MSP430-powered motor control board over the headphone jack to move the legs. It’s a neat build, and surprisingly nimble for a $20 plastic hexapod robot.

You can see the OpenCV-controlled Hexbug in action after the break, along with a video build log with [eric] showing everyone how to tear apart one of these robot toys.

Continue reading “Giving The Hexbug Spider A Set Of Eyes”

Turning The Hexbug Spider Into A Line-following Robot

[youtube=http://www.youtube.com/watch?v=quDHhuEsxEg&w=470]

You may be familiar with the Hexbug Spider, a small electronic robot toy sold at Target and Walmart for $20. While they’re able to be commanded to move forward, backward, and spin around on a dime, there aren’t any external sensors to make it really exciting. [Eric] sought to remedy this and came up with a line-following board replacement for the Hexbug Spider.

The stock Spider has a small circuit board that allows for the control of two motors with a remote. [Eric] removed this control board and replaced it with his own, powered by a TI MSP430 microcontroller. On this board, [Eric] included a pair of IR LEDs, able to detect the path of a white line drawn on the ground. With just a little bit of code, [Eric] made his $20 Hexbug Spider into a very cool looking robot.

[Eric] figured out how to improve his robot toy, but the power of the MSP430 microcontroller he used doesn’t limit him to only following lines. By using an MSP430 Launchpad, anyone can upload new code to the improved Spider, and even add new sensors to this creepy walking robotic toy.

Hexbug Code Rewrite Makes It A Walking Line-follower

You know you’ve got a good hardware platform if you can easily repurpose it with a code rewrite. And that’s what [Eric] continues to do with these little Hexbugs. This time around he’s bent the IR emitter and receiver downward to use as a reflectance sensor. This gives it the ability to follow a dark line on a light surface.

He originally patched an MSP430 into the $25 RC toy. The IR pair was intended for obstacle avoidance, which we saw in a recent links post. This hack does a great job of repurposing the avoidance system. Since the add-on hardware is mounted on a motorized turret, the single sensor pair can sweep back and forth to find the line it will follow. In one way this is better than most line followers which use multiple sensors mounted to the body. But the drawback is that this results in slower travel and won’t be winning any contests. Don’t miss the demo clip after the break.

Continue reading “Hexbug Code Rewrite Makes It A Walking Line-follower”

Giving The Hexbug Spider Freedom To Explore On Its Own

hexbug-hack

[Eric Gregori] recently spent some time messing around with a Hexbug Spider, and wrote in to share some modifications he made to the toy. In its unaltered form the robot can be controlled remotely, and while it’s fun to play with, the excitement is short lived. Using a TI MSP430 along with a small motor controller kit he put together, he gave the Hexbug a bit more personality.

The kit is really just a simple board used for mounting the MSP430 and FAN8200 motor driver, along with an IR emitter/sensor pair. It would be easy enough to put something similar together yourself, though if you are looking for a protoboard/deadbug/PCB etching-free solution, his Spider Hack kit is a quick and easy solution.

[Eric’s] walkthrough shows how to disassemble the Hexbug, and details which components need alterations before the controller board can be properly mounted. A few soldered wires later, the toy is ready to be reprogrammed, a process [Eric] carries out using the Launchpad board from which he lifted the MSP430.

As you can see in the videos below, calling the robot autonomous might be a bit of a stretch (I don’t see it walking to the kitchen to make me a sandwich), but it can navigate and avoid objects with ease.

Continue reading “Giving The Hexbug Spider Freedom To Explore On Its Own”

Hexbug Brain Transplant

The Hex Bug, at $10, proves to be a perfect platform for building your own droid. Out of the box, it has pretty limited functionality. It walks forward until its antennae bump something, then it backs up and turns left. Applied inspirations shows us how you can replace the bug’s brains with a microcontroller to give it much more life. Instead of hacking into the existing electronics, they chose to completely replace the board. The final result, though still only able to turn one direction, is much more robust.  They discuss the ability to add numerous sensors as well as pre program different behaviours and personalities.

Mini Autonomous Robot

Cute Tiny Robot Gets A Pair Of Hacked Eyes

One day while at our poor, poor Radio Shack, [davidhend] purchased a little 6-legged walking robot. It came with an infrared remote that allowed a user to control its movements from afar. After a few minutes of making the robot walk around [davidhend] got bored and decided it would be a great toy to hack.

His plan was to make the robot autonomous and able to avoid obstacles. To start off, the robot was taken apart enough to expose the circuit board. There he found a ST1155A bi-directional motor driver that was controlled by an on-board microcontroller. After checking out the ST1155A data sheet, [davidhend] thought he would be able to drive it with an Arduino. So, out came the soldering iron and all the unnecessary components were removed from the original circuit board.

An off the shelf PING))) sensor was mounted on the front of the robot and is responsible for detecting obstacles. That information is then sent back to the Arduino Nano which controls the motor driver to make the robot back up, turn and then start walking straight again until another obstacle is detected. [davidhend] made his Arduino Code (.zip file) available to anyone who wants to make a similar project. Check out the video after the break!

Oh, and if you plan to run down to the Shack to pick up a robot of your own you better do it like right now.

Continue reading “Cute Tiny Robot Gets A Pair Of Hacked Eyes”

Protoboard Line Following Robot

dspic-line-follower

We love a good line-following robot project and this really hits the spot. It’s got sharp edges, gobs of solder bridging, and look at all those jumper wires! Despite its appearance it puts in a performance that won’t disappoint.

It uses a dsPIC33 to read from half a dozen analog sensors on the bottom of the board. We’re not all that familiar with the chip’s features, but [Exapod] says it’s got an auto-scan feature he uses to read the sensors. This allows him to sample with 12-bit resolution from all six of them at about 30 kHz. No wonder the thing is so responsive in the demo video embedded below. The track he’s using is just some white printer paper with a fat circuit of black electrical tape placed in a somewhat squiggly pattern.

This is also a fun challenge with toys. Here’s one that hacks a hexapod to follow the lines.

Continue reading “Protoboard Line Following Robot”