Gaming On A TP-Link TL-WDR4900 Wireless Router

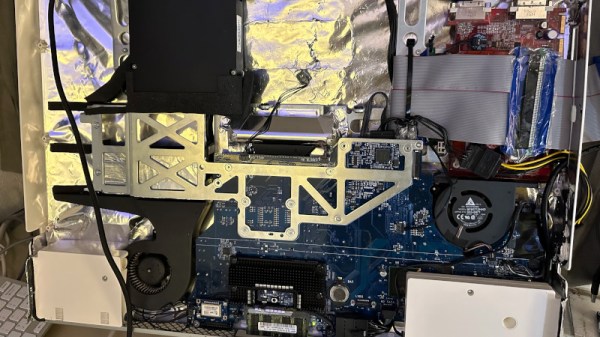
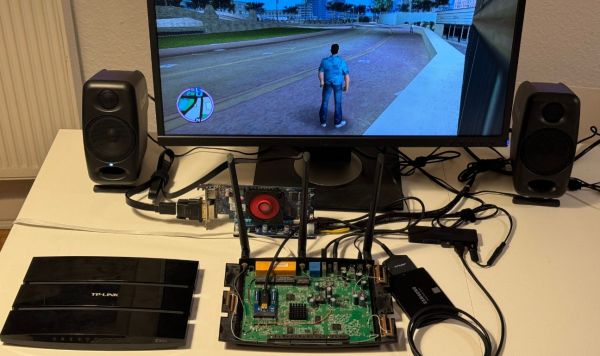
When you look at your home router, the first thought that comes to mind probably isn’t about playing games on it. But that doesn’t stop [Manawyrm] and [tSYS] from taking on the task of turning the 2013-era TP-Link TL-WDR4900 router into a proper gaming machine using an external GPU. This is made possible by the PCIe lanes on the mainboard, courtesy of the PowerPC-based SoC (NXP QorIQ P1014) and remappable Base Address Registers (BARs). This router has been an OpenWRT-favorite for years due to its powerful hardware and feature set.

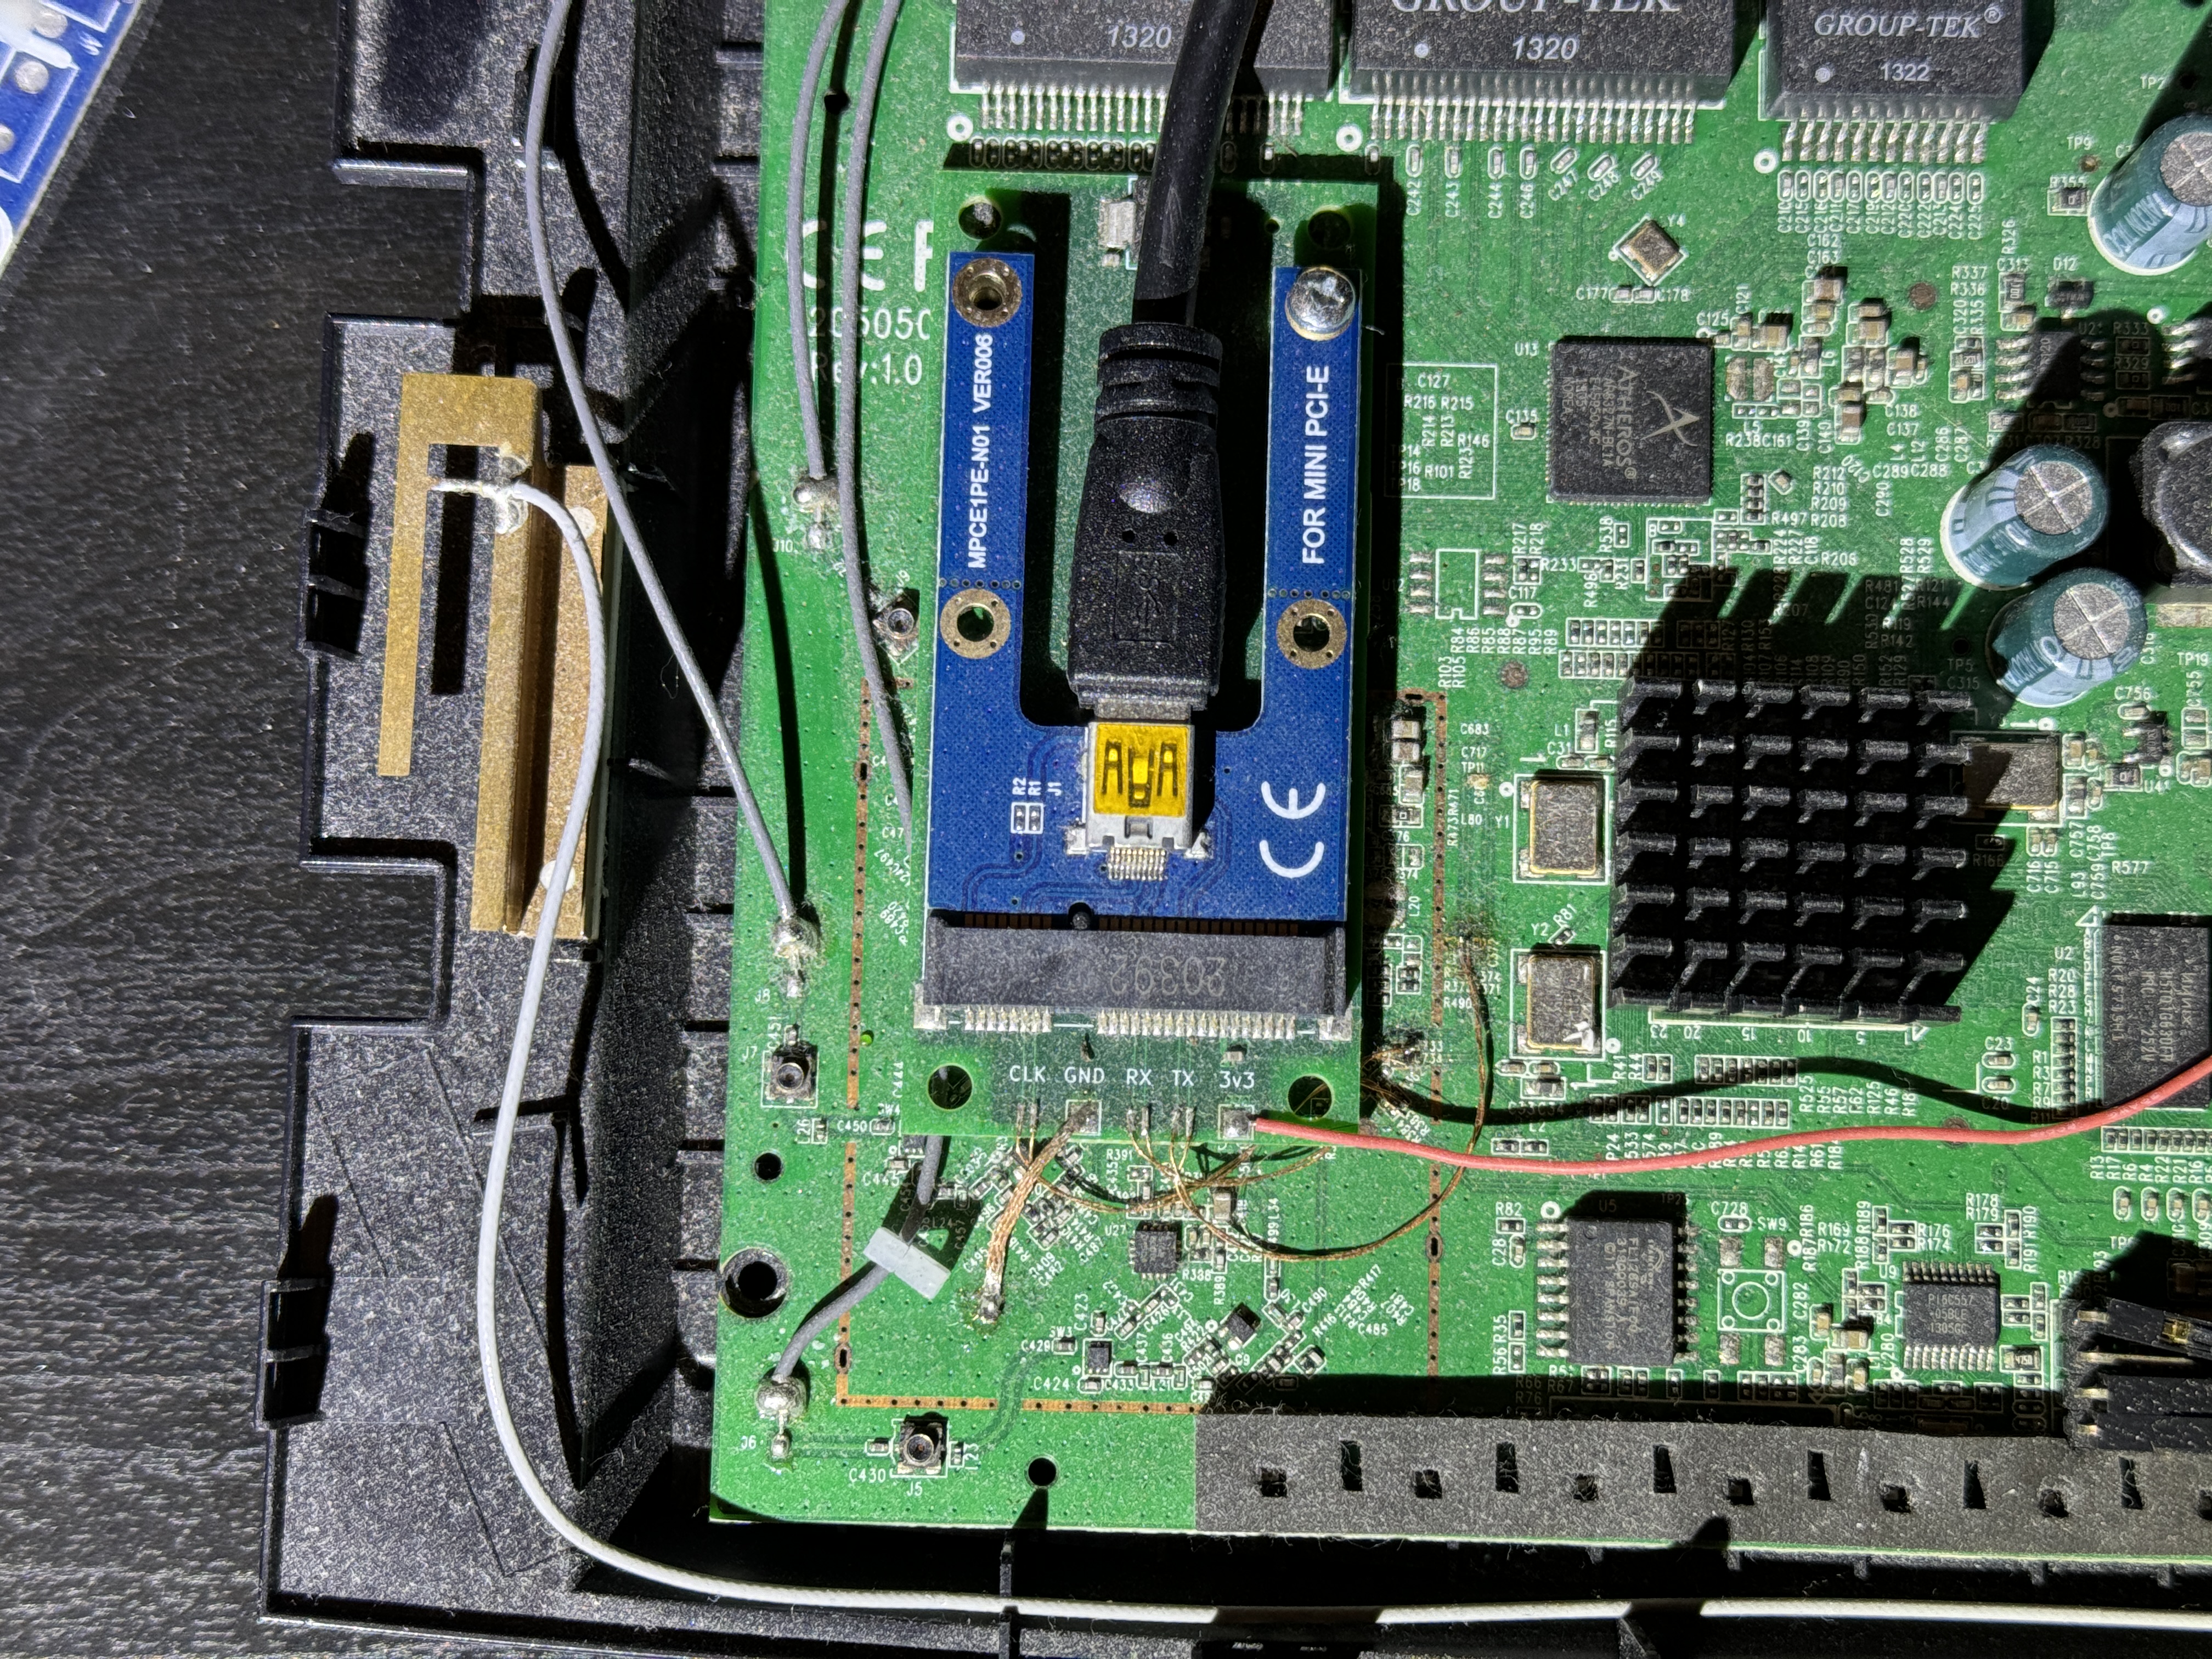
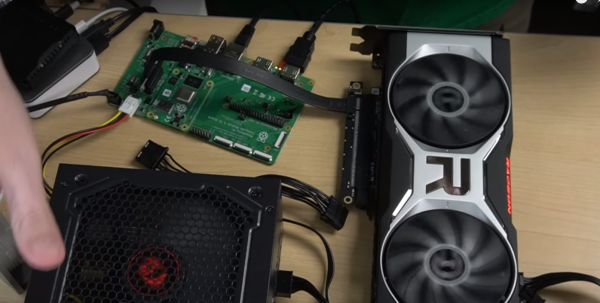
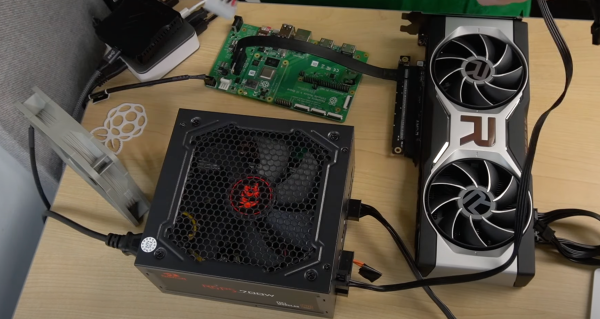
This mod required a custom miniPCIe PCB that got connected to the PCIe traces (after cutting the connection with the Atheros WiFi chipset). This allowed an external AMD Radeon HD 7470 GPU to be connected to the system, which showed up in OpenWRT. To make full use of this hardware by gaining access to the AMD GPU driver, full Debian Linux was needed. Fortunately, the distro had a special PowerPCSPE port that supports the e500v2 CPU core in the SoC. After this it was found that the amdgpu driver has issues on 32-bit platforms, for which an issue ticket got filed.

Using the legacy Radeon driver helped to overcome this issue, but then it was found that the big endian nature of the CPU tripped up the Grand Theft Auto: Vice City game code which has not been written with BE in mind. This took a lot of code patching to help fix this, but eventually the game was up and running, albeit with glitches. Whatever the cause of these graphical glitches was will remain unknown, as after updating everything things began to work normally.

So now it’s possible to convert a 2013-era router into a gaming console after patching in an external GPU, which actually could be useful in keeping more potential e-waste out of landfills.

Continue reading “Gaming On A TP-Link TL-WDR4900 Wireless Router”

The IMac GPU Becomes Upgradeable, With PCIe

Over its long lifetime, the Apple iMac all-in-one computer has morphed from the early CRT models through those odd table-lamp machines into today’s beautiful sleek affairs. They look pretty, but is there anything that can be done to upgrade them? Maybe not today’s ones, but the models from the mid-2000s can be given some surprising new life. [LowEndMac] have featured a 2006 24″ model that’s received a much more powerful GPU, something we’d have thought to be impossible.

The iMacs from that era resemble a monitor with a slightly chunkier back, in which resides the guts of the computer. By then the company was producing machines with an x86 processor, and their internals share a lot of similarities with a laptop of the period. The card is a Mac Radeon model newer than the machine would ever be used with, and it sits in a chain of mini PCIe to PCIe adapters. Even then it can’t drive the original screen, so a replacement panel and power supply are taken from another monitor and grafted into the iMac case. This along with a RAM and SSD upgrade makes this about the most upgraded a 2006 iMac could be.

Of course, another approach is to simply replace the whole lot with an Intel NUC.

This Week In Security: Zenbleed, Web Integrity, And More!

Up first is Zenbleed, a particularly worrying speculative execution bug, that unfortunately happens to be really simple to exploit. It leaks data from function like strlen, memcpy, and strcmp. It’s vulnerable from within virtual machines, and potentially from within the browser. The scope is fairly limited, though, as Zenbleed only affects Zen 2 CPUs: that’s the AMD Epyc 7002 series, the Ryzen 3000 series, and some of the Ryzen 4000, 5000, and 7020 series of CPUs, specifically those with the built-in Radeon graphics.

And at the heart of problem is a pointer use-after-free — that happens inside the CPU itself. We normally think of CPU registers as fixed locations on the silicon. But in the case of XMM and YMM registers, there’s actually a shared store of register space, and the individual registers are mapped into that space using a method very reminiscent of pointers.

Continue reading “This Week In Security: Zenbleed, Web Integrity, And More!”

A Real GPU On The Raspberry Pi — Barely.

[Jeff Geerling] saw the Raspberry Pi Compute Module 4 and its exposed PCI-Express 1x connection, and just naturally wondered whether he could plug a GPU into that slot and get it to work. It didn’t. There were a few reasons why, such as the limited Base Address Register space, and drivers that just weren’t written for ARM hardware. A bit of help from the Raspberry Pi software engineers and other Linux kernel hackers and those issues were fixed, albeit with a big hurdle in the CPU. The Broadcom chip in the Pi 4, the BCM2711, has a broken PCIe implementation.

There has finally been a breakthrough — Thanks to the dedicated community that has sprung up around this topic, a set of kernel patches manage to work around the hardware issues. It’s now possible to run a Radeon HD 5000/6000/7000 card on the Raspberry Pi 4 Compute Module. There are still glitches, and the Kernel patches to make this work will likely never land upstream. That said, It’s possible to run a desktop environment on the Radeon GPU on a Pi, and even a few simple benchmarks. The results… aren’t particularly inspiring, but that wasn’t really ever the point. You may be asking what real-world use is for a full-size GPU on the Pi. Sure, maybe crypto-mining or emulation, or being able to run more monitors for digital signage. More than that, it might help ensure the next Pi has a working PCIe implementation. But like many things we cover here, the real reason is that it’s a challenge that a group of enthusiasts couldn’t leave alone.

Continue reading “A Real GPU On The Raspberry Pi — Barely.”

An AMD GPU plugged into an ATX PSU and Raspberry PI CM4

Raspberry Pi With Some Serious Graphical Muscle

[Jeff Geerling] routinely tinkers around with Raspberry Pi compute module, which unlike the regular RPi 4, includes a PCI-e lane. With some luck, he was able to obtain an AMD Radeon RX 6700 XT GPU card and decided to try and plug it into the Raspberry Pi 4 Compute Module.

While you likely wouldn’t be running games with such as setup, there are many kinds of unique and interesting compute-based workloads that can be offloaded onto a GPU. In a situation similar to putting a V8 on a lawnmower, the Raspberry Pi 4 pulls around 5-10 watts and the GPU can pull 230 watts. Unfortunately, the PCI-e slot on the IO board wasn’t designed with a power-hungry chip in mind, so [Jeff] brought in a full-blown ATX power supply to power the GPU. To avoid problems with differing ground planes, an adapter was fashioned for the Raspberry Pi to be powered from the PSU as well. Plugging in the card yielded promising results initially. In particular, Linux detected the card and correctly mapped the BARs (Base Address Register), which had been a problem in the past for him with other devices. A BAR allows a PCI device to map its memory into the CPU’s memory space and keep track of the base address of that mapped memory range.

AMD kindly provides Linux drivers for the kernel. [Jeff] walks through cross-compiling the kernel and has a nice docker container that quickly reproduces the built environment. There was a bug that prevented compilation with AMD drivers included, so he wasn’t able to get a fully built kernel. Since the video, he has been slowly wading through the issue in a fascinating thread on GitHub. Everything from running out of memory space for the Pi to PSP memory training for the GPU itself has been encountered.

The ever-expanding capabilities of the plucky little compute module are a wonderful thing to us here at Hackaday, as we saw it get NVMe boot earlier this year. We’re looking forward to the progress [Jeff] makes with GPUs. Video after the break.

Continue reading “Raspberry Pi With Some Serious Graphical Muscle”

Crowd Funded Jumping Cubes

The Japan Aerospace Exploration Agency (JAXA) recently contributed their Int-Ball  technology to a Kickstarter campaign operated by the Japanese electronics manufacturer / distributor Bit Trade One (Japanese site). This technology is based on the Cubli project out of the Swiss Federal Institute of Technology in Zurich (ETH Zurich), which we covered back in 2013. The Cubli-based technology has been appearing in various projects since then, including the Nonlinear Mechatronic Cube in 2016.  Alas, the current JAXA-based “3-Axis Attitude Control Module” project doesn’t have a catchy name — yet.

One interesting application of these jumping cubes, presumably how JAXA got involved with these devices, is a floating video camera that was put to use on board the International Space Station (ISS) in 2017.  The version being offered by the Kickstarter campaign doesn’t include the cameras, and you will need to provide your own a gravity-free environment to duplicate that application.  Instead, they seem to be marketing this for educational uses.  You’d better dig deep in your wallet if you want one — a fully assembled unit requires a pledge of over $5000 ( there is a “some assembly required” kit that can save you about $1000 ).  Most of us won’t be backing this project for that reason alone, but it is nice to see the march of progress of such a cool technology:  from inception to space applications to becoming available to the general public.  Thanks to [Lincoln Uehara] for sending in this tip.

Continue reading “Crowd Funded Jumping Cubes”

A Dead Macbook GPU Shouldn’t Stop You, With This BGA Soldering Hack

On some 2011 Macbook Pro models, there is a tendency for the Radeon GPU to fail. This should mean game over for the computer, but surprisingly salvation is offered by its having not one but two GPUs on board. The Intel processor also has a GPU, and Apple use a pile of logic in an FPGA to switch at will between them. The community have produced fresh FPGA code to revive a dead Mac on its Intel GPU, but at the expense of losing brightness control. [Ayilm1] has brought back the brightness with a clever BGA reworking hack that gains access to a brightness control line present on the Intel BD82HM65 Platform Controller Hub chip but not used in the Macbook.

We’re used to impressive soldering work here at Hackaday, and we’ve seen our share of wiring direct to the balls on an upturned BGA chip. This is a similar idea but at another level, as a section of the top insulation on an in-place BGA is removed to expose the microvia above the ball carrying the required signal. A tiny wire is soldered to the exposed pad and taken to a piece of copper tape stuck down to provide mechanical strength, and a piece of enameled copper wire is run from that to the other side of the PCB where lies its destination. It comes with FPGA code to take advantage of it, but even for non-Macbook owners, it’s an extremely impressive piece of work. It’s not the first fine-soldering Macbook fix we’ve seen, either.

Thanks [lightpink784] for the tip.