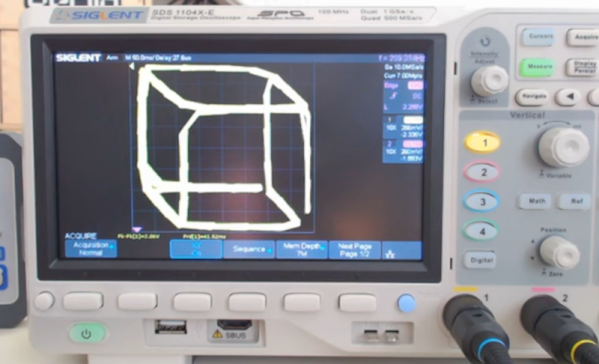
Drawing on an oscilloscope’s XY mode isn’t a new idea. However, if you’ve ever wanted to give it a go, you’d be hard-pressed to find more information than the nearly hour-and-a-half video about the topic from [Low Byte Productions]. You can check out the video below.
If you prefer to jump straight into the code, there’s a GitHub page. While the code is specific to the STM32, you can apply the ideas to anything.
The hot end of the EasyThreed K9 is actually pretty nifty. (Credit: [Thomas Sanladerer])Recently, [Thomas Sanladerer] bought an EasyThreed K9 off AliExpress for a mere €72, netting him an FDM printer with a 10 x 10 x 10 cm build volume. The build plate is unheated, with optional upgrade, and there is no display to interact with the device: just a big multi-function ‘play’ button and five smaller buttons that direct the print head to preset locations above the build plate to allow for build plate leveling using the knobs on each corner. There’s also a ‘home’ button on the back for homing the print head, which pretty much completes the user interface. As the printer comes in a rather small box, the first step is to assemble the parts into something resembling a 3D printer.
What follows is both a mixture of wonder and horror, as the plastic build quality is everything but convincing, while at the same time, the self-contained nature of each of the three axes of the cantilevered design makes for very easy assembly. The print head has a nifty flip-up cover for easy access to the hot end, which makes the best of the anemic 24-watt power supply for the entire printer. A cooling fan with an air duct even provides part cooling, making this print head a contender for the ‘cheap but not terrible’ category. You can check out his full video review below.
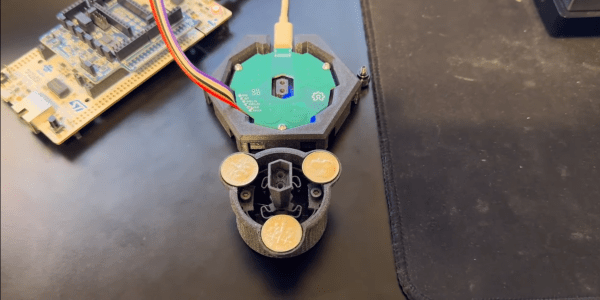
3D mice with six degrees of freedom (6DOF) motion are highly valued by professional CAD users. However, the entry-level versions typically cost upwards of $150 and are produced by a single manufacturer. [Colton Baldridge] has created the OS3M Mouse — an open source alternative using PCB coils and 3D printed flexures.
The primary challenges in creating a 6DOF input device, similar to the 3Dconnexion Space Mouse, lie in developing a mechanical coupling that enables full range motion, and electronics capable of precisely and consistently measuring this motion. After several iterations of printed flexure combinations and trip down the finite element analysis (FEA) rabbit hole, [Colton] had a working single-piece mechanical solution.
To measure the knob’s movement accurately, [Colton] employs inductive sensing. Inductance to Digital Converters (LDCs) assess the inductive alterations across three pairs of PCB coils, each having an opposing metal disk mounted on the knob. This setup allows [Colton] to use a Stewart platform‘s kinematic model calculate the knob’s relative position. The calculation are done on an STM32 which also acts USB HID send the position data to a computer. For the demo [Colton] created a simple C++ app to translate the position data to Solidworks API calls.
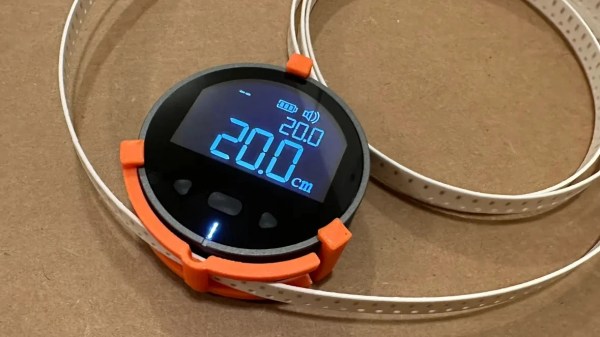
Component reels are a highly-0ptimized packaging format. They deliver components to pick and place machines for effective high-speed assembly. As more of us get into working with SMD components, we’re exposed to them as well. [MG] wanted a way to easily measure tape from component reels, which is difficult because they’re often curled up. Thus, they whipped up a nifty little tool for the job.
The device consists of a 3D printed bracket which is designed to fit on a cheap electronic tape measure from Amazon. The bracket holds an 8mm wide component tape against the measuring wheel. As the component tape is fed through the device, it turns the wheel, and the measurement appears on the screen. No more must you try and flatten out a tape and measure it section by section. Instead, you just feed it in, yank it through, and you’re done!
[MG] notes that the tape measure itself runs on an STM32 microcontroller. As an extra-credit assignment, they suggest that the device could be reprogrammed to display component count instead of distance if that’s more suitable for your application. If you happen to make that mod, be sure to notify us on the tipline!
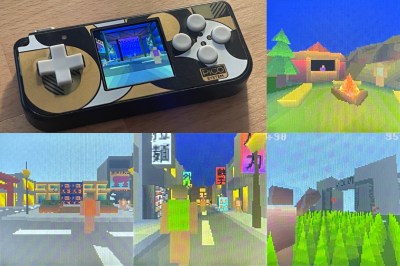
The graphics are simple, but with a compelling low-poly style.
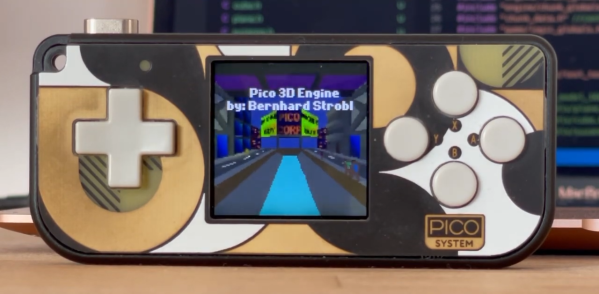
The game engine itself is built to run on the Pimoroni PicoSystem, which is essentially a handheld gaming platform built around the RP2040 chip. The engine takes advantage of the multi-core nature of the RP2040, using the second core as a dedicated rasterizer to keep frames pumping out.
The basic game [Bernhard] built in the engine features 50 NPC characters and 50 further zombies, all running at the same time. Specs are impressive, with the engine’s included game simulating a “world” of 120 x 120 meters in size. As a maximum limit, the engine can handle a 2.56 x 2.56 km world, thanks to the use of 8-bit integers for directional data. However, limited storage space would make it difficult to achieve such a large world in practice.
We don’t get to see much of the gameplay in the YouTube video, but the quality of the graphics is impressive for such a cheap microcontroller. It seems within the bounds of possibility that an actual open-world game could be practical on the PicoSystem if only enough storage were available. Video after the break.
Join Hackaday Editor-in-Chief Elliot Williams and Managing Editor Tom Nardi for a recap of all the best tips, hacks, and stories of the past week. We start things off with an update on Hackaday’s current slate of contests, followed by an exploration of the cutting edge in 3D printing and printables. Next up we’ll look at two achievements in detection, as commercial off-the-shelf hardware is pushed into service by unusually dedicated hackers to identify both dog poop and deep space pulsars (but not at the same time). We’ll also talk about fancy Samsung cables, homebrew soundcards, the surprising vulnerability of GPS, and the development of ratholes in your cat food.
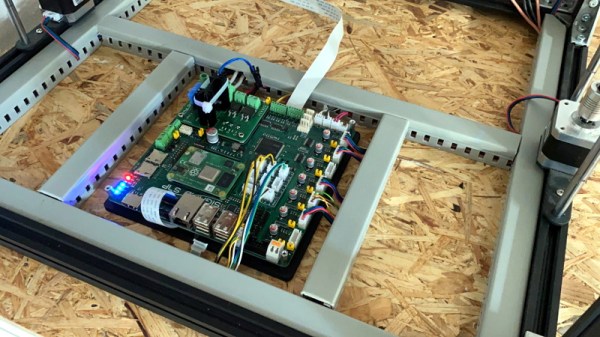
Traditionally, 3D printer control boards have used simplistic 8-bit microcontrollers to command the stepper drivers and ultimately move the machine where it needs to go. Newer boards have switched over to 32-bit microcontrollers, but they’re still relatively limited computationally. Because of this, a Raspberry Pi running OctoPrint is usually used to provide more complex features such as remote management and live video.
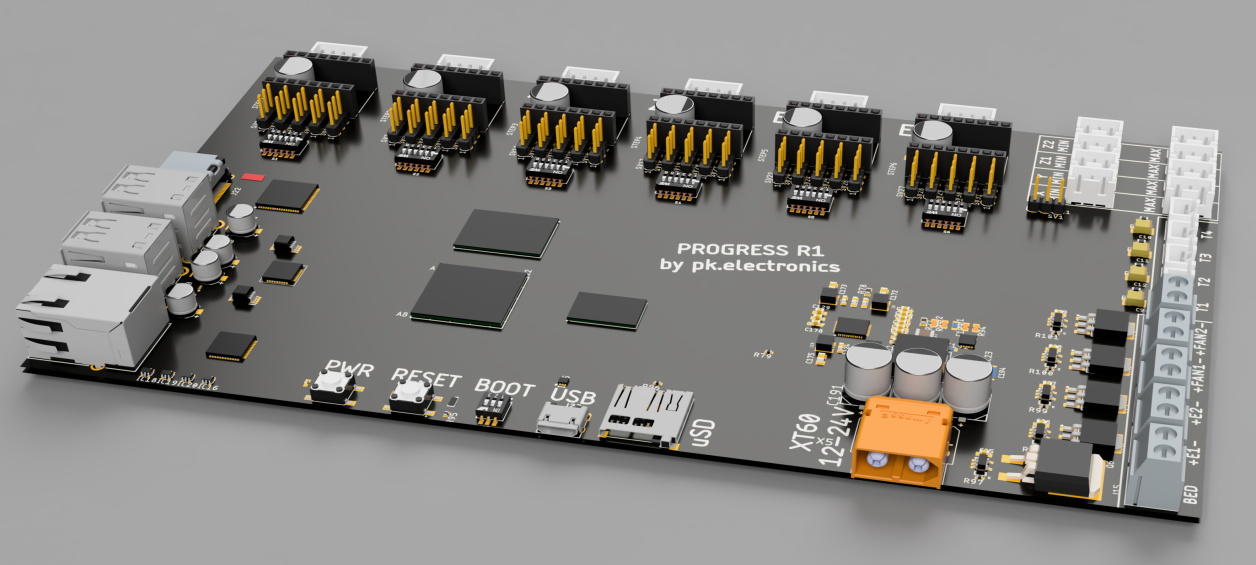
Looking to combine these different devices into a single all-in-one board, [pkElectronics] developed the Sigmoid S7P. With an STM32 microcontroller, TMC2209 stepper drivers, a Raspberry Pi Compute Module 4, and plenty of room for expansion, it promises to be a drop-in upgrade for essentially any 3D printer running on an open source firmware that could be ported over.
An earlier concept for the Sigmoid
According to [pkElectronics], the idea for the Sigmoid had been floating around for several years, but never got off the ground due to the difficulties in dealing with the SO-DIMM interface used by previous iterations of the Compute Module. But with the switch to smaller and denser connector for the CM4, the board finally started to take shape.

![The hot end of the EasyThreed K9 is actually pretty nifty. (Credit: [Thomas Sanladerer])](https://hackaday.com/wp-content/uploads/2024/02/cheapest_fdm_printer_hotend.jpg)