A Spark Gap Transmitter, Characterized

When we think of a spark gap radio transmitter, most of us immediately imagine an early twentieth century ship’s radio room or similar. Most of us know these transmitters as the first radio systems, and from there we’ll probably also know that they were phased out when better circuits arrived, because of their wide bandwidth. So it’s rare in 2024 to find anyone characterizing a spark gap transmitter, as [Baltic Lab] has.

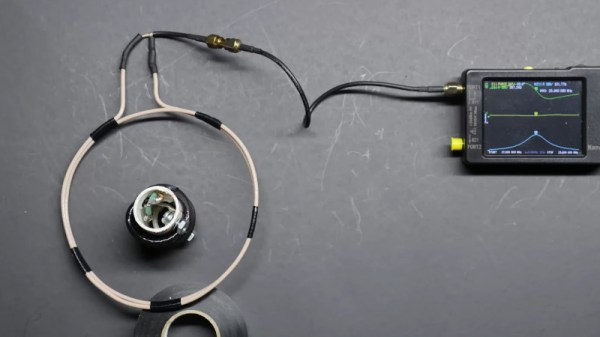
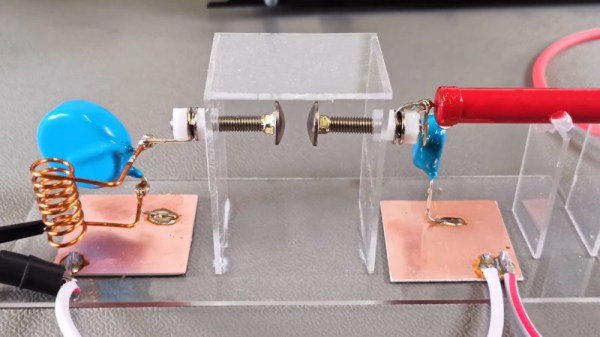
The circuit is simple enough, a high voltage passes through an RC network to a spark gap, the other side of which is a tuned circuit. The RC network and the spark gap form a simple low frequency relaxation oscillator, with the C being charged until the spark gap triggers, forcing the subsequent discharge of the capacitor and causing the spark to extinguish and the cycle to repeat. The resulting chain of high voltage pulses repeatedly energizes the tuned circuit, with each pulse causing a damped oscillation at its resonant frequency. The resulting RF signal is a crude AM tone which can be received fairly simply.

The mathematics behind it all is pretty interesting, revealing both the cause of the bandwidth spread in the low Q factor of the tuned circuit, and the presence of a large spurious frequency spike on an interaction with the capacitor in the RC circuit. It’s all in the video below the break, and we have to admit, it taught us something about radio we didn’t know.

Meanwhile spark gaps weren’t the only early radio transmitter technology. How about an alternator?

Continue reading “A Spark Gap Transmitter, Characterized”

Emergency DIP Pin Repair For Anyone

Who has not at some point in their lives experienced the horror of a pin on a DIP package breaking off? It’s generally game over, but what if you don’t have another chip handy to substitute? It’s time to carefully grind away some of the epoxy and solder on a new pin, as [Zafer Yildiz] has done in the video below the break.

The technique relies on the pins continuing horizontally inside the package , such that they provide a flat surface. He’s grinding with the disk on a rotary tool, we have to say we’d use one of the more delicate grinding heads for something more akin to a miniature die grinder.

Once the flat metal surface is exposed, the chip is placed in a socket, and a new pin is cut from the leg of a TO-220 power device. This is carefully bent over, inserted in the socket, and soldered into place. The whole socket and chip arrangement is then used in place of the chip, making for something a little bulky but one infinitely preferable to having to junk the device.

There are many useful skills to be learned when it comes to reworking, and we’ve covered a few in our time. Most recently we saw a guide to lifting SMD pins.

Continue reading “Emergency DIP Pin Repair For Anyone”

The Easy Way To Make A Smart Appliance

It seems that finding an appliance without some WiFi connectivity and an app to load your laundry data into the cloud is an increasingly difficult thing to do in the 2020s. Many of us resolutely refuse to connect these smart appliances to the Internet, but not because we don’t see the appeal — we just want to do it on our own terms.

[Terence Eden] did just this with his rice cooker, using a surprisingly straightforward approach. He simply connected it to the mains via an energy monitoring smart plug, and that was the hardware part, done. Of course, were it that simple we probably wouldn’t be featuring this here, as the meat of this project lies in connecting it to his smart home systems and getting something useful from it.

He’s using Home Assistant, and after a bit of messing about had it part of his home automation system. Then it was time for Appliance Status Monitor, which allowed him to easily have the rice cooker send him a notification once it has done its thing by monitoring the power it was using. All online, part of a smart home, and not a byte of his data captured and sold to anyone!

This isn’t the first home automation project we’ve brought you from this source.

A Drone Motor Does E-Bikes

On paper, the motors from both an electric bicycle and a drone can both take about 500 watts or so of power. Of course, their different applications make them anything but equivalent, as the bike motor is designed for high torque at low speed while the drone motor has very little torque but plenty of speed. Can the drone motor do the bike motor’s job? [Pro Know] makes it happen, with a set of speed reducing and torque increasing belts.

The build takes a pretty ordinary bicycle, and replaces the rear brake disk with a large pulley for a toothed belt, which drives a smaller pulley, and through a shaft another set of pulleys to the drone motor. The bracket to hold all this and the very large pulley on the wheel are all 3D printed in PLA-carbon fiber mix.

When it’s assembled, it runs the bike from a small lithium ion pack. That’s not unexpected, but if we’re honest we’d have our doubts as to whether this would survive the open road. It’s evidently a novelty for a YouTube video, and we’d be interested to see how hot the little motor became. However what’s perhaps more interesting is the choice of filament.

Could carbon fibre PLA be strong enough to print a toothed belt pulley? We’d be interested to know more. We saw the same filament combo being tested recently, after all.

Continue reading “A Drone Motor Does E-Bikes”

TOMOS Moped Becomes Electric Beast

The TOMOS 50cc moped, a small motorcycle produced in Yugoslavia and the Netherlands, has for decades been a common sight on European roads and provided the first taste of transport independence for countless youngsters. Unfortunately the company went bankrupt a few years ago, but there are still plenty of them about, and it’s one of these that [Doctor D.S.] gives an electric conversion in the video below the break.

The electronics are a standard 5 kW off-the-shelf Chinese kit, but in this they aren’t the star of the show so much as the work on the bike. As with any old moped it’s a bit ropey, and he strips it down and reconditions every part of it alongside his work fabricating brackets, a battery box, and a seat. It’s a long video, but it’s one of those workshop sequences that you can become engrossed in.

The result appears to be a very practical, powerful (for a moped) and rideable bike, and it’s one we’d have for buzzing around town any day. We’d like to take a look at that battery box and seat combo on the interests of safety, but otherwise it’s pretty spot-on. Sit back and enjoy a bit of quality workshop video!

If you’re hungry for more, this is by no means the first road bike electric conversion we’ve brought you.

Continue reading “TOMOS Moped Becomes Electric Beast”

How Much Thrust Is Your Prop Really Making?

The problem of components not conforming to their claimed specification is one that must challenge engineers in all fields, including it seems, that of multi-rotors and remote controlled aircraft. A motor can boast an impressive spec on the website which sells it, but overheat or just not deliver when it’s on your bench. Thus [Valkyrie Workshop] has come up with a simple but ingenious rig to evaluate a motor and propeller combo without breaking the bank.

It tales the form of a L-shaped wooden bracket clamped to a pivot point at its corner with one arm pointing upwards, with motor and propeller in a 3D printed holder on the upwards arm. The other arm extends horizontally and lies on a digital kitchen scale the same distance from the pivot as the motor. The same force as is exerted by the motor is transmitted via the bracket to the kitchen scale, allowing a direct readout of the thrust in grams or kilograms. This is a first version of the rig, further work will move to a load cell and Arduino for more flexibility in measurement.

We’ve featured similar devices here in the past, including one version which can be mounted to an automobile so it can be tested at speed.

Continue reading “How Much Thrust Is Your Prop Really Making?”

A NanoVNA As A Dip Meter

A staple of the radio amateur’s arsenal of test equipment in previous decades was the dip meter. This was a variable frequency oscillator whose coil would be placed near the circuit to be tested, and which would show an abrupt current dip on a moving coil meter when its frequency matched the resonant frequency of what it was testing. For some reason the extremely useful devices seem hard to come by in 2024, so [Rick’s Ham Shack] has come along with a guide to using a nanoVNA in their place.

It’s a simple enough technique, indeed it’s a basic part of using these instruments, with a large sensor coil connected to the output port and a frequency sweep set up on the VNA. The reactance graph then shows any resonant peaks it finds in the frequency range, something easily demonstrated in the video below the break by putting a 20 meter (14 MHz) trap in the coil and seeing an immediate clear peak.

For many readers this will not be news, but for those who’ve not used a VNA before it’s a quick and easy demo of an immediate use for these extremely versatile instruments. For those of us who received our callsigns long ago it’s nothing short of miraculous that a functional VNA can be picked up at such a reasonable price, and we’d go as far as to suggest that non radio amateurs might find one useful, too. Read our review, if you’re interested.

Continue reading “A NanoVNA As A Dip Meter”