The “Melt-O-Matic” – A Digital Melting Point Apparatus

FM43474HOHYF7GW.LARGE

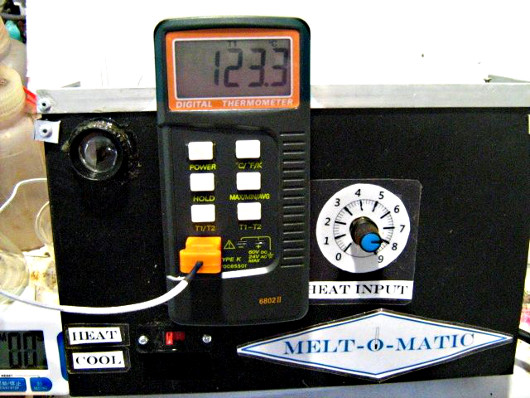
A common technique in organic chemistry is to determine the melting point of a specimen. While commercial options exist, [kymyst] decided to build one with similar (or better) functionality, and managed to keep it under $100. The basis of his rig is a 60W soldering iron. He simply replaced the normal soldering tip with an aluminum heating block that holds the capillary tubes and temperature probe. Two small fans are used to quickly cool the heating block, allowing fairly quick measurement times. It should be noted that building a project like this one will mean working with wires that carry 220V (or 115V, depending on your country). Please use proper precautions.

In case organic chemistry is on your list of ‘to learns’, [kymyst] included a nice writeup of the determination of melting points. It’s a great primer for those interested in learning more.

Using this setup, [kymyst] gets readings of ±0.1 °C. He mentions the possibility of adding a webcam for determining melting point automatically, something that would make this system competitive with much more expensive hardware.

The last time we saw one of these it used a hot glue gun as the heating element.

A 555-Based, Two-Channel Remote Control Circuit

NE555N

[fahadshihab], a young tinkerer, shared his circuit design for a simple remote control using 555 timers.  Using a 555 calculator, he designed a clock circuit that would run at 11.99 Hz. Two transistors are connected to inputs (presumably button switches). One sends the plain clock signal, and one sends the inverted clock signal. A matching circuit at the other end will separate the channels. All it requires is connecting the two circuits in order to synchronize them. It would be easy enough to interface this with an oscillator, an IR LED, or a laser for long-range control.

The great thing about this circuit is its simplicity. It’s often so easy to throw a microcontroller into the mix, that we forget how effective a setup like this can be. It could also be a great starter circuit for a kid’s workshop, demonstrating basic circuits, timers, and even a NOT gate. Of course, it would be a good refresher for those without a lot of circuit knowledge too. Once you’ve mastered this, perhaps an AM transmitter is next?

Writing A FUSE Filesystem In Python

photo

Have you ever thought a particular project could be better if you could just control the file access directly? [Stavros Korokithakis] did, specifically for a backup program he was working on. What followed was the realization that writing a FUSE filesystem, particularly in Python, isn’t as complicated as it may seem. Really, through the power of open source, the heavy lifting has already been done for us. If you’d like to try it yourself, you’ll need to install fusepy. From that point, you simply need to define the filesystem methods you will be using.

Python isn’t going to win any speed contests in the filesystem space, but that isn’t really the point. Using this technology opens up a huge opportunity for new ways of accessing data. If you let your mind wander, you can conceive of encrypted filesystems, seamless remote data access, new key-value storage designs, etc. Perhaps even more interesting is the idea of using Python to communicate with a physical device… maybe a proc filesystem to keep track of your robot telemetry? We’d love to hear your ideas in the comments.

We had success using [Stavros’] example script on Linux and OSX. (Fair warning if you’re on a Mac, the pip version of fusepy seems to be linked against fuse4x rather than OSXFUSE, but once you’ve got the prerequisites installed, you’re golden.) We didn’t have a Windows machine to test. Can anyone confirm if the same is possible there?

Supercap-Based Cell Phone Charger

Screen Shot 2013-11-02 at 11.21.58 AM[Barry] sent us a tip about a video from [electronupdate], describing an experimental cell phone charger. It’s a familiar issue: Your cell phone battery is low, and you aren’t in a position to plug it in for hours to charge. Some phones, including the one in his video, have swappable batteries, but that isn’t always an option either. As he explains in the video, a wall outlet can deliver the joule capacity of a high-end battery in a matter of seconds, but it is impossible to charge a battery that quickly. Capacitors, on the other hand, charge near-instantly.

[electronupdate] decided to look at the possibility of using super capacitors to power a typical usb plug. It would allow you to charge a secondary power supply in a short period of time, and then get on your way, letting your phone charge slowly from the device.

His experiment wasn’t entirely successful, possibly because he used 2.7V capacitors, which required a boost regulator and limited the useful voltage range. We think he might have had better success using 120V capacitors and a switching power supply, but it would be nice to see the various options compared.

Oh, [electronupdate] describes using this circuit as you are rushing to your airplane. We aren’t convinced carrying a couple super capacitors through a TSA checkpoint would be the best idea… YMMV.

Continue reading “Supercap-Based Cell Phone Charger”

Use Your Smartphone As A Microscope For Less Than $10

FY4TBHSHMMFBB4V.LARGE[Yoshinok] recently posted an Instructable on doing a $10 smartphone-to-microscope conversion. The hack isn’t so much a conversion as just a handy jig, but it’s still interesting. The basic idea is to set up a platform for the slides, and to mount the smartphone directly above. The trick, and the reason this can be called a microscope, is that [Yoshinok] embeds the lens from a cheap laser pointer into the smartphone holder. He is able to get 40x optical magnification with the lens, and even though it sacrifices quality, he uses the built-in digital zoom to get up to 175x magnification.

By itself, you could use this with a light source to magnify 3D objects. [Yoshinok] demonstrates this with a dime. But since the slide holder is made of clear acrylic, he mounted a cheap LED flashlight in the base to serve as through-sample lighting. Using this setup, he was able to observe the process of plasmolysis.

If you have kids, this is certainly a project to do with them, but we can’t help but think it will be useful for non-parents alike. This sort of magnification is good enough for simple lab experiments, and given that most Hack-a-Day readers have these parts lying around, we figure the cost is closer to $0. If you give it a try, let us know your results in the comments!

Continue reading “Use Your Smartphone As A Microscope For Less Than $10”

A Jeep-Mounted FLIR Camera

jeep

[Eddie Zarick] is at it again, modding his Jeep Wrangler into something that makes us all properly jealous. This time, he managed to acquire and mount the FLIR camera from an old Cadillac. It truly is an FLIR thermal imaging camera, and not just a near-infrared hack. Cadillac used this technology with a HUD, but [Eddie] decided to connect it to his in-dash screen. He also didn’t settle for simply facing it forward, but mounted it to a Golight searchlight base. He mounted the joysticks under the screen, giving him directional control.

[Eddie] spent about $500 on the project, which seems like a lot, but not when you consider the cost of a new FLIR camera. We would love to know where he found such a great deal! Maybe he hit up a local salvage yard? If you know of a good source for parts like this, let us know in the comments!

Previously we covered [Eddie’s] pressurized water tap, weatherproof keypad entry, and other assorted hacks. We look forward to seeing what he adds to his Jeep next.

Continue reading “A Jeep-Mounted FLIR Camera”

Converting A Mill To CNC

traces

Have a mill that you’d like to automate? Perhaps you can gets some ideas from the work [James] recently finished. Using familiar NEMA 23 stepper motors (the same motors used in the RepRap), he hacked his Proxxon MF-70 mill for CNC control. Adding a Sanguino and the stepper controllers from other projects, [James] got a working machine for minimal investment. You can tell that [James] is a fan of Polymorph, because he uses it liberally for most of the project, even using it to create some Oldham couplings (Google cache).

After completing the build initially, he managed to burn out the spindle motor by milling steel too quickly. We found it interesting that he was able to use a TURNIGY 2217 860kv 22A Outrunner (for R/C airplanes) as a new spindle motor. Not only is it a low-cost solution, but pairing it with a traditional brushless ESC can give your CNC software direct control over the motor speed.

The image above is an example of what [James’] machine is capable of. Overall, it’s a very accessible project for most of us. Not every mill needs to be capable of 10 mil traces. If you’ve got the urge, you can probably put one together yourself. Of course, if you do, please let us know!