DIY MIDI Looper Controller Looks Fantastic!

Due to pedalboard size, complicated guitar pedals sometimes reduce the number of buttons to the bare minimum. Many of these pedals are capable of being controlled with an external MIDI controller, however, and necessity being the mother of invention and all, this is a great opportunity to build something and learn some new skills at the same time. In need of a MIDI controller, Reddit user [Earthwin] built an Arduino powered one to control his Boss DD500 Looper pedal and the result is great looking.

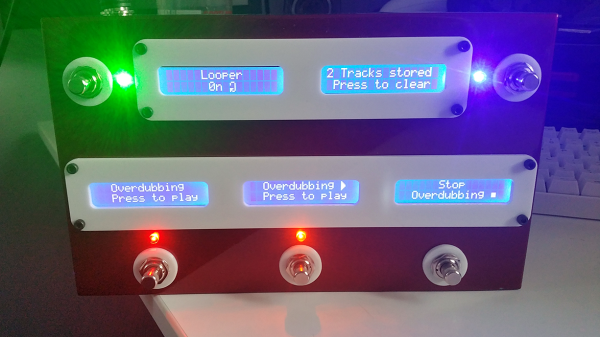
Five 16×2 LCD screens, one for each button, show the functionality that that button currently has. They are attached (through some neat wiring) to a custom-built PCB which holds the Arduino that controls everything. The screens are mounted to an acrylic backplate which holds the screens in place while the laser-cut acrylic covers are mounted to the same plate through the chassis. The chassis is a standard Hammond aluminum box that was sanded down, primed and then filler was used to make the corners nice and smooth. Flat-top LEDs and custom 3D printed washers finish off the project.

[Earthwin] admits that this build might be overkill for the looper that he’s using, but he had fun building the controller and learning to use an Arduino. He’s already well on his way to building another, using the lessons learned in this build. If you want to build your own MIDI controller, this article should help you out. And then you’re ready to build your controller into a guitar if you want to.

[Via Reddit]

DIY 40FPS 16bpp Platformer On A Cortex M0+

Sure, you can play a bunch of retro games on a Raspberry Pi, but if you’re really hardcore, you build your own retro console and write your own games for it. [Nicola Wrachien]’s entry into this year’s Hackaday prize is his DIY Cortex M0+ game console and the platform game he wrote to test the hardware.

The board that [Nicola] is using is the uChip, a small DIP board based around a ATSAMD21 (the same chip that runs the Arduino Zero). That, along with a 160×128 TFT LCD screen, makes up the bulk of the hardware. A carrier board holds both of these as well as several buttons and an OpAmp.

The ATSAMD21 chip has decent hardware DMA that [Nicola] is using to get the frame rate needed. Since the DMA hardware and the CPU can work at the same time, while the DMA is handling one chunk of graphics, the CPU is working on the next chunk. Using this system, [Nicola] is able to get a better framerate than originally designed. Take a look at [Nicola]’s webpage for more details on the algorithm used.

In order to create a level in the platformer that [Nicola] made to show off the console, [Nicola] created a full blown level editor in Java. Using the editor, you can place the tiles and sprites and set their behaviours. The map can then be exported in an optimized format for loading on to the hardware and into the game.

A video showing off the game is after the break. There’s no shortage of great DIY consoles on the site — check out this impressive vector console, or if RetroPie is more your thing, take a look at this DIY Zelda-playing device.

Continue reading “DIY 40FPS 16bpp Platformer On A Cortex M0+”

Individual Neopixels Make Up This Lightsaber’s Blade

The lightsaber is an iconic weapon from the Star Wars franchise, designed in all sorts of shapes and colors. Several fan-made versions have been built as well, quite a few of which use the almost ubiquitous neopixel. [Tirenoth] decided to build his first lightsaber using a series of neopixels, but decided on a unique build method.

Instead of the usual strip of neopixels, [Tirenoth] chose to use a bunch of neopixels in the 5mm LED form-factor. [Tirenoth] soldered each LED’s 5v pins and GND pins to the same pins on the next, rotating each LED 180 degrees, building a tower of pixels. The data in and out pins are soldered to the next (and previous) LED as well. This allows the series of LEDs to be a bit more stable physically, and allows them to be stacked close together, one on top of the other.

To control the neopixels, a Proffieboard is used, an open-source lightsaber controller. The Proffieboard uses an STM32 microcontroller and allows you to hook up LEDs or neopixels as well as a speaker. Its open-source software allows the animation of the pixels and the playing of sounds. It’s designed specifically for lightsaber builds and is programmed via the Arduino IDE.

[Tirenoth] has some nice pictures of the build in process and, of course some nice pics of the final result. He suggests that the blade would be the first to break in battle, though. There’s been a few lightsaber builds over the years, like this lightsaber with rave mode, or this lightsaber made with real lasers.

via Reddit.

Guitar Made From Noodles Glows In The Dark

Wood.  Specifically, certain types of tone woods; woods that impart a certain tone. That’s what guitars are made of. And occasionally, plastic, or metal, or fibreglass or, well, anything. [_forwardaudio_] built his out of noodles, because, why not?

Well, not completely out of noodles. Epoxy is used to give some strength to the noodles, because, despite the fantastic tone that noodles impart to the guitar, they’re not known for their strength. The epoxy helps keep the noodles in place, focusing their noodly tone.

To add a bit of punch to the look of the guitar, the back and front of the body have UV powder blended in, blue on the front and green on the back. Once the guitar was assembled, a set of UV strings were added as well, to add even more glowy goodness.

In the video (after the break) the build process is shown along with the simplified, volume only, wiring. At the end, [_forwardaudio_] noodles around on the guitar a bit.

I’ll show myself out.

If noodles aren’t your thing, maybe you’d prefer 3D printing an extended fretboard for your guitar, or to build yourself a 12 foot long guitar.

Continue reading “Guitar Made From Noodles Glows In The Dark”

DIY Raspberry Pi Multi FX Stomp Box

From building your own analog effects pedal to processing audio through micro controllers, a lot of musicians love building their own boxes of sound modification. In his entry for the 2019 Hackaday Prize, [Craig Hissett] has a project to build an all-in-one multi-effects stomp box.

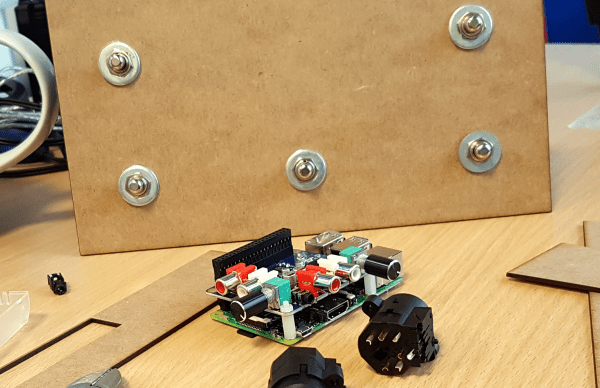
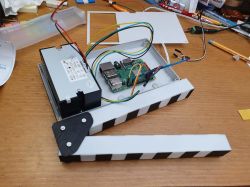
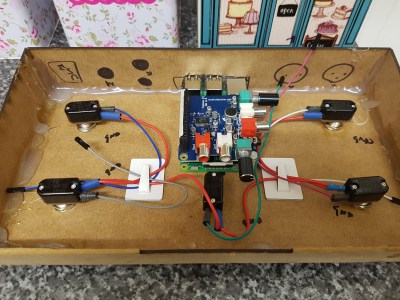
At the center of the box is a Raspberry Pi with an AudioInjector stereo sound card.  The card takes care of stereo in and out, and passing the signal to the Pi. The software is Modep, an open source audio processor that allows the setup of a chain of digital effects plugins to be run on the Pi. After finding some foot switches, [Craig] connected them to an Arduino Pro Micro which he set up as a MIDI device that sends MIDI messages to the Modep software running on the Pi.

There are still a few steps to go, but [Craig] has the basic layout covered. Next up is wiring it up and building a proper case for it, as well as working on latency. A few years ago, another multi-effects stomp box was featured in the Hackaday Prize, and last year, this multi-effects controller was featured.


This Clapperboard Prints Movie Posters

The clapperboard is a device used in video to synchronize audio and video. Its role in movies is well known and its use goes back in one form or another to the 1920s. [Gocivici] is a big movie fan and created a clapperboard that is able to print out posters of recently announced movies when the clapper is clapped.

The poster is not a big, full color job, but rather a black and white one, roughly the size of a movie ticket. [Gocivici] keeps his movie tickets in a journal and wanted to be able to keep small posters in there along with them. A thermal printer is used to print the poster along with the title, the release date, and some information about the movie. In addition to the printer, the hardware involved is a Raspberry Pi, a switch, and an LED. The clapperboard itself is 3d printed and then painted. A bit of metal is used to keep the clappers apart and give a bit of resistance when pressing them together. A nice touch is a metal front, so you can use magnets to keep your posters on the board.

[Gocivici] has detailed build instructions up along with a video (available after the break) showing the printer in action. The 3d models are available as well as the code used to create the posters after grabbing data from TMDb. If you need your clapperboard to be as accurate as possible, take a look at this atomic clock clapperboard.

Continue reading “This Clapperboard Prints Movie Posters”

Web Interface Controls Nixie Tube Clock

We love our clocks around here and we love nixie tubes as well. The combination of the two almost seems to be a no-brainer. With the modern twist of an ESP8266, Reddit user [vladco] built a minimalist nixie tube clock.

The build starts with the nixie tubes, Russian In4s, each one mounted on its own small circuit board. Each board is chained together and they’re mounted on a wooden frame. The frame is mounted inside a nice wooden case which was designed in Fusion 360 and milled out of oak at a local hackerspace.

There are no controls on the case. No buttons or knobs. This clock is set via the EPS8266 which gets the time and updates the shift registers that set the numbers on each of the tubes. The clock dims at night so it’s not as bright. [vladco] wrote a web UI to set the time and interact with the  tubes.

The code and files for the case and circuit board are available online. The result is a nice, minimalist clock for your desk. There are plenty of clock builds on the site, several built from nixie tubes, including another nixie tube clock with an ESP8266, and another.

via Reddit