Primer Tutorials For Arduino IR Remote Cloning And Keyboard Simulation

We’ve featured loads of IR Arduino projects and they are all exciting and unique. The projects spring from a specific need or problem where a custom infrared remote control is the solution. [Rick’s] double feature we’re sharing in this article is no exception, but what is interesting and different about [Rick’s] projects is his careful and deliberate tutorial delivery on how to copy infrared remote codes, store the codes with a flavor of Arduino and then either transmit or receive the codes to control devices.

In the case of his space heater an Arduino was used to record and later retransmit the “power on” IR code to the heater before he awakes on a cold morning. This way his room is toasty warm before he has to climb out from under the covers, which has the added benefit of saving the cost of running the heater all night. Brilliant idea if you don’t have a programmable heating system. Maybe he will add a temperature sensor someday so it doesn’t have to run on strictly time.

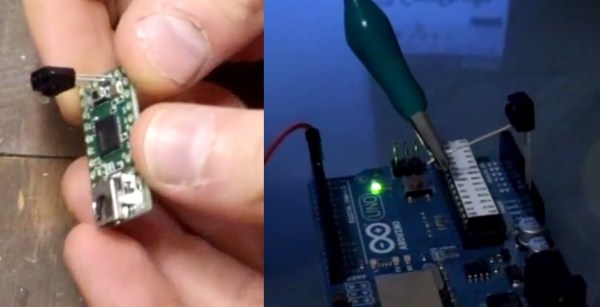
A more complicated problem was controlling DVD playback software on his computer remotely. [Rick] says he sits at a distance when watching DVDs on his computer but his computer doesn’t have a remote control like a normal TV. Arduino to the rescue again! But this time he pulls out a Teensyduino because of its added feature of being able to emulate a keyboard and of course the computer DVD playback software accepts keyboard commands. Once again he used the “IRremote.h” library to record certain button codes from an old remote control before adding the retrieved codes to a Teensyduino setup and programmed to receive and decode the remote’s IR signals. The Teensyduino then maps the IR codes to known keyboard shortcuts and transmits the simulated keyboard shortcut commands to the computer via its USB cable where the DVD playback software recognizes the key commands.

As always [Rick] shares all his libraries and sketches on his blog so follow the above links to download the files. You will not miss a single step if you follow his excellent videos below. Plus, here are some other ways and other tools for using an IR remote with your Arduino and cloning an infrared remote.

Continue reading “Primer Tutorials For Arduino IR Remote Cloning And Keyboard Simulation”

Retrotechtacular: [Zoltán Bay’s] Moon Bounce Coulometer Signal Amplifier

coulometers and antenna

In the years before World War II it was theorized that shortwave radio waves could propagate through the ionosphere relatively undisturbed and allow for a signal to be bounced off the moon and returned. [Zoltán Bay] calculated that the return signal would be too faint to be detected above background noise with the radio receiving equipment of the day. To overcome this receiver dilemma he devised a new receiving element consisting of 10 coulometers sharing a common tank of a water solution. Each of the coulometers had a separate electrical connector and when current flowed through the electrode, hydrogen bubbles would form in an attached glass capillary column. By periodically sweeping through all 10 coulometers using a rotating switch attached to the radar receiver, any radar echo as well as random background noise would be readable by the amount of bubbles in the capillary columns. A single radar echo would be indistinguishable from random background noise in the columns of bubbles, but if the sweep is continued for 30 minutes any periodic radar echo would show as an increased accumulation of bubbles in a respective column. By reading these coulometers and knowing the switching period you could determine that you were receiving a true radar echo from the moon.

What an amazing apparatus to amplify a periodic signal above background noise! Nowadays we would call this a long-time integrator or persistence measurement and it’s a relatively simple task. You can download and read [Zoltán Bay’s] paper on “Reflection of Microwaves From the Moon” dated 1946 in PDF form. His integrator apparatus details start on page 17.

It took some years but in 1946 [Zoltán Bay’s] receiving apparatus was tested and did confirm reception from moon bounce. However, U.S. Army Signal Corps with better crystal frequency stabilized equipment was able to perform the same task earlier as seen in the below video without the use of an integrator. Even though the U.S. Army equipment was superior for this task [Zoltán Bay’s] apparatus enjoyed years of service in the field of planetary radar observation where such a high sensitivity scheme was still necessary.

Continue reading “Retrotechtacular: [Zoltán Bay’s] Moon Bounce Coulometer Signal Amplifier”

Posterior Posture Videogame Controller

Normally we see some crazy mad science projects coming from [Ben Krasnow’s] laboratory. This week [Ben] changes gears a bit and hacks his Xbox controller to interface with his bathroom scale and function as a posture controlled input device. You may want to take a moment for that to tumble around in your noggin before we trying to explain. What this means is you sit catawampus on a bathroom scale and when you lean forward your game character moves forward, lean back your character backs up and lean side to side for strafe left and right.

A modern digital bathroom scale has four pressure point transducers — one in each corner — which are read by the central controller and summed to generate the weight of the object setting on the scale. To use the scale as a controller input [Ben] removed the central scale controller and created two amplified Wheatstone bridge differential circuits, one for each diagonal axis between load cells. After adding an offset potentiometer to fix the resting point at 0.8 volts, the amplified differential voltage signals are fed directly into an Xbox controller’s thumb stick input for game control.

Additionally, to add rotation to his new game controller he hacked a an old ball type mouse and added a bit of rubber tubing that contacted and tracked the base of a  Lazy Susan platter. The scale sits on the Lazy Susan and allows for the partial rotation of your torso to controlled game rotation. However, [Ben] still needed a regular mouse interfaced with the game for full 360° rotation control.

There is more after the break, plus the build and demonstration video.

Continue reading “Posterior Posture Videogame Controller”

Long-distance High Frequency APRS Tracking Using The FreeTrak63

FT63_857_etrex

If you dabble in the ham radio hobby we’re sure you’ve heard of GPS position monitoring or tracking using APRS packet data commonly transmitting over the VHF ham band and FM modulated. One of the issues you’ll face using this common method is range limitations of VHF. [Mike Berg] a.k.a [N0QBH ] tipped us off to his latest project to greatly increase the range of a standalone APRS system utilizing the HF bands on single-sideband (SSB).

There are some unique challenges transmitting packet data using SSB over HF bands.  High Frequency APRS has been around for decades utilizing FSK AX.25 packet transmissions at 300 baud, but it was quite susceptible to noise and propagation aberrations. More recently PSK-31 at the slower 31 baud speed helped alleviate many of these issues. [Mike] utilized the somewhat updated APRS with PSK-63 and the “APRS Messenger” program to overcome these challenges. [Mike’s] hardware solution consists of a PIC 16F690 micro which is coded to receive data from a GPS receiver, convert it into PSK-63 and then transmit on 30 meters over an attached HF radio. A second receiving station or stations at great distances can pick up and decode the transmission using the “APRS Messenger” program connected to the receiving radio over the computer’s soundcard. The program can then forward the tracking information, if good, to tracking websites like FindU.com and APRS.FI.

You can build your own FreeTrak63 by downloading [Mike’s] parts list, assembly code, HEX file, manual and schematic. The PCB is available on OSH Park if you don’t want to make your own or wire point-to-point. Let’s not forget to mention how hackable this hardware is, being really just an eight bit DAC, micro, serial in and radio out. One could reprogram this hardware to do other modulation schemes like AX.25 packet or MFSK16, the sky’s the limit. If short-distance on VHF with existing Internet linked receiver networks using an Arduino compatible platform is more to your taste, then checkout the Trackuino open source APRS Tracker.

Peltier Joule Thief Power Supply

[Steven] manages to power an LED for 15 minutes using hot and cold water as a battery. He does this using the thermoelectric effect also known as the Seebeck effect, Peltier effect or Thomson effect. This isn’t particularly new; in fact there are commercial products that you can use to charge a cell phone using a small campfire or internal burner that works on the same principle.

What is interesting about [Steven’s] device is that he uses a salvaged Peltier device not meant for generating electricity, coupled with a home built joule thief circuit. In the video he describes how the joule thief functions and powers the LED using the small voltage generated by the Peltier device. The energy for the thermoelectric effect is conducted from a hot water bath through aluminum plates, through the positive and negative sides of the Peltier device, through more aluminum plates and finally into a cold water bath. As the heat energy transfers through the Peltier device a small electric current is generated and flows in two small wires coming out the side of the device.  The energy generated by the Peltier device is stored in the joule thief and periodically dumped at a voltage high enough to forward bias the LED “on” for a brief moment. Technically the LED is flashing but at a frequency too high for our eyes to see. As the hot water bath cools, the LED goes from very bright, to dim, to off in about 15 minutes.

Not a very practical power supply but still quite the parlor trick. He wraps up the tutorial specifying that a TEG thermoelectric generator would be a much better choice for generating power and can handle much higher temperatures. You can watch the video after the break.

Continue reading “Peltier Joule Thief Power Supply”

Diagnose And Repair A Yaesu FT-7800 Ham Radio

Yaesu FT-7800 Ham Radio

[Alan Wolke] aka [w2aew] was challenged to repair a friends Yaesu FT-7800 ham radio. This radio operates on two ham bands, 2 m VHF and 70 cm UHF. The complaint was that the 2 m side was not working but the 70 cm was transmitting fine. Alan started by verifying the complaint using a Bird watt meter with a 50 watt slug and terminating the signal into a 50 W dummy load. [Allen’s] bird meter is the type that has an RF sampler that can be connected to an oscilloscope for added signal viewing and validation.

After verifying that the radio was not working as described, Alan starts by glancing over the circuit board to look for any obvious damage. He then walks us through a block diagram as well as a circuit diagram of the FT-7800 radio before stepping us through the troubleshooting and diagnostics of radio repair. Even when he realizes he might have found the problem he still steps us through the remainder of his diagnostics. The skills and knowledge that Alan shares is extremely valuable to anybody looking to repair radios.

Spoiler alert. At the end of the first video he determines that the pin diodes near the final VHF output were bad. In the second video he reveals that he could no longer source these bad components. Through some clever evaluation of a more current Yaesu radio, [Allen] was able to find suitable replacement components. Lesson two ends with some surface mount solder rework tips as well as testing that the repair was successful.

And just in case you don’t know what a pin diode is, or is used for, Alan shares a third video covering just what this component is and does in a radio. You can follow the jump to watch all three videos.

Continue reading “Diagnose And Repair A Yaesu FT-7800 Ham Radio”

Build Your Own Desoldering Station On The Cheap

Desoldering Station on the Cheap

[Sable Wolf] tipped us off to his DYI desoldering station for under $70. We know we have seen this conversion before, but it hasn’t been featured on Hack a Day. [Sable Wolf’s] hack is unique and has added features that make building, cleaning and the overall longevity sounder. However, some kind of sound deadening housing would have to be built around the pump as it seemed uncomfortably loud in the video.

Some Chinese made desoldering stations are getting quite cheap so maybe it’s not worth the effort unless you can salvage more components for the build. Thanks to [Sable Wolf’s] detailed blog you can browse through his BOM and scrounge up the majority of these items from your salvage bins. A cheap but reliable desoldering station would be an extremely handy tool to have on your bench.

This is much safer than desoldering with a candle or using fire as featured in the past, and is kind of a flip around on the SMD hot air pencil hack.

Follow long after the break to watch the video of the desoldering station in action.

Continue reading “Build Your Own Desoldering Station On The Cheap”