Hanging Christmas Lights With No Ladder And No Fuss

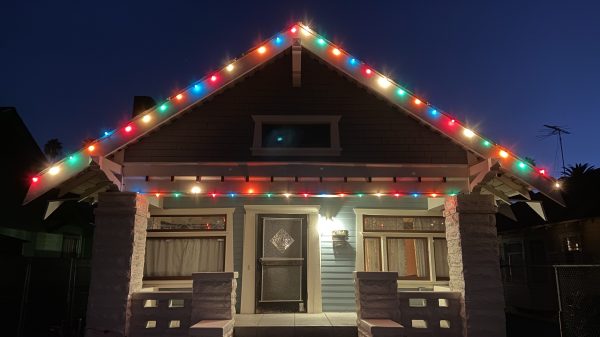
Getting up on a ladder to hang Christmas lights is a great way to hurt yourself if you’re not careful, and winter conditions only add to the peril. One enterprising hacker has whipped up a neat way to avoid ladders entirely, by hanging their lights while planted safely on the ground.

Result!

The build uses hefty magnets and triangle eye bolts, attached at regular intervals to the string of Christmas lights. The magnets are used to hold the lights to metal roof siding, while the hooks allow the lights to be lifted into place using a hook on a large extendable pole. Washers, spacers, and screws are used to attach the magnets and hooks to the lights.

For a layout that follows the lines of a simple peaked roof, this hack works great. For more complicated installations, you might still have to climb up a ladder. We’ve featured great primers on getting started with advanced Christmas light displays before, if you’re looking to up your game.

Meanwhile, no matter how much you enjoy seasonal decoration brinkmanship, don’t even think about watching Deck the Halls (2006). Danny Devito has saved a lot of films, but he couldn’t save this. Happy holidays!

Neodriver Ornament Brightens Up Christmas

Stores will sell you all kinds of gaudy holiday ornaments, but there’s nothing like the style and class achieved by building your own. [w3arycod3r] did just that, whipping up the fun and festive Neodriver Ornament.

It’s a battery-powered build, and runs off an rechargeable 18650 cell which provides several days of operation at a low duty cycle. An ATtiny85 is charged with sending out commands to various NeoPixel devices, from rings to rectangular arrays. [w3arycod3r] then designed various PCBs that could carry the hardware and battery in a well-balanced package that would hang nicely when suspended from a ribbon on a Christmas tree.

As is always the fun part with addressable LEDs, [w3arycod3r] whipped up some fun animations to suit. The 5×5 rectangular arrays of NeoPixels are able to deliver scrolling text, while another animation blips out the RNA sequence of everyone’s least favorite coronavirus, SARS-CoV-2. Getting everything to fit into a ATtiny85’s 8 KB of code space and 512 byte EEPROM was a challenge, but slimming down the Adafruit NeoPixel library and using direct AVR register manipulation in place of regular Arduino functions helped.

Overall, it’s a fun holiday build that looks great on the tree. Alternatively, consider making yourself some rheoscopic ornaments this holiday season. And, if you’ve whipped up your own fun holiday build, throw it on the tipsline!

Custom Christmas Light Controller Blocks Blinks

Finding that his recently purchased LED Christmas lights defaulted to an annoying blinking pattern that took a ridiculous seven button presses to disable each time they were powered up, [Matthew Millman] decided to build a new power supply that keeps things nice and simple. In his words, the goal was to enable “all lights on, no blinking or patterns of any sort”.

Connecting the existing power supply to his oscilloscope, [Matthew] found the stock “steady on” setting was a 72 VAC peak-to-peak square wave at about 500 Hz. To recreate this, he essentially needed to find a 36 VDC power supply and swap the polarity back and forth at the same frequency. In the end the closest thing he could find in the parts bin was a HP printer power supply that put out 30 volts, so the lights aren’t quite as bright as they were before, but at least they aren’t blinking.

To turn that into a pair of AC square waves, the power supply is connected to a common L298 H-Bridge module. You might expect a microcontroller to show up at this point, but [Matthew] went old school, and created his two alternating 500 Hz square waves with a 555 timer and a 74HC74D dual flip-flop.

Unfortunately, he didn’t have the time to get a custom PCB made before Santa’s big night. Though as he points out, since legitimate L298s are backordered well into next year anyway, having the board in hand wouldn’t have helped much. The end result is that the circuit has to live on a breadboard for the current holiday season, but hopefully around this time next year we’ll get a chance to see the final product.

Christmas Lithophanes Make Neat Decorations

Lithophanes are neat little artistic creations that use variations in the thickness of a material to reveal an image when lit from behind. 3D printing is a great way to make lithophanes, and they can make for beautiful Christmas decorations, too!

It’s easy to make lithophane decorations for your Christmas tree with the help of the ItsLitho tool. The online application takes any image you upload, and can generate lithophane geometry that you can 3D print at home. Print your custom bell or bauble, add the printed hooks, and then the final decoration can be backlit to reveal its image by inserting an LED from a string of Christmas lights.

The result is a beautiful, glowing decoration that displays a detailed image when lit up. All you need is a few images and a 3D printer to produce decorations as unique gifts for your family and friends.

We’ve seen the technique put to other uses too, such as in this convincing lamp designed after our very own Moon. Video after the break.

Continue reading “Christmas Lithophanes Make Neat Decorations”

Christmas Tree PCB Just The Trick For Festive Glee

The festive season is often as good a reason as any to get out the tools and whip up a fun little project. [Simon] wanted a little tchotchke to give out for the holidays, so they whipped up a Christmas tree PCB that’s actually Arduino-compatible.

O’ Christmas Tree, on PCB…

It’s a forward-looking project, complete with USB-C connector, future-proofing it for some time until yet another connector standard comes along. When plugged in, like many similar projects, it blinks some APA102 LEDs in a festive way. The PCB joins in on the fun, with white silkscreen baubles augmented by golden ones created by gaps in the soldermask.

An ATTiny167 is the brains of the operation, using the Micronucleus bootloader in a similar configuration to the DigiSpark Pro development board. It relies on a bit-banged low-speed USB interface for programming, but the functionality is largely transparent to the end user. It can readily be programmed from within the Arduino IDE.

It’s not an advanced project by any means, but is a cute giveaway piece which can make a good impression in much the same way as a fancy PCB business card. It could also serve as an easy tool for introducing new makers to working with addressable LEDs. Meanwhile, if you’ve been cooking up your own holiday projects in the lab, don’t hesitate to drop us a line!

USB LED Christmas Tree Is Making Spirits Bright

[Piotr SB] knows there is no way out of the holidays; the only path is through. You’ve got to find cheer wherever and however you can, so why not cater to your own interests and build the cutest little LED Christmas tree you ever did see? And did we mention it’s USB and absolutely free (as in carols, not eggnog)?

This O-Christmas tree is made up of concentric rings that are built into a tier as you solder the LEDs. And of course you’re supposed use the LED legs as supports! One leg from each LED — 18 green and a red one for the top. Because the PCB is not quite thick enough, you’ll need to add a plastic spacer to get it to stay in the USB port. Not only is this a nice design, the snowflakes and snowman on the silkscreen totally seal the cuteness deal.

Ever get so frustrated with your Christmas tree that you want to just empty a few rounds into the thing? No? Well, you’d have a good reason to if you built this Duck Hunt ornament.

Christmas tree PCB with Blinky Circuit

Is It Finally Time For Christmas Decorations?

[Arnov] is trying to get into the holiday spirit and is doing so the way he knows how. He was thinking of some cool decorations for his Christmas tree and decided the best decorations are the ones you make yourself, so he made his own blinky Christmas tree ornament.

The famed “blinky circuit” is certainly one that we are no strangers to here at Hackaday. Some of our readers will be very pleased to see that he did in fact use a 555 timer and not an Arduino. The 555 timer is wired to drive the clock pin of the CD4017 decade counter and the outputs of the decade counter are wired to the LEDs. The LEDs are lit up sequentially upon each low to high transition of the clock pulse though you may try getting creative with your LED wiring scheme to achieve different blinking effects.

What readers might really take away from this build is [Arnov] detailing how to import images into his CAD tool of choice, OrCAD in his case. We know that can be a bit tricky sometimes. Finally, we love that this project doubles as PCB art and a soldering challenge. It would definitely make for a good demo project at your next beginner soldering workshop.

Cool project [Arnov!]

Continue reading “Is It Finally Time For Christmas Decorations?”