Mat Boards Are Spendy, So DIY CNC Tool To The Rescue

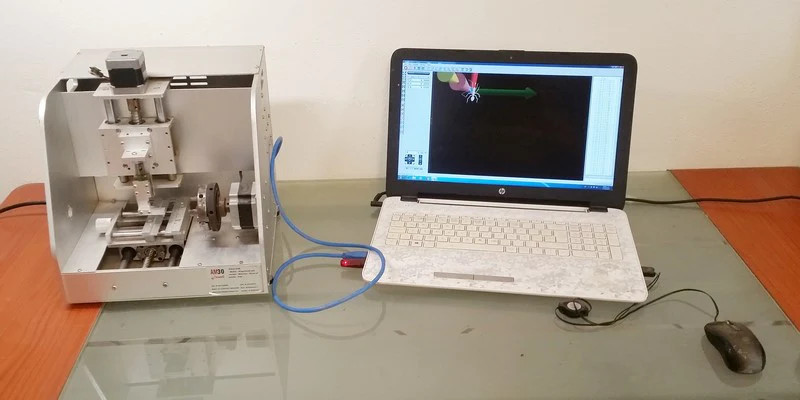
Mats are flat pieces of paper-based material that fill the space between a frame and the art within. They perform a number of aesthetic and practical functions, and they can also be expensive to purchase. Making them by hand is an option, but it’s an exacting process. [wooddragon48] felt that a CNC solution would serve this need nicely, and began designing a DIY CNC tool to do exactly that.

One of the tricky parts about cutting mat boards is that cuts are at an angle, and there is really no tolerance for overcuts or any kind of visual blemish. CNC control would seem to offer a great solution to both the need for precisely straight cuts, as well as fine control over where cuts begin and end in a way that opens the door to complex designs that would be impractical to do by hand.

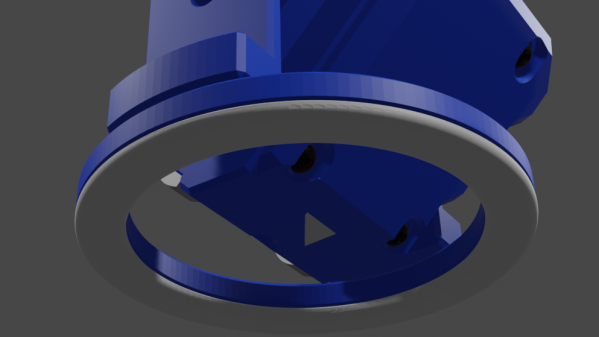
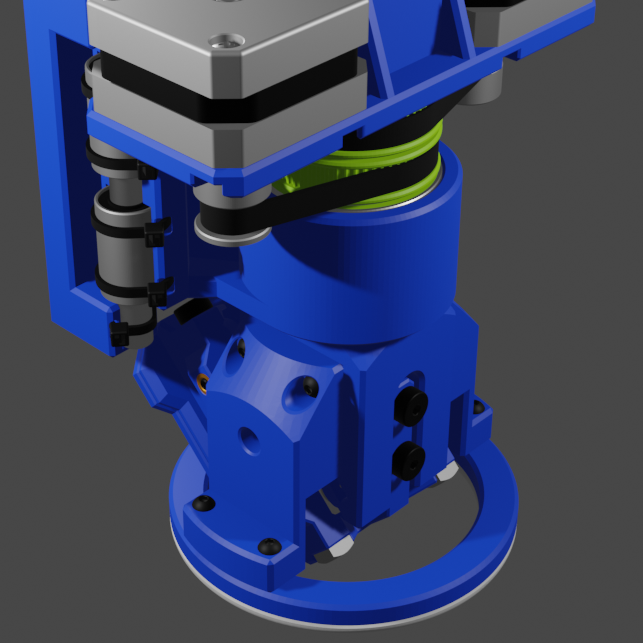
[wooddragon48]’s design has an angled cutter designed to plunge perfectly on demand, surrounded by a ring — similar to that on a router — which ensures the cutting tool is always consistently positioned with the material. It’s still in the design phase, but this is a type of tool that doesn’t yet exist so far as we can tell. The ability to CNC cut mat board, especially in complex designs, would be a huge timesaver.

Art and DIY CNC have a long history of happy intersection, as we have seen with a CNC router repurposed for string art, a CNC painting robot, and even an interactive abstract sculpture generator.

Wood game piece being carved by a CNC mill with a hacked rotary axis

This $12 CNC Rotary Axis Will Make Your Head Spin

[legolor] brings us a great, cheap rotary axis to add to your small 3 axis CNC mills. How are you going to generate G-Code for this 4th axis? That’s the great part, and the hack, that [legolor] really just swapped the Y axis for the rotation. To finish the workflow and keep things cheap accessible to all there’s a great trick to “unwrap” your 3D model so your CAM software of choice thinks it’s still using a linear Y axis and keeps your existing workflow largely intact. While this requires an extra step in Blender to do the unwrapping, we love the way this hack changes as little of the rest of your process as possible. The Blender script might be useful for many other purposes too.

Wood game pieces carved from wood by a CNC mill with a hacked rotary axis

The results speak for themselves too! We thought the 3D printed parts were suspect in a CNC setup, but for the small scale of game pieces and milling wood, the setup is stable enough to produce a surprisingly accurate and detailed finish. If you want to try the same approach with something larger or a tougher material, [legolor] has a suggestion of a tailstock setup that’s still under $100 USD. Continue reading “This $12 CNC Rotary Axis Will Make Your Head Spin”

CNC Feeds And Speeds, Explained As A First-Timer

If you’ve ever looked into CNC cutting tools, you’ve probably heard the term “feeds and speeds”. It refers to choosing the speed at which to spin the cutting tool, and how fast to plow it into the material being cut. They’re important to get right, and some of the reasons aren’t obvious. This led [Callan Bryant] to share his learned insights as a first-timer. It turns out there are excellent (and somewhat non-intuitive) reasons not to simply guess at the correct values!

A table of variables and how they relate to one another (click to enlarge).

The image above shows a tool damaged by overheating. [Callan] points out that as a novice, one might be inclined to approach a first cutting jobs conservatively, with a low feed rate. But doing this can have an unexpected consequence: a tool that overheats due to spinning too quickly while removing too little material.

CNC cutting creates a lot of heat from friction, and one way to remove that heat is by having the tool produce shavings, which help carry heat away. If a tool is making dust instead of shavings — for example if the feed rate is too conservative — the removed pieces will be too small to carry significant energy, and the tool can overheat.

[Callan] makes a table of variables at work in a CNC system in order to better understand their relationship before getting into making a formula for calculating reasonable feed and speed rates. Of course, such calculations are a reasonable starting point only, and it’s up to the operator to ensure things are happening as they should for any given situation. As our own Elliot Williams observed, CNC milling is a much more manual process than one might think.

Retired Welding Robot Picks Up Side Hustle As CNC Router

Who says you can’t teach an old robot new tricks? Nobody, actually. That saying is about dogs. But it applies to robots too, at least judging by the way this late-90s industrial beast was put to use in a way it was never intended: as a giant CNC router.

The machine in question is an ABB IRB6400, a six-axis, floor-mounted industrial machine that had a long career welding at a Eurorail factory in Austria before [Brian Brocken] made its acquaintance. He procured the non-working machine — no word on what he paid for it — and moved the 2-ton paperweight into his shop, itself a non-trivial endeavor. After a good scrubbing, [Brian] tried to get the machine started up. An error prevented the robot controller from booting; luckily, there’s a large community of ABB users, and [Brian] learned that one of the modules in the controller needed replacement.

After fixing that — and swapping out the controller’s long-dead backup batteries, plus replacing the original 1.44 MB floppy drive with a USB drive — he was able to bring the machine back to life. Unfortunately, the limited amount of internal memory made it difficult to use for anything complicated, so [Brian] came up with an application to stream coordinates to the controller over a serial port, allowing for unlimited operation. With that in place, plus a simple spindle mounted to the robot’s wrist with a 3D printed adapter, [Brian] was able to carve foam blocks into complex shapes. The video below shows everything from delivery to first chips — well, dust at least.

This build seems to be a significant escalation from [Brian]’s previous large-format CNC machine. He must have something interesting in mind, so stay tuned for details.

Continue reading “Retired Welding Robot Picks Up Side Hustle As CNC Router”

CNC Intaglio-Esque Engraving

Intaglio is an ancient carving technique for adding details to a workpiece, by manually removing material from a surface with only basic hand tools. If enough material depth is removed, the resulting piece can be used as a stamp, as was the case with rings, used to stamp the wax seals of verified letters. [Nicolas Tranchant] works in the jewelry industry, and wondered if he could press a CNC engraving machine into service to engrave gemstones in a more time-efficient manner than the manual carving methods of old.

Engraving and machining generally work only if the tool you are using is mechanically harder than the material the workpiece is made from. In this case, this property is measured on the Mohs scale, which is a qualitative measurement of the ability of one (harder) material to scratch another. Diamond is the hardest known material on the Mohs scale and has a Mohs hardness of 10, so it can produce a scratch on the surface of say, Corundum — Mohs value 9 — but not the other way around.

[Nicolas] shows the results of using a diamond tip equipped CNC engraver on various gemstones typical of Intaglio work, such as Black Onyx, Malachite, and Amethyst with some details of the number of engraving passes needed and visual comparison to the same material treated to traditional carving.

Let’s be clear here, the traditional intaglio process produces deep grooves on the surface of the workpiece and the results are different from this simple multi-pass engraving method — but limiting the CNC machine to purely metal engraving duties seemed a tad wasteful. Now if they can only get a suitable machine for deeper engraving, then custom digitally engraved intaglio style seal rings could be seeing a comeback!

Intaglio isn’t just about jewelry of course, the technique has been used in the typesetting industry for centuries. But to bring this back into ours, here’s a little something about making a simple printing press.

3 Ways To DIY Custom CNC Dust Covers

Home shop machinists know dust shields are important for keeping swarf out of expensive linear rails and ball screws. [Petteri Aimonen] demonstrates three inexpensive ways to DIY some bellows-style dust covers. Such things can of course be purchased, but they’re priced at a premium and not always available in the size one needs.

A bellows-style dust cover ideally maximizes extension length while minimizing side wall distortion. It should hold its shape without external support.

The first method is to fold a suitable flat plastic or paper sheet into a bellows pattern. This method is all about the fold pattern, and thankfully, there’s no need to reinvent the wheel. [Petteri] used a fellow enthusiast’s bellows folding pattern generator which is, believe it or not, itself inspired by a remarkably comprehensive US Patent Number 6,054,194.

The downside to this method is the thickness of the bellows when it is fully collapsed. The corners always contain the most material, because it is there that the material is folded upon itself, and this limits how close to the end of travel the CNC carriage can move with the bellows attached.

The second method is to cut a large number of C-shaped sections from fabric and sew them together to make bellows. This method collapses down well and holds its shape well, but the cutting and sewing it requires can be a barrier.

The final method — and the one [Petteri] found most useful — was to hack some IKEA window blinds. IKEA Schottis pleated blinds are inexpensive, with a slick finish on one side and polyester fabric.  The polyester is perfect for gluing. By cutting the material at a 45-degree angle into three sections and gluing them into a U-shape, one can create a serviceable bellows-style cover for a minimum of work.

Any of the explored methods can do the job, but [Petteri] has formulas to determine the maximum extensions and folded thicknesses of each method just in case one would like to see for themselves before choosing. And if a bellows-style cover isn’t your cup of tea, check out this method for turning a plastic strip into a spring-like tube that does the same job.

Hackaday Podcast 204: Cesium, Colorful Cast Buttons, And CNC Pizza

This week, Editor-in-Chief Elliot Williams and Assignments Editor Kristina Panos met up over thousands of miles to discuss the hottest hacks of the past seven days. There’s a whole lot of news this week, and the really good part is the the small radioactive source that went missing in Australia has been found. Phew!

Kristina is still striking out on What’s That Sound, but we’re sure you’ll fare better. If you think you know what it is, fill out the form and you’ll be entered to win a coveted Hackaday Podcast t-shirt!

Finally, we get on to the hacks with an atomic pendulum clock that’s accurate enough for CERN, safecracking the rough-and-ready way, and plenty of hacks that are non-destructive to nice, old things. We’ll gush over a tiny DIY adjustable wrench, drool over CNC pizza, and rock out to the sounds of a LEGO guitar/synthesizer thing.

Check out the links below if you want to follow along, and as always, tell us what you think about this episode in  the comments!

And/or download it and listen offline.

Continue reading “Hackaday Podcast 204: Cesium, Colorful Cast Buttons, And CNC Pizza”