Congratulations To Our Op-Amp Challenge Winners!

The real world is analog, and the op-amp is the indispensable building block of many analog circuits. We wanted to give you analog fanatics out there a chance to shine and to encourage our digital brothers and sisters to dip their toes in the murky waters where ones and zeroes define the ends of a spectrum rather than representing the only choice. Hence, we presented the Op Amp Challenge. And you did not disappoint!

We received 83 entries, and it was extraordinarily hard to pick the winners. But since we had three $150 DigiKey shopping sprees to give away, our six judges buckled down and picked their favorites. Whether or not you’ve got the Golden Rules of the ideal op-amp tattooed on your arm, you’ll enjoy looking through all of the projects here. But without further ado…

The Winners

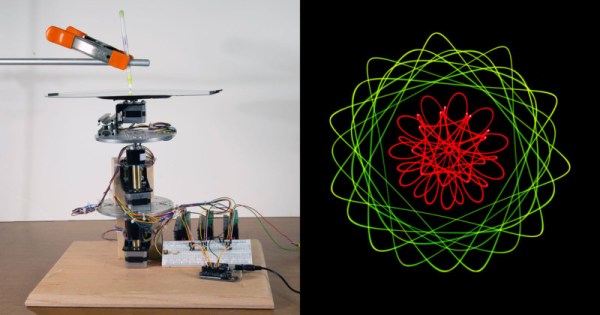
[Craig]’s Op Art is an X-Y voltage generator to plug into an oscilloscope and make classic Lissajous and other spirograph-like images, and it’s all done in analog. Maybe it was his incredible documentation, the nice use of a classic three-op-amp tunable oscillator, or the pun hidden in the title. Whatever the case, it wowed our judges and picked up a deserved place in the top three.

Hearkening back to the pre-digital dinosaur days, [Rainer Glaschick]’s Flexible Analog Computer is a modular analog computer prototyping system on a breadboard backplane. Since you have to re-wire up an analog computer for your particular, it’s great that [Rainer] gave us a bunch of examples on his website as well, including a lunar lander and classic Lorenz attractor demos.

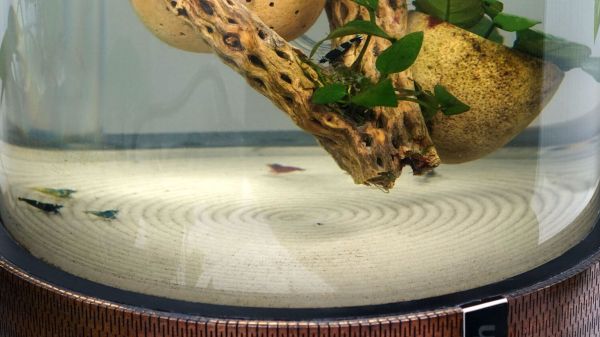
And there was no way that [Chris]’s interactive analog LED wave array wouldn’t place in the top three. It’s a huge 2D analog simulation that runs entirely on op-amps, sensing when your hand moves across any part of its surface and radiating waves out from there. You have to admire the massive scale here, and you simply must check out the video of it in action. Glorious!

Continue reading “Congratulations To Our Op-Amp Challenge Winners!”

Dear Ubuntu…

Dear Ubuntu,

I hope this letter finds you well. I want to start by saying that our time together has been one of creativity and entertainment, a time in which you gave me the tools to develop a new career, to run a small electronics business, make fun things, and to write several thousand articles for Hackaday and other publications, but for all that it’s sadly time for our ways to part. The magic that once brought us together has faded, and what remains is in danger of becoming a frustration.

In our early days as an item you gave me for the first time a Linux distro that was complete, fast, and easy to use without spending too much time at the CLI or editing config files to make things happen; you gave me a desktop that was smooth and uncluttered, and you freed me from all those little utilities that were required to make Windows usable. You replaced the other distros I’d been using, you dual-booted with my Windows machines, and pretty soon you supplanted the Microsoft operating system entirely.

Ubuntu and me and a trusty Dell laptop, Oxford Hackspace, 2017.
Me and Ubuntu in 2017, good times.

We’ve been together for close to two decades now, and in that time we’ve looked each other in the eye across a variety of desktop and laptop computers. My trusty Dell Inspiron 640 ran you for over a decade through several RAM, HDD, and SSD upgrades, and provided Hackaday readers with the first few years of my writing. Even the Unity desktop couldn’t break our relationship, those Linux Mint people weren’t going to tear us asunder! You captured my text, edited my videos and images, created my PCBs and CAD projects, and did countless more computing tasks. Together we made a lot of people happy, and for that I will always be grateful. Continue reading “Dear Ubuntu…”

the SoM module used to power a Dell Mini 1210, in an extended SODIMM form-factor

When Dell Built A Netbook With An X86 System-on-Module

Just like with pre-touchscreen cellphones having fancy innovative features that everyone’s forgotten about, there’s areas that laptop manufacturers used to venture in but no longer dare touch. On Twitter, [Kiwa] talks a fascinating attempt by Dell to make laptops with user-replaceable CPU+RAM modules. In 2008, Dell released the Inspiron Mini 1210, with its CPU, chipset and RAM soldered to a separate board in an “extended SODIMM” form-factor – not unlike the Raspberry Pi Compute Modules pre-CM4! Apparently, different versions of such “processor cards” existed for their Inspiron Mini lineup, with varying amounts of RAM and CPU horsepower. With replacement CPU+RAM modules still being sold online, that makes these Dell netbooks to be, to our knowledge, the only x86 netbooks with upgradable CPUs.

You could try and get yourself one of these laptops or replacement CPU modules nowadays, if you like tinkering with old tech – and don’t mind having a subpar experience on even Linux, thanks to the Poulsbo chipset’s notorious lack of openness. Sadly, Dell has thoroughly abandoned the concept of x86 system-on-module cards, and laptops have been getting less modular as we go – we haven’t been getting socketed CPUs since the third generation of mobile Intel boards, and even RAM is soldered to the motherboard more and more often. In theory, the “CPU daughterboard” approach could improve manufacturing yields and costs, making it possible to use a simpler large board for the motherboard and only have the CPU board be high-layer-count. However, we can only guess that this wasn’t profitable enough overall, even with all the theoretical upsides. Or, perhaps, Google-style, someone axed this project internally because of certain metrics unmet.

If you think about it, a laptop motherboard is a single-board computer; however, that’s clearly not enough for our goals of upgradability and repairability. If you’re looking to have your own way and upgrade your laptop regardless of manufacturer’s intentions, here’s an old yet impressive story about replacing the soldered-in CPU on the original Asus EEE, and a more recent story about upgrading soldered-in RAM in a Dell XPS ultrabook. And if you’re looking for retrocomputing goodness, following [Kiwa] on Twitter is a must – last seen liveblogging restoration and renovation of a Kaypro someone threw out on the curb.

Linux Fu: The Ultimate Dual Boot Laptop?

I must confess, that I try not to run Windows any more than absolutely necessary. But for many reasons, it is occasionally necessary. In particular, I have had several laptops that are finicky with Linux. I still usually dual boot them, but I often leave Windows on them for one reason or another. I recently bought a new Dell Inspiron and the process of dual booting it turned out to be unusually effective but did bring up a few challenges.

If you ever wanted a proper dual-booting laptop, you’ll be interested in how this setup works. Sure, you can always repartition the drive, but the laptop has a relatively small drive and is set up very specifically to work with the BIOS diagnostics and recovery so it is always a pain to redo the drive without upsetting the factory tools.

Since the laptop came with a 512 GB NVMe drive, I wanted to upgrade the drive anyway. So one option would have been to put a bigger drive in and then go the normal route. That was actually my intention, but I wound up going a different way.

Continue reading “Linux Fu: The Ultimate Dual Boot Laptop?”

Light Painting With An 19th Century Inspired Plotter

The geometric chuck was a device that stacked up multiple rotating wheels that could vary their speed and their offset to a central shaft, in order to machine ornate designs using a lathe. It’s this piece of machining obscura from the 19th century that inspired this light painting build from [Ted Kinsman].

Rather than the complicated gears and wheels used in the distant past, [Ted] instead elected to use stepper motors. Three stepper motors are stacked on top of each other, each one able to rotate at an independent rate. The design only implements three steppers as the slip rings needed to send power and control signals to each stepper are prohibitively expensive.

An Arduino is programmed to run the show, changing the speed of each motor and thus the patterns the system generates. Put LEDs on the spinning plates, or install a pen to mark a piece of paper, and it’s possible to generate all manner of beautiful spirograph-like patterns. Vary the motor speeds or the positioning of the lights, and the patterns vary in turn.

It’s a fun build for light painting, with some great visuals produced. We also appreciate the use of the Arduino which makes varying the parameters far easier than having to change out gearsets in classical designs.

If you miss the old school spirograph, you can always build one out of Lego. Else, consider experimenting with other light painting techniques. If you’ve built a fancy rig of your own, be sure to let us know!

[Thanks to zit for the tip!]

Jigsaw Puzzle Lights Up With Each Piece

Putting the last piece of a project together and finally finishing it up is a satisfying feeling. When the last piece of a puzzle like that is a literal puzzle, though, it’s even better. [Nadieh] has been working on this jigsaw puzzle that displays a fireworks-like effect whenever a piece is placed correctly, using a lot of familiar electronics and some unique, well-polished design.

The puzzle is a hexagonal shape and based on a hexagonally symmetric spirograph, with the puzzle board placed into an enclosure which houses all of the electronics. Each puzzle piece has a piece of copper embedded in a unique location so when it is placed on the board, the device can tell if it was placed properly or not. If it was, an array of color LEDs mounted beneath a translucent diffuser creates a lighting effect that branches across the entire board like an explosion. The large number of pieces requires a multiplexer for the microcontroller, an ATtiny3216.

This project came out of a FabAcademy, so the documentation is incredibly thorough. In fact, everything on this project is open sourced and available on the project page from the code to the files required for cutting out the puzzle pieces and the enclosure. It’s an impressive build with a polish we would expect from a commercial product, and reminds us of an electrified jigsaw puzzle we saw in a previous build.

Thanks to [henk] for the tip!

Aquarium Plotter Shows Sisyphish’s Submerged Sand Stripes

Sisyphus is cursed to roll a boulder up a hill for eternity. Pet fish generally content themselves to swimming the same lap over and over in a glass tank. Perpetuity can be soothing, so long as you’re not shouldering a boulder.

[Zach Frew] wants to integrate and automate the boulder on a smaller scale and one that can benefit his aquarium full of colorful Taiwanese bee shrimp. Instead of an inert rock and a Greek, Sisyphish uses a magnet and servo motors connected to a microcontroller to draw Spirograph-style shapes in the tank’s sand.

There are a couple of gears beneath the tank to trace the geometric patterns but they’re clear of any water. One gear rotates about the center of the cylindrical tank while the other holds a magnet and adjusts the distance from the center. Pilots, and select nerds, will recognize this as rho-theta positioning. Despite the uncommon coordinate system, the circular plotter accepts G-code. We love when math gets turned into gorgeous designs, and shrimp love when those tasty microbes get shaken from their gravelly hiding places.

We adore the dry sand plotters that came before, and Sisyphus himself appeared in a LEGO format that made us question our proficiency with the blocks.

Continue reading “Aquarium Plotter Shows Sisyphish’s Submerged Sand Stripes”