AM Radio Broadcast Uses Phasor To Let Eight Towers Spray One Big Signal

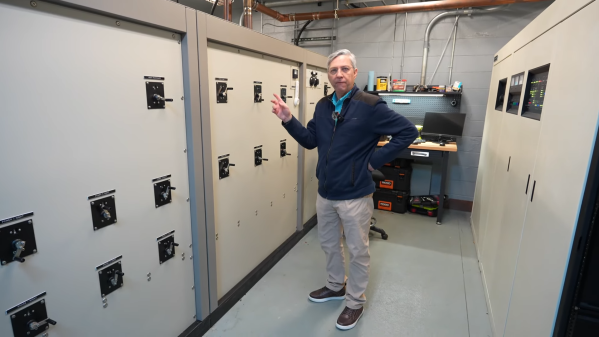
If you’re in the commercial AM radio business, you want to send your signal as far and wide as possible. More listeners means you can make more ad revenue, after all. [Jeff Geerling] recently visited a tower site for WSDZ-AM, which uses a full eight towers to broadcast its 20kW AM signal. To do that, it needs a phasor to keep everything in tune. Or, uh… phase.

The phasor uses a bunch of variable inductors and capacitors to manage the phase of the signal fed to each tower. Basically, by varying the phase of the AM signal going to each of the 8 transmitter towers, it’s possible to tune the directionality of the tower array. This allows the station to ensure it’s only broadcasting to the area it’s legally licensed to do so.

The tower array is also configured to broadcast slightly differently during the day and at night to account for the differences in propagation that occur. A certain subset of the 8 towers are used for the day propagation pattern, while a different subset is used to shape the pattern for the night shift. AM signals can go far farther at night, so it’s important for stations to vary their output to avoid swamping neighbouring stations when the sun goes down.

[Jeff’s] video is a great tour of a working AM broadcast transmitter. If you’ve ever wondered about the hardware running your local commercial station, this is the insight you’re looking for. AM radio may be old-school, but it continues to fascinate us to this day. Video after the break.

Continue reading “AM Radio Broadcast Uses Phasor To Let Eight Towers Spray One Big Signal”

Solar Panel Keeps Cheap Digital Calipers Powered Up

There’s no doubt that cheap digital calipers are useful, especially when designing 3D-printed parts. Unfortunately, cheap digital calipers are also cheap, and tend to burn through batteries quickly. Sure, you can remove the battery when you’re done using them, but that’s for suckers — winners turn to solar power to keep their calipers always at the ready.

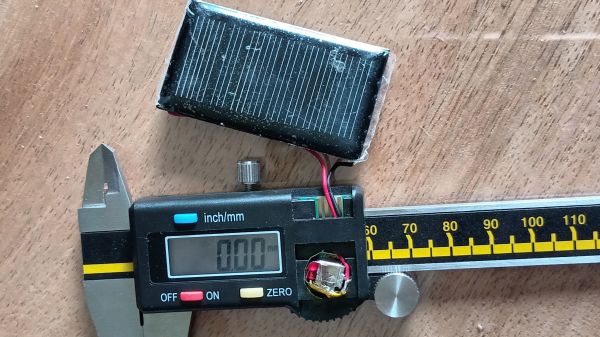
[Johan]’s solar upgrade begins with, unsurprisingly, a solar cell, one that just fits on the back of his digital calipers. Like most of these cheap calipers, this one is powered by a single 1.5 V LR44 button cell, while the polycrystalline solar cell is rated for 5 V, so [Johan] used a red LED as a crude voltage regulator. He also added a stack of fourteen 100 μF SMD capacitors soldered together in parallel. The 1206 devices form a 1,400 μF block that’s smaller than the original button cell so that everything fits in the vacated battery compartment. It’s pretty slick.

Given their agreeable price point, digital calipers are a tempting target for hacking. We’ve seen a ton of them, from accessibility add-ons to WiFi connectivity and even repurposing them for use as DROs. Ever wonder how these things work? We’ve looked at that, too.

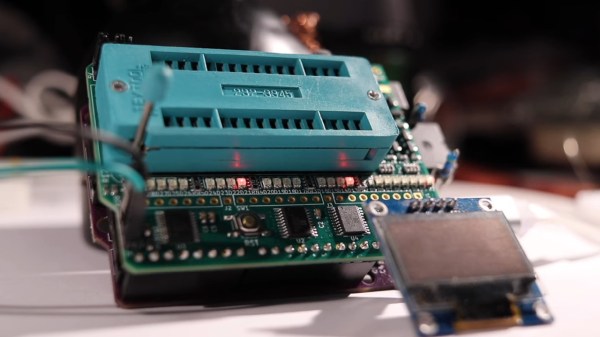
The ROM programmer on display, with an OLED screen attached

Relatively Universal ROM Programmer Makes Retro Tech Hacking Accessible

There’s treasures hidden in old technology, and you deserve to be able to revive it. Whether it’s old personal computer platforms, vending machines, robot arms, or educational kits based on retro platforms, you will need to work with parallel EEPROM chips at some point. [Anders Nielsen] was about to do just that, when he found out that a TL866, a commonly used programmer kit for such ROMs, would cost entire $70 – significantly raising the budget of any parallel ROM-involving hacking. After months of work, he is happy to bring us a project – the Relatively Universal ROM Programmer, an open-source parallel ROM programmer board that you can easily assemble or buy.

Designed in the Arduino shield format, there’s a lot of care and love put into making this board as universal as reasonably possible, so that it fits any of the old flash chips you might want to flash – whether it’s an old UV-erasable ROM that wants a voltage up to 30 V to be written, or the newer 5 V-friendly chips. You can use ICs with pin count from 24 to 32 pins, it’s straightforward to use a ZIF socket with this board, there’s LED indication and silkscreen markings so that you can see and tweak the programming process, and it’s masterfully optimized for automated assembly.

You can breadboard this programmer platform as we’ve previously covered, you can assemble our own boards using the open-source files, and if you don’t want to do either, you can buy the assembled boards from [Anders Nielsen] too! The software is currently work in progress, since that’s part of the secret sauce that makes the $70 programmers tick. You do need to adjust the programming voltage manually, but that can be later improved with a small hardware fix. In total, if you just want to program a few ROM chips, this board saves you a fair bit of money.

Continue reading “Relatively Universal ROM Programmer Makes Retro Tech Hacking Accessible”

Let The Solder Scroll Take Care Of Your Feed Needs

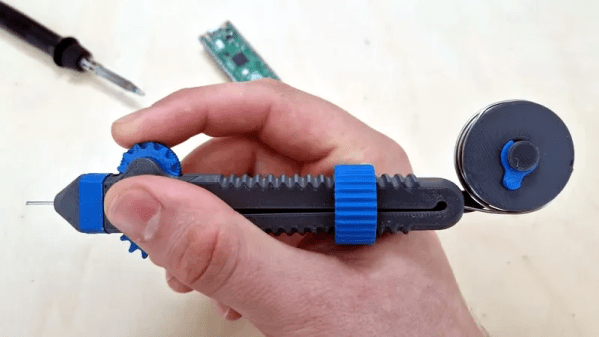
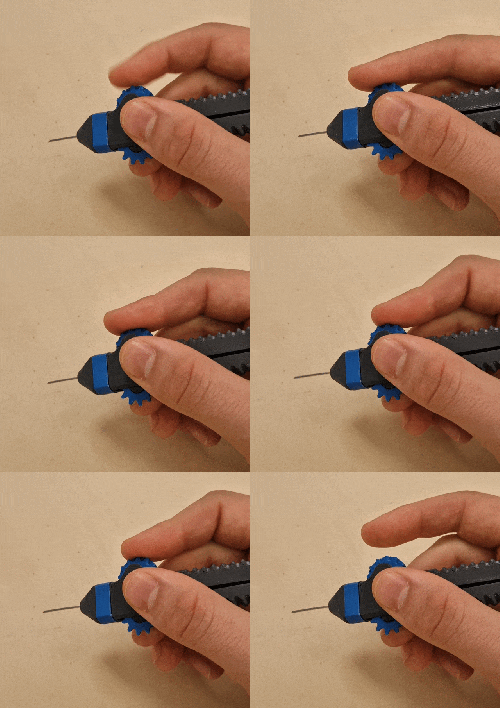
[Victor]’s nifty tool the Solder Scroll is a handheld device that lets one feed solder out simply by turning something a little like a scroll wheel. It looks like an intuitive and comfortable design that can adapt to a wide variety of solder thicknesses, and is entirely 3D printed.

One part we particularly like is the feed system. One rolls a wheel which feeds solder out using a mechanism a lot like extrusion gears in many 3D printer hot ends. Both wheels have ridged surfaces that grip and feed the solder; their gears mesh with one another so that moving one moves both in unison.

Solder feed tools like this have seen all kinds of interesting designs, because while the problem is the same for everyone, there are all kinds of different ways to go about addressing it. We love this one, and we have seen many other takes that range from a powered, glove-mounted unit to an extremely simple tool with no moving parts. We’ve even seen a method of hacking a mechanical pencil into a new role as a solder feeder.

The Long And The Short Of It

Last weekend was Hackaday Europe 2024, and it was great. Besides having some time to catch up with everyone, see some fun new badge hacks, and of course all the projects that folks brought along, I also had time to attend most all of the talks. And the talks were split into two distinct sections: long-format talks on Saturday and a two-hour session of seven-minute lightning talks on Sunday.

I don’t know if it’s our short attention spans, or the wide range of topics in a short period of time, but a number of people came up after the fact and said that they really appreciated the short-but-sweet format. One heretic even went so far as to suggest that we only have lightning talks in the future.

Well, we’ve done that before – the Hackaday Unconferences. One year, we even ran three of them simultaneously! I was at Hackaday’s London Unconference the year later, and it was a blast.

But I absolutely appreciate the longer talks too. Sometimes, you just have to give a speaker free rein to dig really deeply into a topic. When the scope of the project warrants it, there’s just no substitute for letting someone tell the whole story. So I see a place for both!

If you were at Hackaday Europe, or any other conference with a lightning talks track, what do you think? Long or short? Or a good mix?

Bad Experiences With A Cheap Wind Turbine

If you’ve got a property with some outdoor space and plenty of wind, you might consider throwing up a windmill to generate some electricity. Indeed, [The Broject List] did just that. Only, his experience was a negative one, having purchased a cheap windmill online. He’s warning off others from suffering the same way by explaining what was so bad about the product he bought.

The windmill in question was described as a “VEVOR Windturbine”, which set him back around 100 euros, and claimed to be capable of producing 600 watts at 12 volts. He starts by showing how similar turbines pop up for sale all over the Internet, with wildly inflated specs that have no relation to reality. Some sellers even charge over 500 euros for the same basic device.

He then demonstrates the turbine operating at wind speeds of approximately 50 km/h. The output is dismal, a finding also shared by a number of other YouTube channels out there. Examining the construction of the wind turbine’s actual generator, he determines that it’s nowhere near capable of generating 600 watts. He notes the poorly-manufactured rotor and aluminium coils as particular disappointments. He concludes it could maybe generate 5 watts at most.

Sadly, it’s easy to fall into this trap when buying online. That’s where it pays to do your research before laying down your hard-earned cash. Continue reading “Bad Experiences With A Cheap Wind Turbine”

3D Printer Streaming Solution Unlocks Webcam Features

While 3D printer hardware has come along way in the past decade and a half, the real development has been in the software. Open source slicers are constantly improving, and OctoPrint can turn even the most basic of printers into a network-connected powerhouse. But despite all these improvements, there’s still certain combinations of hardware that require a bit of manual work.

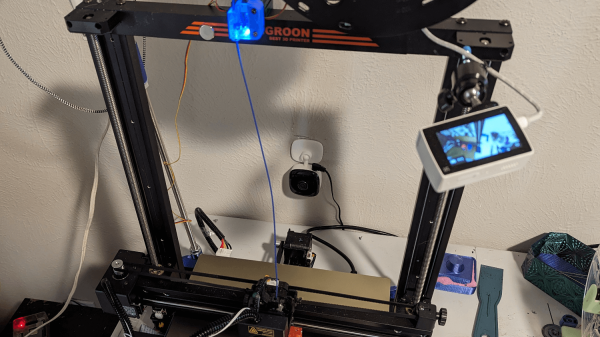
[Reticulated] wanted an easy way to monitor his prints over streaming video, but didn’t have any of the cameras that are supported by OctoPrint. Of course he could just point a cheap network-connected camera at the printer and be done with it, but he was looking for a bit better integration than that. In the process, he demonstrates how to unlock some features hidden in inexpensive webcams.

He set about building something that wouldn’t require buying more equipment or overloading the limited hardware responsible for the actual printing. A few of his existing cameras have RTMP support, which allows a fairly straightforward setup with YouTube Live once Monaserver is set up to handle the RTMP feeds from the cameras and OBS Studio is configured to stream it out to YouTube. Using the OctoPrint API, he was able to pull data such as the current extruder temperature and overlay it on the video.

One of the other interesting parts of this build is that not all of [Reticulated]’s cameras have built-in RTMP support but following this guide he was able to get more of them working with this setup than otherwise would have had this capability by default. Even beyond 3D printing, this is an excellent guide (and tip) for getting a quick live stream going for whatever reason. For anything more mobile than a working 3D printer, though, you might want to look at taking your streaming setup mobile instead.