Smooth 3D Prints With Alcohol

There was a time when most 3D printers used ABS, which is a great plastic for toughness, but is hard to print with since it tends to warp. Worse still, it stinks and the fumes may be bad for you. Most people have switched over to printing in PLA these days, but one thing you might miss with this more forgiving plastic is vapor smoothing with acetone; a smoothed print doesn’t show layer lines and looks more like plastic part that didn’t go through a nozzle.

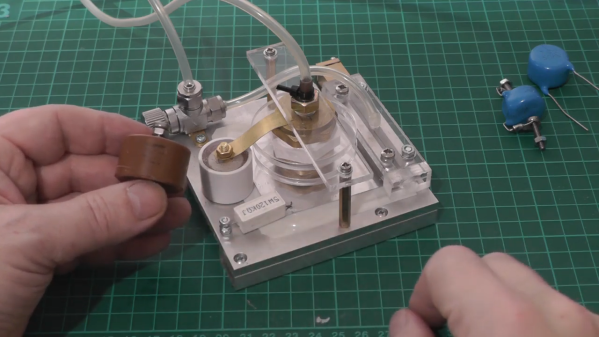
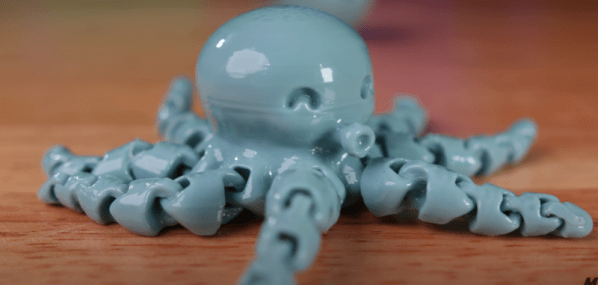
[Major Hardware] likes the look of vapor smoothed parts, but doesn’t like working with ABS and acetone fumes, so he’s started using Polysmooth. As you can see in the video below, the results look good, but be warned that the filament is relatively pricey. Plus you need to use a $300 machine that atomizes your alcohol into a mist. We feel certain you could do the same thing for less since it appears to just be like a humidifier, but we’d also suggest being careful putting flammable substances in a consumer-grade humidifier and certainly don’t use a vaporizer.

The filament sounds like it is on par with PLA for ease of printing. The material has a higher glass temperature than PLA but less than ABS. The tensile strength and Young’s modulus (a measure of stiffness) numbers are comparable to ABS. Although all smoothing has some imperfections and you probably need to experiment with times and other parameters. The smoothing did fuse some movable joints, so anything that moves or fits together is probably a bad candidate for this process. We’ve also heard that thin-walled parts can get soft in water due to alcohol residue, but you can dry or soak the part clean to avoid that.

If you want to try your own hand at making a mist, this might get you started. After all, if it can handle acetone, we imagine alcohol isn’t any worse. While it isn’t as easy to handle as alcohol, we hear the solvents such as THF or ethyl acetate can smooth regular PLA. Heat guns and open flames are popular, too.

Continue reading “Smooth 3D Prints With Alcohol”

Homebrew Doorknob Caps For High-Voltage Fun

Mouser and Digi-Key are great for servicing most needs, and the range of parts they offer is frankly bewildering. But given the breadth of the hardware hacking community’s interests, few companies could afford to be the answer to everyone’s needs.

That’s especially true for the esoteric parts needed when one’s hobby involves high voltages and homemade lasers, like [Les Wright]. He recently came up with a DIY doorknob capacitor design that makes the hard-to-source high-voltage caps much easier to obtain. We’ve seen [Les] use these caps in his transversely excited atmospheric (TEA) lasers, a simple design that uses high-voltage discharge across a long, narrow channel filled with either room air or nitrogen. The big ceramic caps are needed for the HV supply, and while [Les] has a bunch, they’re hard to come by online. He tried a follow-up using plain radial-lead ceramic capacitors, and while the laser worked, he did get some flashover between the capacitor leads.

[Les]’s solution was to dunk the chunky caps in acetone for a week or so to remove their epoxy covering. Once denuded, the leads were bent into a more axial configuration and soldered to brass machine screws. The dielectric slug is then put in a small section of plastic tubing and potted in epoxy resin with the bolts protruding from each end. The result is hard to distinguish from a genuine doorknob cap; the video below shows the build process as well as some testing.

Hats off to [Les] for taking pity on those of us who want to replicate his work but find ourselves without these essentials. It’s nice to know there’s a way to make unobtanium parts when you need them.

Continue reading “Homebrew Doorknob Caps For High-Voltage Fun”

Casting Skateboard Wheels With A 3D Printed Mold

We’ll admit that most of the Hackaday staff wouldn’t get too far on a skateboard, but that doesn’t mean we can’t appreciate the impressive DIY wheels that [Chris McCann] has managed to cast using 3D printed molds. From unique color combinations to experimental materials, the process certainly opens up some interesting possibilities for those looking to truly customize their rides. Though it’s worth noting there’s a certain element of risk involved; should a set of homemade wheels fail at speed, it could go rather poorly for the rider.

Both the STL and STEP files for the mold have been released under the Creative Commons Attribution 4.0 license, meaning anyone with a 3D printer can follow along at home. Unfortunately, it’s not quite as simple as clicking print and coming back to a usable mold. Because of the layer lines inherent to FDM 3D printing, the inside of the mold needs to be thoroughly sanded and polished. [Chris] mentions that printing the mold in ABS and using vapor smoothing might be a workable alternative to elbow grease and PLA, but he hasn’t personally tried it yet.

Once you’ve got the three part mold printed, smoothed, and coated with an appropriate release agent like petroleum jelly, it’s time to make some wheels. The core of each wheel is actually 3D printed from PETG, which should give it pretty reasonable impact resistance. If you have access to a lathe, producing aluminum cores shouldn’t be too difficult either. With the core loaded into the mold, urethane resin is poured in through the top until all the empty space is filled.

But you’re not done yet. All those little air bubbles in the resin need to be dealt with before it cures. [Chris] puts his filled molds into a pressure chamber, though he mentions that vacuum degassing might also be a possibility depending on the urethane mixture used. After everything is solidified, the mold can easily be taken apart to reveal the newly cast wheel.

While there’s often some trial and error involved, 3D printing and resin casting are an undeniably powerful combination. If you can master the techniques involved, you can produce some very impressive parts that otherwise would be exceptionally difficult to produce on a hacker’s budget. Especially when you’re ready to start casting molten metal.

Continue reading “Casting Skateboard Wheels With A 3D Printed Mold”

See This Casio? Watch It Unlock My Tesla!

The whole point of gaining the remote unlock ability for our cars was to keep us from suffering the indignity of standing there in the rain, working a key into the lock while the groceries get soaked. [Mattia Dal Ben] reports that even Teslas get the blues and don’t unlock reliably all the time, in spite of the price tag.

[Mattia] decided that a spare key card might be good to have around, and that building it into his Casio F-91W watch would put the key as close at hand as it could be without getting an implant.

After programming a new J3A040-CL key card to match the car, getting the chip out was the easy part — just soak it in acetone until you can peel the layers apart. Then [Mattia] built a fresh antenna for it and wound it around the inside of a 3D printed back plate.

The hardest part seems to be the tuning the watch antenna to the resonant frequency expected by the car-side antenna. [Mattia] found that a lot of things mess with the resonant frequency — the watch PCB, casing, and even the tiny screws holding the thing together each threw it off a little bit.

Since the watch is less comfortable now, [Mattia] thought about making a new back from transparent resin, which sounds lovely to us. It looks as though the new plan is to move it to the front of the watch, with a resin window to show off the chip. That sounds pretty good, too. Check out the secret unlocking power after the break.

Casio watches are great, though we are more into the calculator models. Someone out there loves their F-91W so much that they made a giant wall clock version.

Continue reading “See This Casio? Watch It Unlock My Tesla!”

3D Printed Speaker Uses DSP For Ultimate Performance

Speaker design used to be as much about woodwork as it was about advanced acoustic mathematics. In recent decades, technologies such as digital signal processing and 3D printing have changed the game significantly. Leaning heavily on these techniques, [ssashton] developed a design called Mr. Speaker.

The speaker contains a 3″ woofer for good bass response, and twin tweeters to deliver stereo audio. Using WinISD to help do the requisite calculations on porting and volume, [ssashton] designed a swooping 3D printed enclosure with a striking design. Sound comes into the unit through an off-the-shelf Bluetooth module, before being passed to an ADAU1401 digital signal processing unit. From there, it’s passed to a mono amp to drive the woofer and a stereo one for the tweeters.

To get the flattest frequency response possible and maintain linear phase, it’s all about DSP in this case. RePhase software was used to design a DSP filter to achieve these goals, helping the speaker to produce the desired output. The ADAU1401 DSP was then programmed using Sigma Studio, which also allows the designer to do things such as split outputs for seperate woofer and tweeter drives.

[ssashton] does a great job of explaining both DSP principles and old-school speaker design tricks, from phase plugs to reflections. The use of 3D printed parts to rapidly iterate the design is impressive, too. We’d love to see the final enclsoure get an acetone smoothing treatment to really take it over the edge.

If you’re into serious speaker design and want more, be sure to check out this advanced transmission line design. For those of you with your own builds with some nifty tricks, drop us a note on the tipline.


PCB Jewelry Never Looked So Good

[Gautchh] wanted to make something nice for his girlfriend. Being the DIY enthusiast he is, he thought a hand-made gift would resonate with her better than something he could pick up from the store. Enter NeckLight, a glow in the dark PCB necklace. He was first inspired by another project he ran across on Instructables, then decided to put his own little spin on the design. It’s cool how that works. Interestingly enough, it was his first time using Fusion 360, but you probably wouldn’t know that if you took a look at the results.

Aside from soldering, the trickiest part of this project was trying to get the LED intensities just right. [Gautchh] found the best way to do this was experimentally by testing each LED color with a series of resistors. He wanted to ensure he could get the color intensity and the LED current just right. Finally, with a touch of acetone, he was done (though he might want to try some alternatives to acetone next time).

[Gautchh] also thinks that this project would be a really nice way for beginners to learn surface mount (SMD) soldering. We’ve seen a few cool SMD LED projects before. Who could forget those competitive soldering challenges over at DEF CON?

Anyway. Thanks, [Gautchh]. We hope your girlfriend, and your dog, enjoyed their gifts.

Cheap Alternative Solvents For PCB Cleaning

If you’re in the habit of using isopropyl alcohol to clean your PCBs after soldering, you probably have a nice big jug of the stuff stashed away. If you don’t, you’re probably out of luck, since the COVID-19 pandemic has pretty much cleared IPA out of the retail market. But don’t fret: depending on where you live, alternative PCB cleaning solutions may be as close as your nearest auto parts store.

[Steven]’s search for a cheaper and perhaps more readily available substitute for his usual dedicated flux cleaner lead him to try automotive brake cleaner on a few test boards. He suspected that they might contain acetone, which is prone to yield unfortunate results with solder resist and silkscreen on PCBs, so some tests were in order. The brand he tried was Normfest Bremsenreiniger MC-1, a German brand that according to its Safety Data Sheet contains only hydrocarbons like alkanes, butane, and propane. It did a fine job cleaning all but the crustiest rosin flux without collateral damage.

In the video below, [Steven] goes through a few more brands with similar results, and we were encouraged enough by his results to check brake cleaners made for the US market. Alas, almost all of the cheap and readily available aerosols have acetone as the principle ingredient, mixed in with methanol, ethanol, and assorted ingredients that together will probably make for a bad day. About the only US-sold brand without acetone that we could find was Keller-Heartt, which lists only naptha and ethanol on its SDS. There may be others, but make sure you test whatever you find.

Aerosol solvents aren’t the only way to clean a PCB, of course. Ultrasonic cleaners do a great job, and as [Steven] discovered, they’re generally safe for most components.

Continue reading “Cheap Alternative Solvents For PCB Cleaning”