NASA’s Ingenuity Mars Helicopter Transitions Into Stationary Testbed

On April 16th NASA announced the formal end to Ingenuity’s days as the first ever Martian helicopter, following its 72nd and final flight mission in January. This flight ended with a rough landing during which the helicopter’s blades got damaged and separated, leaving the plucky flying machine with its wings clipped. During the final meet-up of the Mars Helicopter Team there was cake, but none for Ingenuity as its latest data set was reviewed by the team from 304 million kilometers away. This data confirms the latest software patch allows it to work stand-alone as a data collection platform.

With these latest software changes, Ingenuity will wake up daily, activate its computers and perform a self-check of all its components before collecting sensor data and images. The main goal of this is to collect long-term performance data on the helicopter’s systems, with enough onboard memory to allow for measurements to be stored for around 20 years. This means that although the Perseverance rover will have to trundle on without its flying mission buddy, one day in the future another rover, helicopter or primate will presumably drop by to either communicate with Ingenuity if it’s still alive, or harvest its memory unit for data retrieval.

Thanks to [Mark Stevens] for the tip.

Build Your Own RGB Fill Light For Photography

Photography is all about light, and capturing it for posterity. As any experienced photographer will tell you, getting the right lighting is key to getting a good shot. To help in that regard, you might like to have a fill light. If you follow [tobychui]’s example, you can build your own!

Colors!

The build relies on addressable WS2812B LEDs as the core of the design. While they’re not necessarily the fanciest LEDs for balanced light output, they are RGB LEDs, so they can put out a ton of different colors for different stylistic effects. The LEDs are under the command of a Wemos D1, which provides a WiFI connection for wireless control of the light.

[tobychui] did a nice job of building a PCB for the project, including heatsinking to keep the array of 49 LEDs nice and cool. The whole assembly is all put together inside a 3D printed housing to keep it neat and tidy. Control is either via onboard buttons or over the WiFi connection.

Files are on GitHub if you’re seeking inspiration or want to duplicate the build for yourself. We’ve seen some other similar builds before, too. Meanwhile, if you’re cooking up your own rad photography hacks, don’t hesitate to let us know!

PC Watercooling Prototype Is Pumpless

Watercooling is usually more efficient than air cooling for the same volume of equipment, and — important for many people — it is generally quieter. However, you still have water pump noises to deal with. [Der8auer] got a Wieland prototype cooler that doesn’t use a pump. Instead, it relies on the thermosiphon effect. In simple terms, the heat moves water — possibly boiling it — upwards to a radiator. Once the water is cool, it falls down back to the heat exchanger again.

It looks like any other AIO, but the block is extremely flat compared to normal coolers, which have the pump on top of the plate. As you might expect, orientation matters, and you can’t have tight bends in the hoses. The system also has to be totally airtight to function properly. The test was meant to be against a commercial AIO unit with the same number of fans. However, there was a problem, and the final test was done with a larger radiator with one of its three fans removed.

The prototype performed fine and was quiet. It didn’t do as well as the commercial cooler, but it wasn’t bad. Of course, this is a prototype. Maybe a final product will do better. Around the ten-minute mark, the IR camera came out, and it didn’t show any major unexpected hot spots.

We’ve seen water-cooled printer hotends, and pumping is a problem there. We wondered if this technology might work there. The whole thing reminded us of heat pipes without the internal wick to move cold working fluid. We’ve even seen a water-cooled calculator.

Continue reading “PC Watercooling Prototype Is Pumpless”

Computing Via (Virtual) Dominos

Back in 2012, [Matt Parker] and a team built a computer out of dominos for the Manchester Science Festival. [Andrew Taylor], part of the team that built the original,  has built a series of virtual domino puzzles to help explain how the computer worked. He also links to a video from the event, but be warned: the video contains some spoilers for the puzzles. If you are ready for spoilers, you can watch the video below.

The original computer could add two three-bit numbers and provide a four-bit result. We don’t want to give away the answers, but the inverter is quite strange. If you don’t want to puzzle it out, you can press the “reveal answer” to see [Andrew’s] solutions. Press “play” and watch the dominos fall.

Continue reading “Computing Via (Virtual) Dominos”

Remove Wall Plugs Fast With A Custom Tool

The best thing about buying your own home is that you can hang things on the walls. It’s a human right all too often denied to renters the world over. Regardless, five years later, when you’re doing the mandatory minimalist remodel, you’ll be ruing the day you put in all those wall anchors. At that point, consider removing them with this nifty tool from [XDIY with Itzik].

The design aims to remove wall anchors as cleanly as possible. It’s easiest to watch the video to get the idea of how it works.

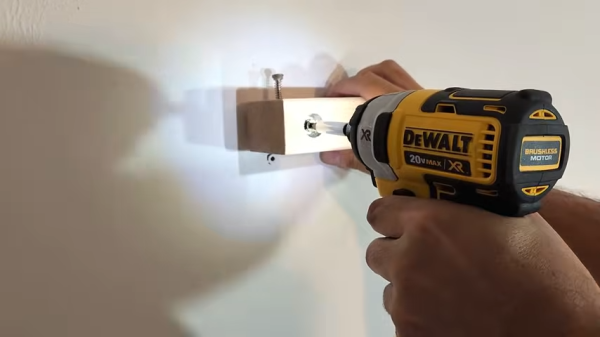
The tool features a block which holds a bearing. That bearing acts as a rotating stop for a wood screw. The idea is that you place the block against the wall, and use a power drill to drive a wood screw into the anchor at high speed. The screw can’t move forward, so the threads basically yank the plug out of the wall, and relatively neatly at that. Once removed, there’s a little push stopper you can use to hold the old plug in place as you remove the wood screw from the device, ready to go again.

[Itzik] demonstrates the device by removing ten wall plugs in just 40 seconds. If you’ve got a lot to do, or it’s a job you do regularly, you might like to have this tool in your kit.

Oftentimes, having the right tool can make a job ten times faster, and this seems like one of those cases. Video after the break.

Continue reading “Remove Wall Plugs Fast With A Custom Tool”

DIY Quad-Motor Go-Kart Is A Thrilling Ride

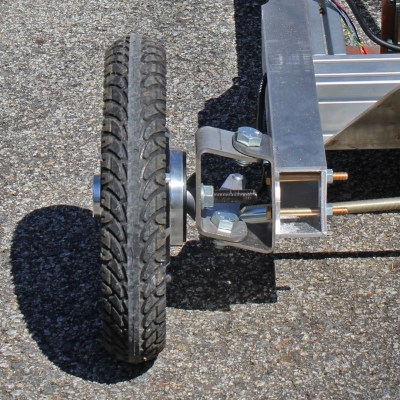
[Peter Holderith] set out some time ago to build an electric go-kart. That by itself is not terribly unusual, but where his project diverts from the usual is in the fact that each of the four wheels has an integrated hub motor.

It might not look it, but each wheel has an integrated hub motor.

This kart project is a bit of a work in progress, with [Peter] previously building (then scrapping) a failed attempt at a cheap suspension system. But it’s completely operational with all four wheels able to deliver a monstrous amount of power despite being limited by the power supply (a battery pack salvaged from an Audi Q5 Hybrid).

The kart might not look it, but it weighs 177 pounds (80 kg) with the battery and motors accounting for nearly half of that. What is is like to drive? “Nothing short of thrilling,” says [Peter]. It’s got no suspension and is pretty bare bones, not to mention limited in power by the battery, but [Peter] finds it a satisfying drive that nevertheless delivers car-like cues in the driving experience. The build isn’t done, and [Peter] plans to see if more power is available by switching battery chemistries rather than add more battery weight.

Building and driving electric vehicles can be remarkably satisfying, and it’s an area in which hobbyists can meaningfully innovate. Self-balancing one-wheeled vehicles for example look like a ton of fun. Heck, researchers have discovered that even rats seem to enjoy driving just for the fun of it.

Early CD Player Teardown

While CD players are nothing new today, they were the height of high-tech in the early 1980s. [w1ngsfly] shows us the inside of a Phase Linear 9500 player from 1983. Not only does it have many components, but it is also mechanically unusual.

The CD loads into a toaster-like slot and even pops out like a piece of toast. The tracking mechanism is quite complex, and there’s something that looks suspiciously like a dial string from an old slide rule tuner radio. Apparently, the unit was made by Kyocera and is internally similar to a Kyocera DA-01.

There’s a “head position” indicator that is actually just an LED connected to the tracking mechanism. The front panel controls look great but also allow you to control the head position exactly. As [w1ngsfly] mentions, it is almost like moving a turntable’s tonearm where you can drop it anywhere you want.

If we recall, they were about $600 to $1,000 new. If Phase Linear doesn’t ring a bell, they were well known in their day. Founded by [Bob Carver] and [Steve Johnston], the company was bought by Pioneer before the introduction and, later, by Jensen before the introduction of the 9500. [Bob] would go on to found Carver Corporation. You can find plenty of history about the company online.

We’ve seen CD players that look older. These days, CD drives are cheap and they are easy enough to control.

Continue reading “Early CD Player Teardown”