This Week In Security: Terrapin, Seized Unseized, And Autospill

There’s a new SSH vulnerability, Terrapin (pdf paper), and it’s got the potential to be nasty — but only in an extremely limited circumstance. To understand the problem, we have to understand what SSH is designed to do. It replaces telnet as a tool to get a command line shell on a remote computer. Telnet send all that text in the clear, but SSH wraps it all inside a public-key encrypted tunnel. It was designed to safely negotiate an unfriendly network, which is why SSH clients are so explicit about accepting new keys, and alerting when a key has changed.

SSH uses a sequence counter to detect Man-in-the-Middle (MitM) shenanigans like packet deletion, replay, or reordering. That sequence isn’t actually included in the packet, but is used as part of the Message Authentication Check (MAC) of several encryption modes. This means that if a packet is removed from the encrypted tunnel, the MAC fails on the rest of the packets, triggering a complete connection reset. This sequence actually starts at zero, with the first unencrypted packet sent after the version banners are exchanged. In theory, this means that an attacker fiddling with packets in the pre-encryption phase will invalidate the entire connection as well. There’s just one problem.

The innovation from the Terrapin researchers is that an attacker with MitM access to the connection can insert a number of benign messages in the pre-encryption phase, and then silently drop the first number of messages in the encrypted phase. Just a little TCP sequence rewriting for any messages between, and neither the server nor client can detect the deception. It’s a really interesting trick — but what can we do with it?

For most SSH implementations, not much. The 9.6 release of OpenSSH addresses the bug, calling it cryptographically novel, but noting that the actual impact is limited to disabling some of the timing obfuscation features added to release 9.5.

Continue reading “This Week In Security: Terrapin, Seized Unseized, And Autospill”

PCIe For Hackers: External PCIe And OCuLink

We’ve seen a lot of PCIe hacks on Hackaday, and a fair few of them boil down to hackers pulling PCIe somewhere it wasn’t meant to be. Today, we routinely can find PCIe x1, x2 and x4 links sitting around in our tech, thanks to the proliferation of things like NVMe SSDs, and powerful cheap SoCs that make PCIe appear at your fingertips.

In the PCIe For Hackers series, we’ve talked about PCIe and how cool it is, all the benefits it has for hackers, gave you layout and interconnection rules, and even went into things like PCIe switches and bifurcation. However, there’s one topic we didn’t touch much upon, and that’s external PCIe links.

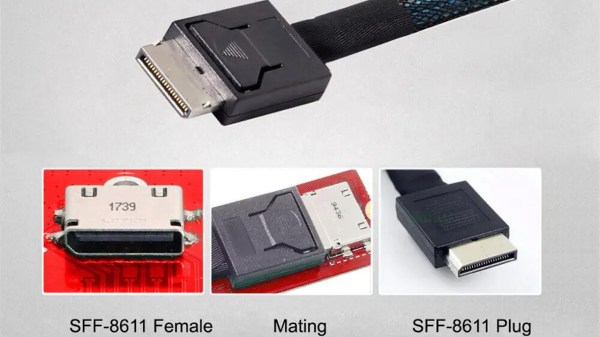
Today, I’d like to tell you about OCuLink – a standard that hackers might not yet know as an option whenever we need to pull PCIe outside of your project box, currently becoming all that more popular in eGPU space. Essentially, OCuLink is to PCIe is what eSATA is to SATA, and if you want to do an eGPU or an external “PCIe socket”, OCuLink could work wonders for you.

Respectable Capabilities

Just like any high-speed standard, PCIe has some tight requirements when things get fast. Even though PCIe is known to be not as sensitive to lower-quality links due to its link training and generation downgrade abilities, at higher link speeds, even through-hole vs SMD sockets can make a difference. So, if you want to go high-throughput, you want proper cabling and connectors, intended for out-of-chassis use – and OCuLink gives you all of this, at a low price.

Continue reading “PCIe For Hackers: External PCIe And OCuLink”

Cheap Computer PSU Puts On Weight With Box Of Iron

Humans are funny creatures. For whatever reason, when handling a piece of electronics, we tend to equate heft with value.  If something feels too light, it gives the impression of being cheap or inferior. As such, it’s not unheard of for gadgets to include a little chunk of metal that serves no purpose other than to add weight.

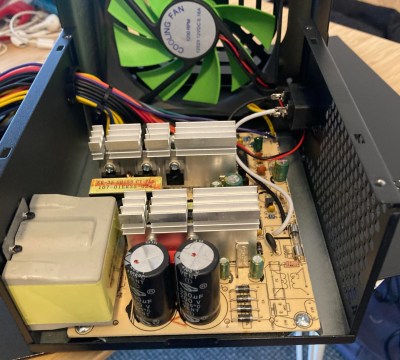
But a recent discovery by the aptly named [RedditCringe990] really takes things to a new low. Upon opening up the cheap power supply that came with their computer case, they noticed an odd little box that didn’t appear to have any electrical connection to the rest of the device. After unscrewing it from the metal body of the power supply and pulling the bottom panel off, they found it was packed full of iron filings.

At some level, you have to appreciate the attention to detail here. At first glance, especially if you were peeking through the PSU’s air vents, you could be forgiven for thinking the box was some kind of transformer. It’s even got some alphanumeric gibberish written on the side to help complete the look. Makes us wonder how many of these things might actually have gone undetected by less curious PC-builders.

As you might expect, the weighted box is only one of the issues with this particular PSU. As pointed out by fellow Redditor [Hattix], even the functional components are worthy of suspicion. There’s no protection on the input or output, no safety capacitor, and (unsurprisingly) no regulatory marks.

We’d say the thing might still be useful as a boat anchor, but now that the box of iron fillings has been removed, it’s probably not even heavy enough. Stay safe out there, folks.

A Single Board Computer, With Vacuum Tubes

We have occasionally featured vacuum tube computers here at Hackaday and we’ve brought you many single board computers, but until now it’s probable we haven’t brought you a machine that combined both of these things. Now thanks to [Usagi Electric] we can see just such a board, in the form of his UE-0.1, a roughly 260 by 210 mm PCB with 24 6AU6 pentodes on board that implements a simple one-bit CPU.

The architecture starts with the MC14500B 1-bit microcontroller, which was the subject of a previous vacuum tube computer. People found the unusual architecture difficult to understand, so this board is an even simpler take. It doesn’t have all the features of the Motorola original but it is (just) enough to be a CPU.

The tubes are arranged in groups of four with heaters in series from a 24 V supply, while the inputs and clock come in the form of on-board suitably retro-looking switches. The final touch is a VFD of the type used in bar graphs, were used to show the state of the various bits. It’s a fully working computer in the simplest sense, and definitely worth a look in the video below the break.

It would be interesting to see whether the tube count could be reduced further, or is this a record. The number of physical devices could be cut by using tubes with more than one device in them such as double-triodes, but perhaps that would be cheating.

Meanwhile, if you think vacuum computing is all about the old stuff, perhaps you should look at the state of the art.

Continue reading “A Single Board Computer, With Vacuum Tubes”

Mini Meters Monitor Microprocessor Maximization

[Lex] over at Computing: The Details loves to make fun projects. Recently, they have created a hardware CPU monitor that displays how PCs are parallelizing compile tasks at a glance. The monitor is built from 14 analog meters, along with some WS2812 RGB LEDs.

Each meter represents a core on [Lex]’s CPU, while the final two meters show memory and swap usage. The meters themselves are low-cost 5 mA devices. Of course, the original milliamps legends wouldn’t do much good, so [Lex] designed and printed graduations that glue over the top. The RGB LED strip is positioned so two LEDs fit under each meter. The LEDs allow a splash of color to draw attention to the current state of the machine. The whole bank going red would sure get our attention!

The system is controlled by an Arduino Mega, with the meters driven using the PWM pins. The only extra part is a 1 kΩ resistor. The Arduino wrangles the LEDs as well. Sadly [Lex] did not include the software. They did describe it though. Basically they are using a Rust program to call systemstat, obtaining the current CPU utilization data in Linux. A bit of math converts this into pointer values and LED colors. The data is then sent via USB-serial to the Arduino Mega. The software savvy will say it’s pretty easy to replicate, but the hardware-only hackers among us might need a bit of help.

This isn’t the first custom meter we’ve seen on Hackaday. Your author’s first project covered by Hackaday was for a meter created using an automotive gauge stepper motor. I didn’t include source code either – but only because [Guy Carpenter]’s Switec X25 library had me covered.

Continue reading “Mini Meters Monitor Microprocessor Maximization”

A Handheld Hackintosh, But So Much More

As handheld computing has solidified alongside everything else into the mobile phone, it’s sad that the once promising idea of a general purpose machine in the palm of the hand has taken a turn into the dumbed-down walled-garden offered by smartphone vendors. There was a time when it seemed that a real computer might be a common miniaturized accessory, but while it’s not really come to pass, at least [iketsj] has taken a stab at it. His handheld Hackintosh runs MacOS on a miniature scale, and looks rather nice.

At its heart is the LattePanda Alpha x86 single board computer, with a small custom expansion board  for a couple of buttons, a USB hub, a small keyboard, and a display. These parts are all mounted to a baseboard with metal stand-offs, and the power is sourced from a single USB-C socket at the bottom edge. What makes it more extraordinary is that it’s not the first handheld Hackintosh from this maker, the previous one being significantly bigger.

On one hand then, this is home-built PC like any other, assembled from off-the-shelf-parts. But on the other it’s far from normal, for despite its simplicity it forms a very usable small form factor device. The Akruvia Una keyboard uses tactile switches so maybe it’s not the machine to type your thesis on, but other than that it makes a great little machine for MacOS, Linux, or Windows. We like it, and we think you will too when you see the video below the break.

Continue reading “A Handheld Hackintosh, But So Much More”

Jenny’s Daily Drivers: RiscOS 5.28

On a mundane day at some point in late 1987, though I didn’t grasp exactly what it would become at the time, I sat in front of the future. My school had a lab full of BBC Micros which I’d spent the previous few years getting to know, but on that day there was a new machine in one corner. It was a brand-new Acorn Archimedes, probably an A300, and it was the first time I had used an operating system with a desktop GUI. The computer was the first consumer application of the ARM processor architecture which has since gone on to conquer the world, and the operating system was called Arthur, which hasn’t. That’s not to say that Arthur is forgotten though, because it was soon renamed as RiscOS, managed to outlive both Acorn and the Archimedes, and still survives as a maintained though admittedly niche operating system to this day. So my Daily Driver this month is the current generation of RiscOS, version 5.28, and the machine I’m running it on is a Raspberry Pi 4. For a computer with an ARM core that’s designed and sold by a company based in Cambridge just like the original Acorn, it’s the most appropriate pairing I can think of.

Probably the Smallest OS In This Series

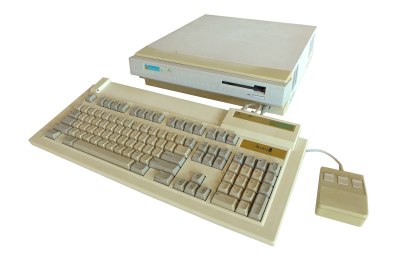
A beige desktop with no monitor, keyboard and mouse in front. It shows signs of yellowing with age.
The first ARM product, an Acorn Archimedes A310. mikkohoo, CC BY-SA 4.0.

At one point the Raspberry Pi folks even featured the Pi version of RiscOS on their website, but for those missing it there it’s freely downloadable as a disk image from the RiscOS Open site. Having spent most of its life as a closed-source product it’s been opened up over the last decade, and you can grab the source if you’re interested. When it’s normal for an OS download to run into the many gigabytes, it’s a bit of a shock to grab one that’s a shade under 140 megabytes and can be written to a 2 gigabyte SD card. This makes it probably one of the quickest operating system installs I have ever done, with all steps completed in a very short time. Sticking the SD card into the Pi it boots to a desktop in about 32 seconds which is only 5 seconds less than the latest Raspberry Pi OS image, so sadly that compactness doesn’t net you any extra speed. Continue reading “Jenny’s Daily Drivers: RiscOS 5.28”