A Wireless Headphone Charger Without The Wireless

We’re all used to the idea of wireless charging, usually in the form of an induction coil on which a mobile phone or other appliance can be placed for a top-up. Not every battery-powered appliance has a built-in wireless charging coil though, meaning that despite the tech being available we all still have a jumble of wires.

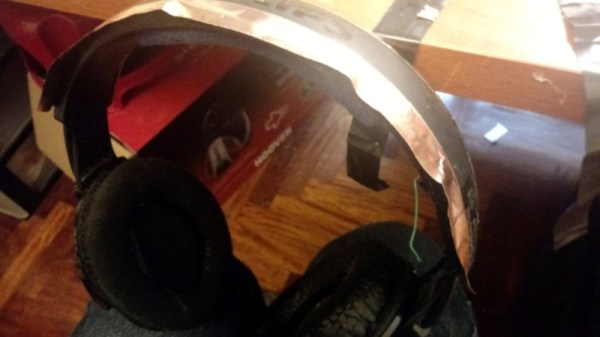
[Sergio Costas] has a simple solution to conjuring wireless charging from thin air in his headphone stand, which conceals a set of charging contacts. It’s by no means a new idea and it might seem like an obvious hack, but it undeniably does away with the wires and we like it. After all, if it were that obvious, none of us would have that mess of chargers.

The headphones in question are a Bluetooth wireless pair, and the charging contacts have been brought out via a voltage regulator and a bridge rectifier to a pair of copper tapes along the sides of the headband. These mate with matching contacts in a 3D printed holder to which 12 VDC has been applied. Perhaps he’s just reinvented the springy contacts you’ll find on any cordless home phone, but it’s unquestionably a charger without wires.

Meanwhile if you have a conventional wireless charger, how do you know it’s working?

DIY Super-Bright Outdoor TV With Watercooling

Watching TV or playing a console game is usually not an outdoor activity, helped by the fact that you can’t see anything on your average TV in direct sunlight. However, with some basic fabrication skills, [Matt] from [DIY Perks] demonstrates how to upgrade an LCD TV to be viewable in the brightest conditions by upgrading its backlight, and adding a simple water-cooling system in the process. Full build video after the break.

An LCD panel doesn’t produce any light but acts as a filter for the backlight behind it, which is just a widely spaced array of white LEDs. The core of the build is upgrading the backlight, so [Matt] picked up a large 4K TV with a partially faulty backlight for a very affordable price. The new backlight consists of a set of high-brightness LED panels, screwed to a sheet of aluminum. The LEDs generate a lot of heat, so [Matt] cools the back of the aluminum sheet with a budget-friendly water cooling system built from a car radiator, small water pump, and some clear plastic tubing. Everything is housed in an industrial-looking enclosure made from aluminum sheet, aluminum extrusions, and an acrylic back panel. To protect the LCD panel, it’s glued to a sheet of tempered glass from an old coffee table.

The final product performs very well, even in direct sunlight, and is also weatherproof. [DIY Perks] is known for projects that work as well as they look, like his triple-screen luggable PC or massive bellow-cooled PC. Continue reading “DIY Super-Bright Outdoor TV With Watercooling”

Pulling Off A CRT Transplant Doesn’t Have To Be Tricky!

Whether it’s an engine swap in an old car or pulling a hard drive out of an old computer, we often find ourselves transplanting bits from one piece of hardware to another. [Emily Velasco] recently attempted this with a pair of CRTs, and came away with great success.

The donor was an old 1980s fishing sounder, which came complete with a rather fetching monochrome amber CRT display. [Emily]’s goal was to transplant this into the body of a early 2000s portable television. The displays were of a similar size and shape, though the Toshiba CRT from the 80s used a lot more glass in its construction.

The tube socket in the TV used to hook up the display matched the old CRT perfectly, so there were no hassles there. A bit of soldering was all that was needed to hook up the yoke, and [Emily] was ready to test. Amazingly, it powered up cleanly, displaying rolling amber static as you’d expect, given that analog television stations have been off the air for some time now.

After some perseverance, a VCR playing Mystic Pizza on VHS was able to deliver a video signal to the TV, proving that everything was working well. The next stage of the project is to get the television electronics to fit inside the 1980s fishing sounder housing, as it’s the more attractive of the two. Things were just built differently back in those days!

We’ve seen some other great vintage display swaps before, too. Video after the break.

Continue reading “Pulling Off A CRT Transplant Doesn’t Have To Be Tricky!”

Build Your Own CRT TV

There was a time following the Second World War when TV sets for the nascent broadcast medium were still very expensive, but there was an ample supply of war-surplus electronic parts including ex-radar CRTs. Thus it wasn’t uncommon at all for electronics enthusiasts of the day to build their own TV set, and magazines would publish designs to enable them. With a burgeoning consumer electronics industry the price of a new TV quickly dropped to the point of affordability so nobody would consider building one themselves today. Perhaps that should be amended to almost nobody, because [Retro Tech or Die] has assembled a small black-and-white CRT TV from a kit he found on AliExpress.

We have to admit to having seen the same kit and despite a sincere love for analogue telly, to have balked at the price. It’s an exceptionally cheap set of the type that was available from discount stores for a laughably low price around the final few years of mainstream analogue TV broadcasting, and having a couple in the stable we can confirm that the value here lies in building the thing rather than owning it.

The unboxing and building proceeds as you might expect, with the addition of very poor documentation and extremely low-quality parts. Satisfyingly it works on first power-up, though some adjustment and the reversing of a deflection yoke connection is required for a stable picture. The scanned area doesn’t fill the screen and he doesn’t find the solution in the video, we hope that by his next video someone will have suggested moving the deflection yoke forwards.

Perhaps merely assembling a kit might not seem the most exciting subject for a Hackaday story, but this one is a little different here in 2022. CRT TV sets are now a long-gone anachronism, so for a younger generation there is very little chance to see them up close and thus watching one built has some value. If you want to spend the cash and build your own he’s dropped the link in the YouTube description, otherwise watch the progress in the video below the break.

Fancy learning a bit more about analogue TV? Have a dive into the video waveform. Or for a bit more CRT goodness, learn about converging a delta-gun colour set from the days when a TV weighed almost as much as you did.

Continue reading “Build Your Own CRT TV”

1960s Stereo Console Gets An Upgrade

Faced with an old console stereo from the 1960s that was barely functional, [Sherman Banks] aka W4ATL decided to upgrade its guts while keeping its appearance as close to the original as possible. This stereo set is a piece of mahogany furniture containing an AM/FM stereo receiver and an automatic turntable from JCPenny’s Penncrest line. As best [Sherman] can determine, it is most likely a 1965 model. The old electronics were getting more and more difficult to repair and the tuner was drifting off-station every 15 minutes. He didn’t want to throw it away, so he decided to replace all the innards.

The first thing was to tear out the old electronics while retaining the chassis proper. The new heart of the entertainment center is a modern Denon AV stereo receiver. This unit can be controlled over Ethernet, has a radio tuner, inputs for SiriusXM and a turntable, and supports Bluetooth streaming. [Sherman] next replaced the 1965 turntable, and then turned his attention to connecting up the controls and indicators.

The potentiometers were replaced with equivalent ones of lower resistance, the neon stereo indicator was replaced with an LED, but the linear tuning dial proved to be a nearly two month challenge and resulted in a cool hack. In brief, he connected an optical rotary encoder to the tuning knob and used a stepper motor with a linear actuator to control the dial indicator. All this is controlled from an Arduino Mega 2560 with three shields for I/O and LAN. But there was still one remaining issue — without vacuum tubes to warm up, the radio would play immediately after power-on. [Sherman] fixed that by programming the Arduino to slowly ramp up the volume at the same rate as the original tube receiver. And finally, he installs a small HDMI monitor in the corner to display auxiliary information and metadata from the Denon receiver.

Check out the videos below the break. We wrote about a couple of similar conversions in the past: this one from 2018 was also a Penncrest, and from last year this COVID isolation project that emphasized the addition of a new liquor cabinet.

Continue reading “1960s Stereo Console Gets An Upgrade”

Getting Root On Linux Amplifier Adds New Inputs

We remember when getting Linux on your average desktop computer was a tricky enough endeavor that only those with the most luxurious of graybeards would even attempt it. A “Linux box” in those heady days was more than likely an outdated machine salvaged from the dumpster, side panel forever removed, cranking away in a basement or garage. Fast forward today, and Linux is literally everywhere: from smartphones and luxury cars, to TVs and refrigerators. Ironically it’s still not on most desktop computers, but that’s a discussion for another time.

So when [Michael Nothhard] sent in the fascinating account of how he hacked his Linux-powered Bluesound Powernode N150 amplifier to unlock more inputs, the least surprising element was that there was a “smart amplifier” out there running the free and open source operating system. What piqued our interest was that he was able to bust his way in with relative ease and enable some impressive new capabilities that the manufacturer would probably have rather been kept under wraps.

Configuring the CM6206’s audio settings.

[Michael] explains that the N150 has a USB port on the back side of it, and that officially, it only works with mass storage devices and a handful of approved peripherals such as a Bluetooth dongle. But as he was hoping to connect some more devices to the input-limited amplifier, he wondered if he could get a USB audio adapter recognized by the OS. After using a known exploit to get root access, he started poking around at the underlying Linux system to see what kind of trickery the developers had done.

Based on a fairly common C-Media CM6206 chipset, the StarTech 7.1 USB audio adapter was picked up by the kernel without an issue. But to actually get it working with the amplifier’s stock software, he then needed to add a new <capture> entry to the system’s sovi_info.xml configuration file and make some changes to its default ALSA settings. With the appropriate files modified, the new USB audio input device popped up under the official Bluesound smartphone application.

At the end of the write-up [Michael] notes that you’ll need to jump through a few additional hoops to make sure that an upstream firmware update doesn’t wipe all your hard work. Luckily it sounds like backing up the configuration and returning it to the newly flashed Powernode is easy enough. We’ve certainly seen more elaborate methods of gaining control of one’s sound system over the years.

Know Audio: A Mess Of Cables

We’ve now spent several months in this series journeying through the world of audio, and along the way we’ve looked at the various parts of a Hi-Fi system from the speaker backwards to the source. It’s been an enjoyable ride full of technical detail and examining Hi-Fi myths in equal measure, but now it’s time to descend into one of the simplest yet most controversial areas of audio reproduction. Every audio component, whether digital or analogue, must be connected into whatever system it is part of, and this is the job of audio cables, sometimes referred to as interconnects. They are probably the single component most susceptible to tenuous claims about their performance, with audiophiles prepared to spend vast sums on cables claimed to deliver that extra bit of listening performance. Is there something in it, or are they all the same bits of wire with the expensive ones being a scam? Time to take a look.

What Makes A Nearly Good Cable

In a typical domestic audio system with digital and analogue signals you might expect to find two types of cable, electrical interconnects that could carry either analogue or digital signals, and optical ones for digital signals. We’re here to talk about the electrical cables here as they’re the ones used for analogue signals, so lets start with a little transmission line theory. Continue reading “Know Audio: A Mess Of Cables”