Automation Makes Traditional Japanese Wood Finishing Easier

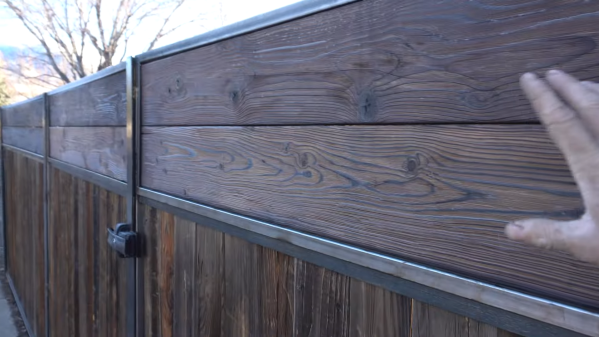
Unless you move in architectural circles, you might never have heard of Yakisugi. But as a fence builder, [Lucas] over at Cranktown City sure has, with high-end clients requesting the traditional Japanese wood-finishing method, which requires the outer surface of the wood to be lightly charred. It’s a fantastic look, but it’s a pain to do manually. So, why not automate it?

Now, before we get into a whole thing here, [Lucas] himself notes that what he’s doing isn’t strictly Yakisugi. That would require the use of cypress wood, and charring only one side, neither of which would work for his fence clients. Rather, he’s using regular dimensional lumber which is probably Douglas fir. But the look he’s going for is close enough to traditional Yakisugi that the difference is academic.

To automate the process of burning the wood and subsequently brushing off the loose char, [Lucas] designed a double-barreled propane burner and placed it inside a roughly elliptical chamber big enough to pass a 2×8 — sorry, metric fans; we have no idea how you do dimensional lumber. The board rides through the chamber on a DIY conveyor track, with flame swirling around both sides of the board for an even char. After that, a pair of counter-rotating brushes abrade off the top layer of char, revealing a beautiful, dark finish with swirls of dark grain on a lighter background.

[Lucas] doesn’t mention how much wood he’s able to process with this setup, but it seems a lot easier than the manual equivalent, and likely yields better results. Either way, the results are fantastic, and we suspect once people see his work he’ll be getting more than enough jobs to justify the investment.

Continue reading “Automation Makes Traditional Japanese Wood Finishing Easier”

A Raspberry Pi in an enclosure, connected to a stepper motor controller and a UMTS stick

2024 Home Sweet Home Automation: SMS Controlled Heating

Hackaday.io user [mabe42] works during the week away from their home city and rents a small apartment locally to make this life practical. However, the heating system, a night-storage system, is not so practical. They needed a way to remotely control the unit so that the place was habitable after a long winter commute; lacking internet connectivity, they devised a sensible solution to create an SMS-controlled remote heating controller.

The controller runs atop an old Raspberry Pi B inside a 3D-printed case. Seeing such an old board given a real job to do is nice. Connectivity is via a USB UMTS stick which handles the SMS over the cellular network. The controller knob for the heater thermostat (not shown) is attached via a toothed belt to a pully and a 28BYJ-48 5V geared stepper motor. Temperature measurement is via the ubiquitous DS1820 module, which hooks straight up to the GPIO on the Pi and works out of the box with many one-wire drivers.

The software is built on top of Gammu, which handles the interface to the UMTS device. Daily and historical temperature ranges are sent via SMS so [mabe42] can decide how to configure the heating before their arrival. The rest of the software stack is in Python, as per this (German-language) GitHub project.

While we were thinking about storage heating systems (and how much of a pain they are), we came across this demonstration of how to build one yourself.

Building A Tiny Organic Swimming Pool With Natural Filtering

When we think of swimming pools, we typically think of large fiberglass, plastic, or concrete constructions full of pristine, clear water. They’re usually maintained in this state with the regular addition of chlorine or other chemical. These kill biological stuff and help filter out dirt and other detritus. However,  [David] likes to do things differently, as he demonstrates with a tiny plunge pool built inside his greenhouse.

The basic construction starts with digging a hole and building up a wall with concrete and bricks. There’s nothing particularly controversial there. It’s roughly 2 meters by 3 meters by 0.8 meters deep. To help the pool maintain heat, there’s a layer of foam insulation in the bottom, while the water is held inside a black liner.

Rather than traditional chemical methods, however, [David] relies on organic methods to maintain the pool. He explains how he uses an aquarium pump to create a “bubble filtered” pool that draws water through a gravel bed to maintain it and keep it clear. It’s a very natural setup, with multiple plants in the water to make it as organic as can be. It’s the kind of thing you’d expect to see at a luxury island resort, but [David’s] got one right in his very own greenhouse.  [David] explains the organic filtering concept in greater detail on his website.

We’ve featured some pool hacks before, too, though more traditional ones than this. Video after the break.

Continue reading “Building A Tiny Organic Swimming Pool With Natural Filtering”

Your Voice Assistant Doesn’t Have To Be Cloudy

Voice assistants are neat — they let us interface with computers without having to bother with touching them at all. Still, many decry the perceived privacy intrusion these devices present, as they’re always trucking data off to corporate servers for all kinds of opaque reasons. Building your own standalone assistant is a way to get around that, and that’s precisely what [Tristram] did.

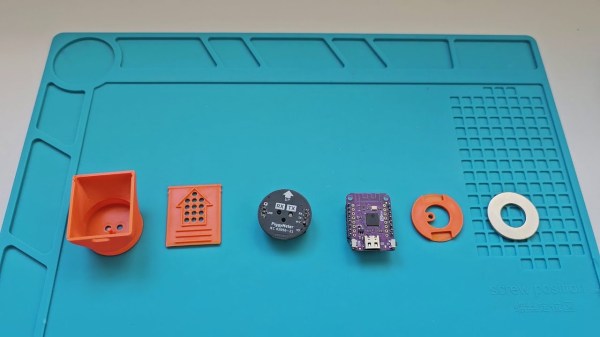
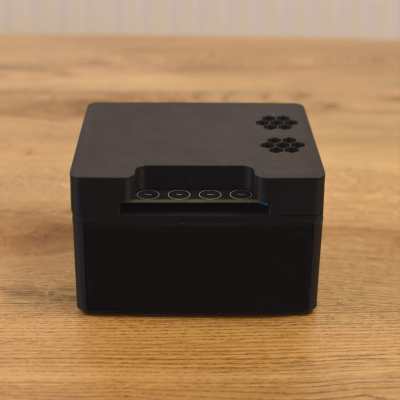
The build is based on an ESP32 Lyrat development board. Unlike most devboards, this one has two 3 watt audio outputs and mics on board, making it perfect for a build like this one. The Lyrat was paired with some NeoPixel LEDs and a pair of Dayton Audio 1.5″ speakers to enable it to interact with the user both audibly and visually.

[Tristram] steps through not only how to set up the voice assistant, but also how to build it into a simple and attractive enclosure that won’t unduly stand out in the average house. The Lyrat simply has to be flashed with firmware that enables it to work as a voice aid with Home Assistant platform.

If you’re unfamiliar, Home Assistant is a smart home architecture that you can run yourself on your own hardware, without having everything live in the cloud of some murky corporation.

Home Assistant has grown in popularity in recent years as a less intrusive smarthome solution. You can even use it to monitor your hot tub! Video after the break.

Continue reading “Your Voice Assistant Doesn’t Have To Be Cloudy”

A DIY DIN rail mounted rack of PLC components for home automation

2024 Home Sweet Home Automation: A DIY SCADA Smart Home

A SCADA-style display of icons and control buttons
Touch-screen control and monitoring

Supervisory control and data acquisition, or SCADA, systems sit in the background in industrial settings, performing all kinds of important jobs but in an ad-hoc setup, depending on the precise requirements of the installation. When we think about home automation systems, they’re pretty much the same deal: ad-hoc systems put together from off-the-shelf components and a few custom bits thrown in. [Stefan Schnitzer] clearly has significant knowledge of SCADA in an industrial setting and has carried this over into their home for their entry into the Hackaday 2024 Home Sweet Home Automation Contest. Continue reading “2024 Home Sweet Home Automation: A DIY SCADA Smart Home”

2024 Home Sweet Home Automation: Simple Window Closer Relies On Gravity

While most pet owners are happy to help out their furry friends, everyone has a limit. For [Gauthier], getting up to open or close the window every three minutes so their cat can go out on the balcony was a bridge too far, so they decided to take a crack at automating the window. The end result not only does the job, it’s extremely low-tech and pretty much invisible except when in use.

Of course, [Gauthier] didn’t arrive at this solution immediately. Their first thoughts went to RFID or perhaps a pressure sensor to detect the cats, coupled with something motorized to open and shut the window, like a belt or maybe a linear actuator. But ultimately, the system has to be robust, so that’s when [Gauthier] got the idea to employ gravity by using pulleys and weights.

Due to the configuration of the space and the shape of the window, [Gauthier] was able to to hide cable pretty well — you can’t really see anything when the window is closed. Be sure to check it out in action after the break. Continue reading “2024 Home Sweet Home Automation: Simple Window Closer Relies On Gravity”

All the components of the Piggymeter interface laid out on a silicon mat

Simple Optical Meter Sets New Standards For Documentation

PiggyMeter is a wonderful example of a device that you never knew you needed – simple, elegant, easy to build, and accompanied by amazing documentation. It’s a snap-on interface for electric meters, dubbed so because its 3D printable shell looks like a pig nose, and it works with IEC62056-21 compliant meters. If you want to learn about your home’s power consumption in real time and your meter happens to fit the bill, look into building a PiggyMeter, it’s the kind of DIY project that a hacker was destined to design at some point.

All you need is a printed shell, a Wemos-compatible development board with an ESP32 MCU, an optical interface board, and a few small parts like a ring magnet. The optical interface board is not open source, but there’s drawings available, and the design is pretty simple, so it should be trivial to recreate. Plus, it’s also reasonably inexpensive if you don’t want to build your own board. Got parts? Simply put them all together, flash the firmware, and you have a meter adapter added to your smart home device family.

This device works with HomeAssistant, and it’s incredibly easy to set up, in part because of just how clearly everything is outlined in the blog post. Seriously, the documentation is written with love, and it shows. If you’re looking to learn how to document a device in a helpful way, take notes from the PiggyMeter. And, if you’d like to learn more about optically coupled power meter interfaces, here’s a different open source project we’ve covered before!