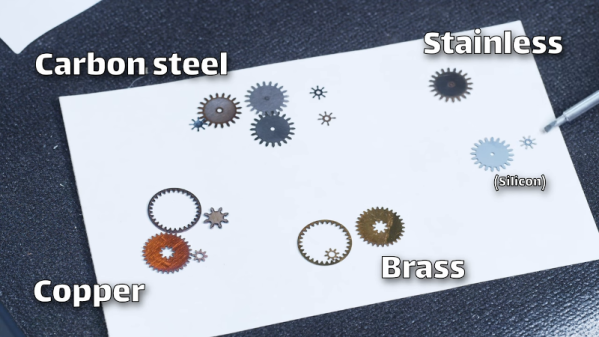
[Breaking Taps] has a nice pulsed fiber laser and decided to try it to micromachine with silicon. You can see the results in the video below. Silicon absorbs the IR of the laser well, although the physical properties of silicon leave something to be desired. He also is still refining the process for steel, copper, and brass which might be a bit more practical.
The laser has very short duration pulses, but the pulses have a great deal of energy. This was experimental so some of the tests didn’t work very well, but some — like the gears — look great.
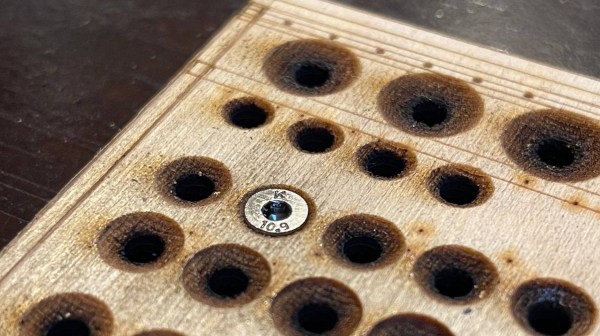
Here’s a fun quick hack from [Timo Birnschein] about using the 3D laser engraving (or ‘stamp’ engraving) mode of certain laser cutter toolchains to create a handy countersink shape in a laser-cut and engraved workpiece. Since [Timo] uses a small laser cutter to cut out and mark project boards for their electronics builds, having an extra messy, manual countersinking operation with subsequent clean-up seemed like a waste of time and effort, if the cutter could be persuaded to do it for them.
Designs are prepared in Inkscape, with an additional ‘3D engraving’ layer holding the extra processing step. [Timo] used the Inkscape feathering tools to create a circular grayscale gradient, leading up to the central cut hole (cuts are in a separate layer) which was then fed into Visicut in order to drive the GRBL-based machine, However, you could do it with practically any toolchain that supports laser power control during a rastering operation. The results look perfectly fine for regions of the workpiece not on show, at least, but if you’re only interested in the idea from a functional point of view, then we reckon this is another great trick for the big bag of laser hacks.
What does it take to make your own integrated circuits at home? It’s a question that relatively few intrepid hackers have tried to answer, and the answer is usually something along the lines of “a lot of second-hand equipment.” But it doesn’t all have to be cast-offs from a semiconductor fab, as [Zachary Tong] shows us with his homebrew direct laser lithography setup.
Most of us are familiar with masked photolithography thanks to the age-old process of making PCBs using photoresist — a copper-clad board is treated with a photopolymer, a mask containing the traces to be etched is applied, and the board is exposed to UV light, which selectively hardens the resist layer before etching. [Zach] explores a variation on that theme — maskless photolithography — as well as scaling it down considerably with this rig. An optical bench focuses and directs a UV laser into a galvanometer that was salvaged from an old laser printer. The galvo controls the position of the collimated laser beam very precisely before focusing it on a microscope that greatly narrows its field. The laser dances over the surface of a silicon wafer covered with photoresist, where it etches away the resist, making the silicon ready for etching and further processing.
Being made as it is from salvaged components, aluminum extrusion, and 3D-printed parts, [Zach]’s setup is far from optimal. But he was able to get some pretty impressive results, with features down to 7 microns. There’s plenty of room for optimization, of course, including better galvanometers and a less ad hoc optical setup, but we’re keen to see where this goes. [Zach] says one of his goals is homebrew microelectromechanical systems (MEMS), so we’re looking forward to that.
When it comes to high-speed, high-voltage switching, there are a wealth of components to choose from — MOSFETS, thyristors, IGBTs, and even vacuum tubes like thyratrons. But who needs all that expensive silicon (or glass) when all you need to build a high-voltage switch is some plumbing fixtures and a lathe?
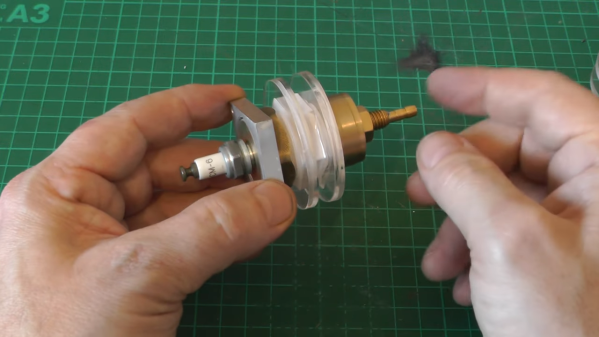
At least that’s the approach that budget-minded laser experimenter [Les Wright] took with his latest triggered spark gap build. We’ve been watching his work for a while now, especially his transversely excited atmospheric (TEA) lasers. These are conceptually simple lasers that seem easy to build, at least compared to other lasers. But they do require a rapid pulse of high voltage across their long parallel electrodes to lase, and controlling the pulse is where this triggered spark gap shines.
The spark gap is made from brass plumbing fittings on either end of a short PVC coupler. [Les] used his lathe to put a thread into one of the caps to accept a spark plug, the center electrode of which pokes through a small hole in the metal cathode. To trigger the spark gap, [Les] built a trigger generator that outputs about 15,000 volts, which arcs from the spark plug electrode to the spark gap cathode in the low-pressure nitrogen environment. Little spark leads to big spark, big spark discharges a capacitor across the laser electrodes, and you’ve got a controlled single-shot laser. Check it out in the video below.
Honestly, the more we see of [Les]’ videos, the more we want to play with lasers and high voltage. From DIY doorknob caps to blasting Bayer arrays off cheap CCD cameras, there’s always something fun — and slightly dangerous — going on in [Les]’s lab.
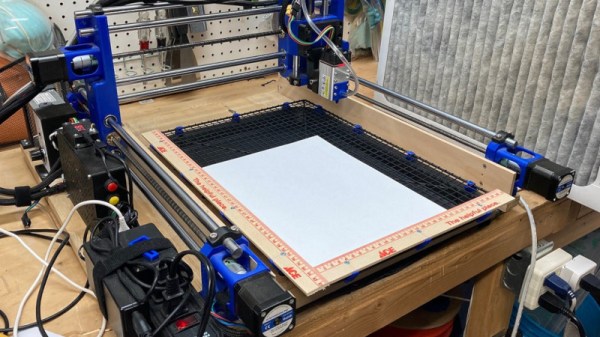
A laser cutter bed has to be robust, fireproof, and capable of adequately supporting whatever piece of work is being done on the machine. For that reason they are typically a metal honeycomb, and can be surprisingly expensive. [David Tucker] has built a MultiBot CNC machine and is using it with a laser head, and his solution to the problem of a laser bed is to turn towards the kitchen ware store.
The answer lay in an Expert Grill Jerky Rack, a wire grille with a baking tray underneath it. Perfect lasering support but for its shininess, so it was painted matte back to reduce reflections and a handy set of clips were 3D printed to secure the grille to the tray.
We like this solution as it’s both effective and cheap, though we can’t help a little worry at the prospect of any laser cutter without adequate enclosure for safety. Having been involved in the unenviable task of cleaning an encrusted hackerspace laser cutter bed, we also like the idea that it could be disposed of and replaced without guilt. Do you have any tales of laser cutter bed cleaning, or have you found a cheap substitute of your own? Let us know in the comments!
Want to make a sweet adhesive decal with a complex design and floating elements, but all you have is a laser cutter and some tape? Good news, because that’s all you need with this method of creating adhesive tape decals on a laser cutter demonstrated by the folks at [Lasers Over Los Angeles]. The overall technique is very similar to creating vinyl decals and using tape transfer to apply them, but is geared towards laser cutters and nice, cheap tape.
This method also makes applying to non-flat surfaces a breeze.
The way it works is this: paper-based tape (such as blue painter’s tape) is laid down in strips on the laser cutter’s honeycomb bed, forming a nice big rectangle big enough for the intended design. Then, the laser cutter cuts vector art into the tape, resulting in an adhesive decal ready to be stuck to some other surface. Transferring is done by using good quality clear packing tape to “pick up” the decal, then move it to where it needs to be.
To do this, one lays strips of packing tape onto the top of the design on the laser bed, then lifts the design up and away. Move the design to its destination (the clear packing tape helps in eyeballing the final position), press the decal onto the final surface, and carefully peel away the clear packing tape. This works because the packing tape sticks only weakly to the back of the painter’s tape; it’s a strong enough bond to hold the decal, but weak enough that the decal will stick to a surface even better.
It’s true that painter’s tape isn’t as durable as vinyl and the color selection is a bit limited, but design-wise one can go as big as the laser bed allows, and the price is certainly right. Plus it’s easily cut by even the most anemic of diode lasers.
Here at Hackaday, we love projects that result in useful lab equipment for a fraction of the cost of professional gear. [Lorenz], over at Advanced Tinkering, built his own instrument for Laser-Induced Breakdown Spectroscopy, or LIBS, and it’s quite an impressive device. LIBS is a technique for analyzing substances to find their chemical composition. Basically, the idea is to zap a sample with a powerful laser, then look at the little cloud of plasma that results and measure the wavelengths emitted by it.
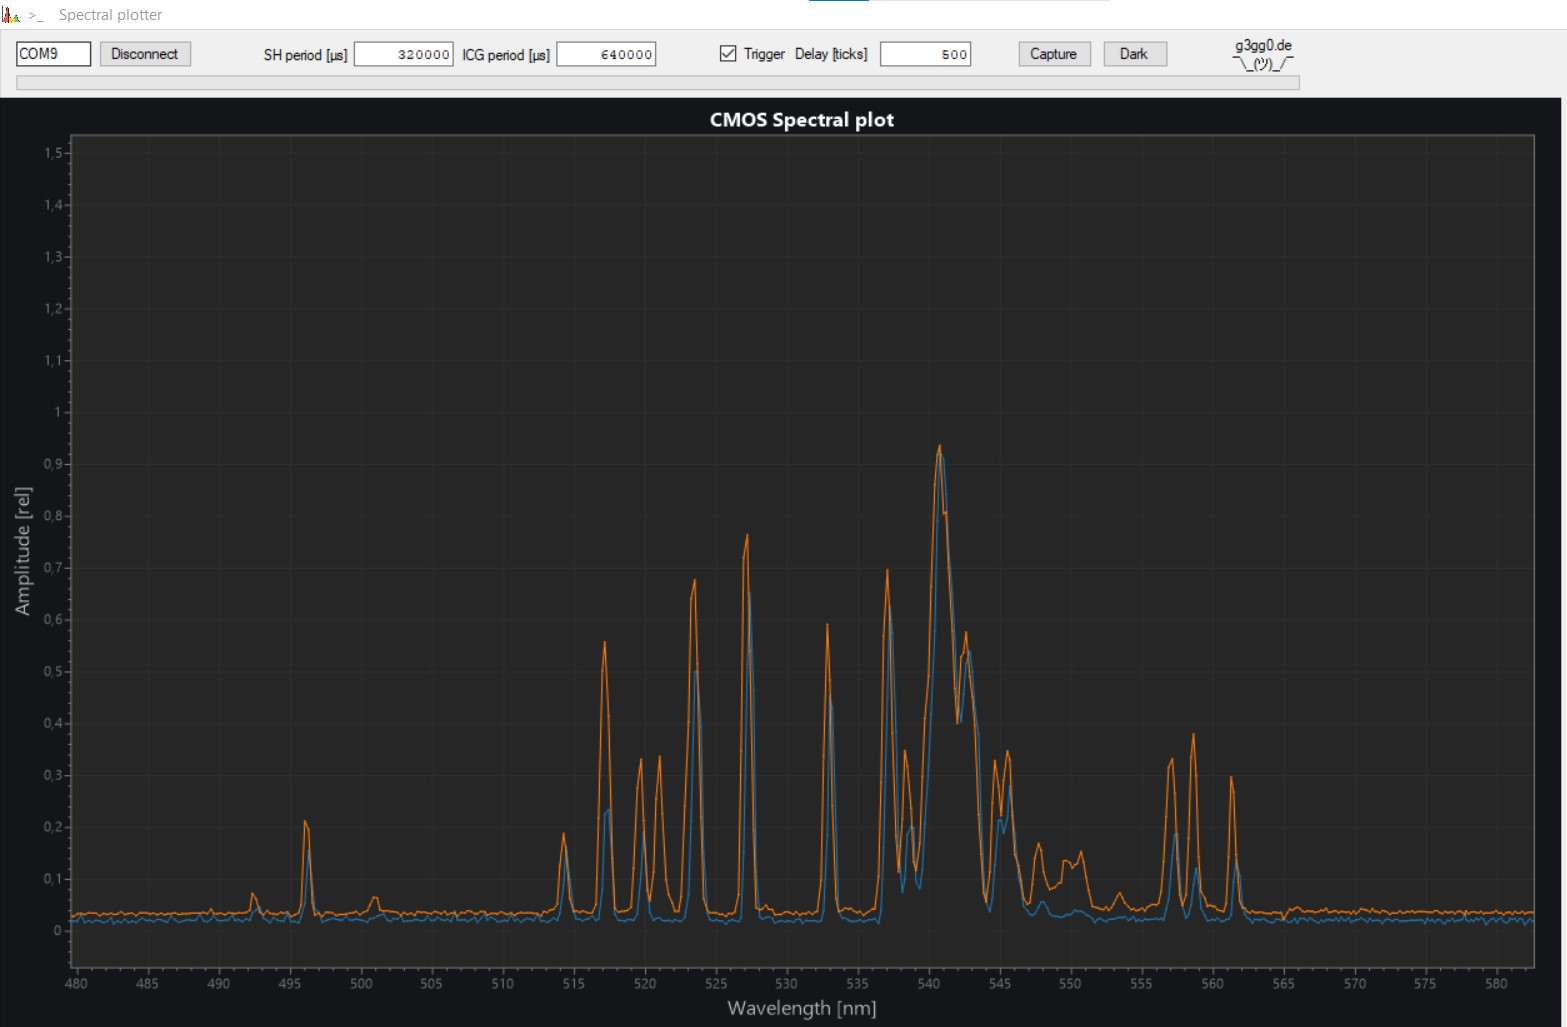
The spectrum of hematite (iron oxide), compared to that of pure iron
The laser [Lorenz] used is a Nd:YAG unit salvaged from a tattoo removal machine. After it fires a pulse, a photodiode detects the light and triggers a spectrometer, which consists of a diffraction grating, a few lenses and mirrors, and a linear CCD sensor. The grating splits the incoming lights into its constituent components, which fall onto the CCD and trigger its pixels. An STM32 Nucleo board reads out the results and sends them to a PC for further processing.
That processing bit turned out to be a full project on its own. [Lorenz] called upon [g3gg0], who software that simplifies the operation of the spectrometer. First, it helps with the instrument’s calibration. Point the detector at a well-known light source like a laser or a fluorescent lamp, then select the expected wavelengths on the resulting spectral plot. The software then automatically calculates the correct coefficients to map each pixel to a specific wavelength.
The software also contains a database of spectra corresponding to chemical elements: once you’ve taken a spectrum of an unknown sample, you can overlay these onto the resulting plot and try to find a match. The resulting system seems to work quite well. Samples of iron oxide and silver oxide gave a reasonable match to their constituent components.