High-Power Laser Salvaged From Headlights

[DiodeGoneWild]’s latest video lives up to the name. He takes apart a laser headlight to recover a pretty powerful blue laser. You can see the video, below.

The headlights work with blue laser diodes that excite phosphor to produce white light. Removing the outside trappings revealed a three-pin laser diode (the case is the third pin). There’s also a substantial heatsink. Removing the diode from the assembly is difficult, but it is easy enough to leave it in the heatsink and use the existing connector.

Of course, the phosphor and a filter have to go. Some destructive work with a screwdriver and pliers broke out the optics from a diode he’d destroyed trying to remove it. Then he replaced the optics on the remaining diode with the modified housing.

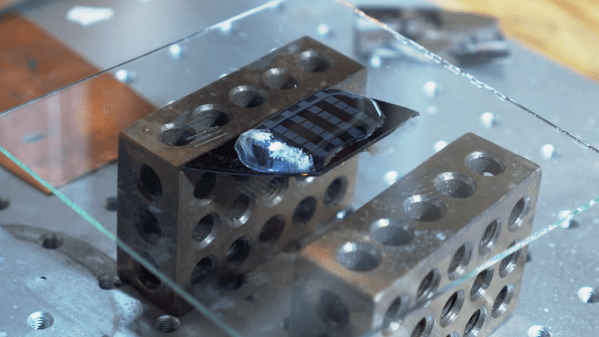
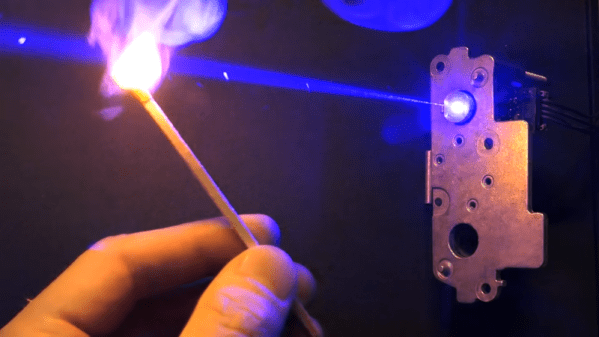
With a low-current test, the diode didn’t lase but did act as a regular LED. More current did the trick, though. The laser without the optics made a line rather than a spot but still had enough power to melt some plastic and light matches. To get a parallel beam, the internal lens needs to move closer to the diode, and a drill bit allowed that to happen, which reduced the beam’s divergence quite a bit, but didn’t create the best result.

With the proliferation of cheap laser modules, it is really worth scrapping a headlight? Maybe. But it is an interesting look inside of a modern headlight, either way. We’ve peeked inside these headlights before. Maybe you can turn those old headlights into an oven.

Continue reading “High-Power Laser Salvaged From Headlights”

As Fast As A Speeding Bullet

[Electronoobs] built a coil gun and the obvious question is: how fast is the projectile? To answer it, he built a chronograph suitable for timing a bullet. The principle is straightforward. A laser and a light sensor would mark the entry and exit of the projectile over a known distance. As it turns out, there are some issues to resolve.

For one thing, a laser is too narrow and might miss the projectile. The first attempt to rectify this used mirrors, but the loss was too great — we suspect he was using a second surface mirror. The final answer was to use an array of detectors and removed the laser’s collimation lens to cover a wider area.

Continue reading “As Fast As A Speeding Bullet”

Integrating sphere test setup

Cannonball Mold Makes A Dandy Integrating Sphere For Laser Measurements

It’s an age-old riddle: if you have a perfect sphere with a perfectly reflective inner surface, will light bounce around inside it forever? The answer is pretty obvious when you think it through, but that doesn’t mean that you can’t put the principle to use, as we see with this homemade Ulbricht sphere for optical measurements.

If you’ve never heard of an Ulbricht sphere, don’t worry — it’s also known as an integrating sphere, and that makes its function a little more apparent. As [Les Wright] explains, an integrating sphere is an optical element with a hollow spherical cavity that’s coated with a diffusely reflective coating. There are two ports in the sphere, one for admitting light — usually from a laser — and one for light to exit. The light bounces around inside the sphere and becomes perfectly diffuse, and creates a uniform beam at the exit port.

[Les]’ need for an integrating sphere comes from the desire to measure the output of some of his lasers with his Raspberry Pi-based PySpectrometer. Rather than shell out for an expensive commercial integrating sphere, or turn one on a lathe, [Les] turned to an unlikely source: cannonball molds. The inside of the mold was painted with an equally unlikely ultra-white paint concocted from barium sulfate and PVA glue. With a few ports machined into the mold, it works perfectly to diffuse the light from his dye lasers for proper measurements.

Lasers can be an expensive hobby, but [Les] always seems to find a way to make things more affordable and just as good. Whether it’s homemade doorknob caps for high-voltage power supplies or blasting the Bayer filter off a cheap CCD camera, he always seems to find a way.

Continue reading “Cannonball Mold Makes A Dandy Integrating Sphere For Laser Measurements”

Laser Z-Axis Table Comes Into Focus

Laser cutters and 3D printers are game-changing tools to have in the workshop. They make rapid prototyping or repairs to existing projects a breeze as they can churn out new parts with high precision in a very short amount of time. The flip side of that, though, is that they can require quite a bit of maintenance. [Timo] has learned this lesson over his years-long saga owning a laser cutter, although he has attempted to remedy most of the problems on his own, this time by building a Z-axis table on his own rather than buying an expensive commercial offering.

The Z-axis table is especially important for lasers because a precise distance from the lens to the workpiece is needed to ensure the beams’s focal point is correctly positioned. Ensuring this distance is uniform over the entire bed can be a project all on its own. For this build, [Timo] started by building a simple table that allowed all four corners to be adjusted, but quickly moved on to a belt-driven solution that uses a stepper motor in order to adjust the entire workspace. The key to the build was learning about his specific laser’s focal distance which he found experimentally by cutting a slot in an angled piece of wood and measuring the height where the cut was the cleanest.

After everything was built, [Timo] ended up with a Z-axis table that is easily adjustable to the specific height required by his laser. Having a laser cutter on hand to bootstrap this project definitely helped, and it also seems to be an improvement on any of the commercial offerings as well. This also illustrates a specific example of how a laser cutter may be among the best tools for prototyping parts and building one-off or custom tools of any sort.

Open Source Replacement For EzCAD

[Bryce] obtained a fiber laser engraver to use for rapid PCB prototyping last Fall. But he was soon frustrated by the limitations of the standard EzCAD software that typically comes with these and similar devices — it is proprietary, doesn’t have features aimed at PCB manufacturing, only runs on Windows, and is buggy. As one does, [Bryce] decided to ditch EzCAD and write his own tool, Balor, named after the King of the Fomorians.

The controller board in [Bryce]’s machine is a Beijing JCZ LMCV4-FIBER-M board, containing an Altera FPGA and a Cypress 8051 USB controller. So far, he hasn’t needed to dump or modify the FPGA or 8051 code. Instead, he sorted out the commands by just observing the USB operations as generated by a copy of EzCAD running know operations. A lot of these engraving systems use this control board, but [Bryce] want’s to collect data dumps from users with different boards in order to expand the library.

Balor is written in Python and provides a set of command line tools aimed at engineering applications of your engraver, although still supporting regular laser marking as well. You can download the program from the project’s GitLab repository. He’s running it on Linux, but it should work on Mac and Windows (let him know if you have any portability issues). Check out our write-up from last year about using these lasers to make PCBs. Are you using a laser engraver to make rapid prototype boards in your shop? Tell us about your setup in the comments.

Laser doping silicon wafer

Laser Doping His Way To Homemade Silicon Chips

It’s a pity that more electronics enthusiasts haven’t taken the hobby to its ultimate level: making your own semiconductors. There are plenty of good reasons for that: chief among them is the huge expense involved in obtaining the necessary equipment. But for the sufficiently clever, there are ways around that.

[Zachary Tong] is dipping his toes into the DIY semiconductor world, and further to the goal of keeping costs to a hobbyist scale, is experimenting with laser doping of silicon. Doping is the process of adding impurities to silicon wafers in a controlled manner to alter the electrical properties of the semiconductor. [Zach]’s doping method is a more localized version of the simple thermal diffusion method, which drives a dopant like phosphorus into silicon using high temperatures, but instead of using a tube furnace, he’s using a fiber laser.

The video below shows his two-step process, which first blasts the silicon oxide layer off the wafer before doping with the laser shining through a bath of phosphoric acid. The process is admittedly fussy, and the results were mixed at best. [Zach]’s testing seems to suggest that some doping occurred, and it even looks like he managed to make something reasonably diode-like using the method.

Although the jury is still out on [Zach]’s method, we thought the effort was the important bit here. Granted, not everyone has a fiber laser kicking around to replicate his results, but it’s always good to see progress in the DIY semiconductor field. Here’s hoping [Zach]’s work, along with the stuff that [Sam Zeloof] is doing, kicks off a spate of garage semiconductor fabs.

Continue reading “Laser Doping His Way To Homemade Silicon Chips”

Laser Sees Through Keyhole

Those guys at Stanford must be watching a lot of James Bond movies. Their latest invention is a laser that can image an entire room through a keyhole. We imagine that will show up in a number of spy movies real soon now. You can see the code or watch the video below.

The technique is called NLOS or non-line-of-sight imaging. Previous approaches require scanning a large area to find indirect light from hidden objects. This new approach uses a laser to find objects that are moving. The indirect data changes based on the movement and an algorithm can reverse the measurements to determine the characteristics of the object.

Continue reading “Laser Sees Through Keyhole”