Build Your Own Nanoleaf-Like Hex Lights

Nanoleaf makes a variety of beautiful LED lighting products, with their hexagon tiles particularly popular with gamers and streamers alike. However, they do come at a significant cost, particularly if you want to put together a larger display. [Giovanni Aggiustatutto] decided to build his own version from scratch, with a nice wooden finish to boot.

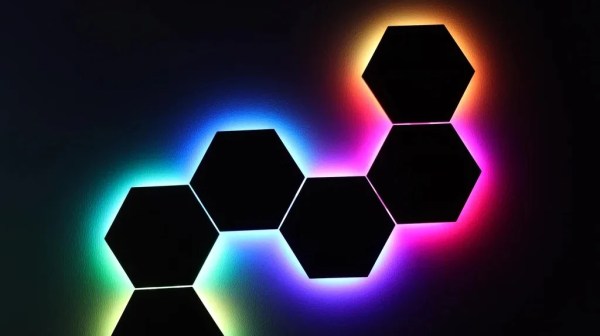
The benefit of the wooden design is that the panels look nice both when they’re switched on, and when they’re switched off. [Giovanni] selected attractive okumè plywood for the build, which is affordable and has a lovely grain. The hexagons were then fitted on their back side with strips of WS2812B LEDs. The first hexagon is fitted with an ESP32 that runs the lights, with the other hexagons having their LEDs daisychained from there. 3D printed frames were then fitted to each hexagon to allow them to be connected together into a larger wall-hanging piece.

Ultimately, building your own wall lights lets you customize them to operate exactly as you want, and often lets you save a lot of money, too. We’ve featured other similar builds before, too. Video after the break.

Continue reading “Build Your Own Nanoleaf-Like Hex Lights”

How The WS2812 Is Made

[Scotty Allen] of Strange Parts is no stranger to Chinese factory tours, but this one is now our favorite. He visits the font of all WS2812s, World Semi, and takes a good look at the machines that make two million LEDs per day.

The big deal with the WS2812s, and all of the similar addressable LEDs that have followed them, is that they have a logic chip inside the LED that enables all the magic. And that means die-bonding bare-die ICs into each blinky. Watching all of the machines pick, place, glue, and melt bond wire is pretty awesome. Don’t miss the demo of the tape-and-frame. And would you believe that they test each smart LED before they kick it out the door? There’s a machine that clocks some data in and reads it back out the other side.

Do we take the addressable LED for granted today? Probably. But if you watch this video, maybe you’ll at least know what goes into making one, and the next time you’re blinking all over the place, you’ll spill a little for the epoxy-squirting machine. After all, the WS2812 is the LED that prompted us to ask, three years ago, if we could live without one.
Continue reading “How The WS2812 Is Made”

Fixing Astronomy In The Blink Of An Eye

If you’ve ever set a telescope up in your backyard, you probably learned how quick any kind of lighting ruins your observation. In fact, a recent study found that every year, about 10% of the stars that were visible the previous year disappear in the mishmash of light scattering through the atmosphere. A company called StealthTransit has a solution: blink the lights in a controlled way. They have an animated video explaining the concept.

The technology, named DarkSkyProtector, assumes there is LED lighting and that the light’s owner (or manufacturer) will put a simple device in line that causes the LED to blink imperceptibly. As you might guess, the telescope — presumably some giant observatory uses a GPS receiver to synchronize and then images only when the LED lights all turn off. That presumes, of course, that you have a significant number of lights under control.

It is hard to imagine every city and home having astronomy-safe lighting. However, we can imagine a university installing a lighting system on its campus to protect night viewing. The system underwent a test in the Caucasus mountains using a 24-inch telescope and was apparently quite successful with a shutter rate of about 150 Hz. We weren’t clear if each LED control module has to have a GPS-disciplined time source, but it seems like you’d have to. However, the post talks about how the bulbs wouldn’t cost more to make than conventional ones, so maybe they don’t have anything fancy in them.

You can see satellites in the day with some tech tricks. Want to check out observatories? Hit the road. Or, get time on a telescope with Skynet University.

Taking A Public Transit Display From Project To Product

We’ve noticed an uptick in “project to product” stories lately, which seems like a fantastic trend to us. It means that hackers are turning out projects that really resonate with people, to the degree that taking the leap and scaling up from a one-off to a marketable product is worth the inherent risk. And luckily enough for the rest of us, we get to learn from their experiences.

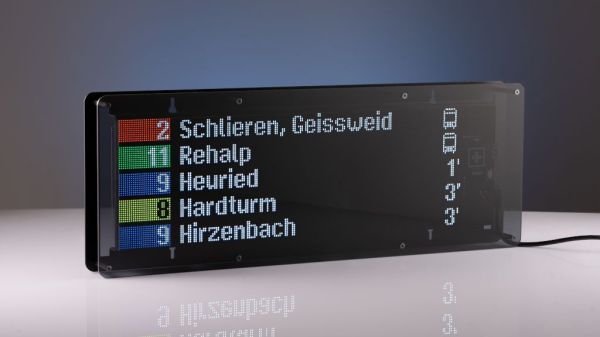
The latest example of this comes to us from [Stefan Schüller], who from the sound of things only reluctantly undertook the conversion of his LED matrix public transit sign into an actual product. The original project had a lot going for it; it looked fantastic, it was technologically simple, and it provided a valuable service. But as a project, it made certain assumptions and concessions that would cause problems when in the hands of a customer. Chief among these was the physical protection of the fragile LEDs, which could easily shear off the display modules if bumped or dropped. There were also firmware issues, such as access to the backend API that serves the transit data; requiring each customer to sign up for and configure their own API key is a non-starter for a product.

In the article, [Stefan] enumerates a long list of problems that going from project to product raises, as well as how he addressed them. The API issue was solved by implementing his own service, which acts as a middleman between the official API and his customers. A nice plexiglass and sheet-metal frame serves to protect the display, too. Design changes were made as well, not only to provide better functionality but to make manufacturing easier. [Stefan] also relates a tale of woe with regard to getting the display’s app into the app stores, something that few of us have to deal with when we’re just fiddling around with something on the bench.

All in all, [Stefan] does a great job walking us through the trials and tribulations of bringing a product to market. There are similar lessons in this production run scale-up, too, but with an entirely different level of project complexity.

Neopixels? Try Liquid Nitrogen To Color Shift Your LEDs Instead

If you’re like us, you’ve never spent a second thinking about what happens when you dunk an ordinary LED into liquid nitrogen. That’s too bad because as it turns out, the results are pretty interesting and actually give us a little bit of a look at the quantum world.

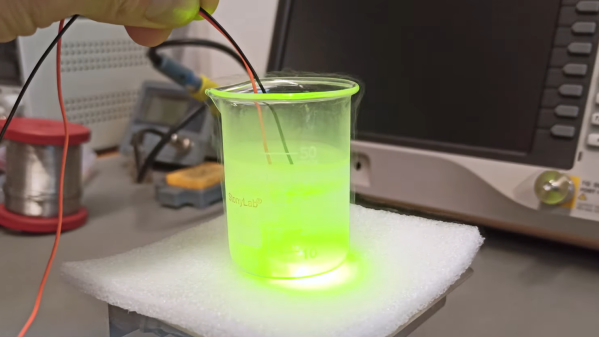
The LED fun that [Sebastian] over at Baltic Lab demonstrates in the video below starts with a bright yellow LED and a beaker full of liquid nitrogen. Lowering the powered LED into the nitrogen changes the color of the light from yellow to green, an effect that reverses as the LED is withdrawn and starts to warm up again. There’s no apparent damage to the LED either, although we suppose that repeated thermal cycles might be detrimental at some point. The color change is quite rapid, and seems to also result in a general increase in the LED’s intensity, although that could be an optical illusion; our eyes are most sensitive in the greenish wavelengths, after all.

So why does this happen? [Sebastian] goes into some detail about that, and this is where quantum physics comes into it. The color of an LED is a property of the bandgap of the semiconductor material. Bandgap is just the difference in energy between electrons in the valence band (the energy levels electrons end up at when excited) and the conduction band (the energy levels they start at.) There’s no bandgap in conductive materials — the two bands overlap — while insulators have a huge bandgap and semiconductors have a narrow gap. Bandgap is also dependent on temperature; it increases with decreasing temperature, with different amounts for different semiconductors, but not observably so over normal temperature ranges. But liquid nitrogen is cold enough for the shift to be dramatically visible.

We’d love to see the color shift associated with other cryogens, or see what happens with a blue LED. Want to try this but don’t have any liquid nitrogen? Make some yourself!

Continue reading “Neopixels? Try Liquid Nitrogen To Color Shift Your LEDs Instead”

Pimp The Potentiometer

Sometimes, a hack isn’t really about the technology but about the logistics. If we asked you to light up an LED using an Arduino, there’s a good chance you’d know exactly how to do that. How about a bunch of LEDs? Simple. Now turn on LEDs proportional to an input voltage. A little harder, but nothing that you probably haven’t done a million times. Finally, arrange the LEDs in an attractive circle around a potentiometer. Wait, how are you going to do that? [Upir] shows us a ready-made ring light for just this purpose and you can see the beautiful thing in the video below.

We made the LED things sound slightly easier than it is. The ring light has 31 LEDs but only 12 pins, so there is some multiplexing going on. The modules come in pairs for about $20, so not a throwaway part, but they will really dress up anything that needs a knob of any kind.

Naturally, it doesn’t matter what you use to drive the LEDs. You could track a pot or a rotary encoder. Or you could show microphone levels or something else. After all, it is just a bunch of LEDs. For that matter, they’d probably make a good pair of robot eyes. Let us know what you want to use them for in the comments.

If your significant other is a little geeky, you might want a different kind of ring light. We couldn’t help but wish the LEDs on the ring were addressable. That would open up a world of interesting possibilities while reducing the pin count, too.

Continue reading “Pimp The Potentiometer”

3D-Printed LED Wall Clock Does Lots With Little

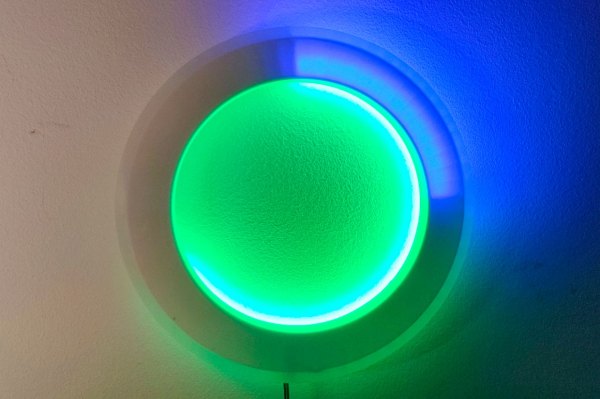
This wall clock built by [Alf Müller] is lovely, using two NeoPixel rings to mark the time by casting light onto a 3D-printed ring. The blue shows the minutes, made more discrete by a grid inside the ring. The green shows the hours.  [Alf] has provided the code so you can rework the color scheme.  It might be interesting to add seconds with the red LEDs, or perhaps a countdown triggered by a touch sensor…

Continue reading “3D-Printed LED Wall Clock Does Lots With Little”