There’s Hope For That Cheap Lathe Yet!

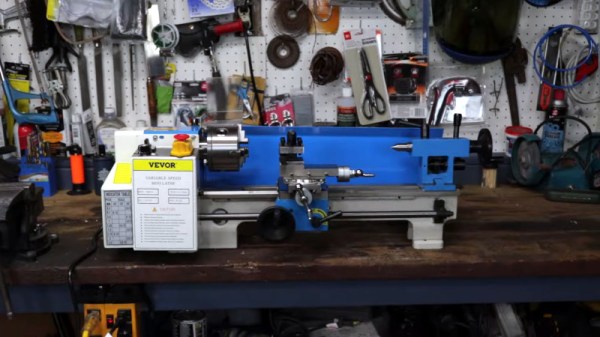
There may be few cases where the maxim that “you get what you pay for” rings true, than a lathe. The less you spend on a lathe, the closer you get to a lathe-shaped object and the further from, well, a lathe. [Camden Bowen] has bought a cheap lathe, and he’s not content with a lathe-shaped object, so he takes us in the video below through a set of upgrades for it. In the process he makes a much nicer lathe for an entirely reasonable sum.

First up are the bearings, in this case a set of ball races which aren’t really appropriate for taking lateral force. After a lot of effort and a tiny bit of damage he manages to remove the old bearings and get the new ones in place, though their slightly different dimensions means he has to replace a spacer with a temporary 3D printed item which he’ll turn in metal later. We learn quite a bit about cheap lathe tools and tool alignment along the way, and he ends up buying a better tool post to solve some of its problems. We were always not very good at grinding HSS edges, too.

At the end of it all he has a much better lathe, upping cost from $774 to $1062 which is still pretty good for what he has. Worth a look, if you too have a lathe-shaped object.

Continue reading “There’s Hope For That Cheap Lathe Yet!”

Streaming Deck Removes Need For Dedicated Hardware

Streaming content online has never been more popular than it is now, from YouTube to Twitch there are all kinds of creators around with interesting streams across a wide spectrum of interests. With that gold rush comes plenty of people selling figurative shovels as well, with audio mixing gear, high-quality web cams, and dedicated devices for controlling all of this technology. Often these devices take the form of a tablet-like device, but [Lenochxd] thinks that any tablet ought to be able to perform this task without needing dedicated, often proprietary, hardware.

The solution offered here is called WebDeck, an application written in Flask that turns essentially any device with a broswer into a stream control device. Of course it helps to have a touch screen as well, but an abundance of tablets and smartphones in the world makes this a non-issue. With the software running on the host computer, the streamer can control various aspects of that computer remotely by scanning a QR code which opens a browser window with all of the controls accessible from within. It has support for VLC, OBS Studio, and Spotify as well which covers the bases for plenty of streaming needs.

Currently the host software only runs on Windows, but [Lenochxd] hopes to have MacOS and Linux versions available soon. We’re always in favor of any device that uses existing technology and also avoids proprietary hardware and software. Hopefully that’s a recipe to avoid planned obsolescence and unnecessary production. If you prefer a version with a little bit of tactile feedback, though, we’ve seen other decks which add physical buttons for quick control of the stream.

Your Scope, Armed And Ready

[VoltLog] never has enough space on his bench. We know the feeling and liked his idea of mounting his oscilloscope on an articulated arm. This is easy now because many new scopes have VESA mounts like monitors or TVs. However, watching the video below, we discovered there was a bit more to it than you might imagine.

First, there are many choices of arms. [VoltLog] went for a cheap one with springs that didn’t have a lot of motion range. You may want something different. But we didn’t realize that many of these arms have a minimum weight requirement, and modern scopes may be too light for some of these arms. Most arms require at least 2 kg of weight to balance the tensions in their springs or hydraulics. Of course, you could add a little weight to the mounting plate of the arm if you needed it. The only downside we see is that it makes it hard to remove the scope if you want to use it somewhere else.

Assuming you have a mount you like, the rest is easy. Of course, your scope might not have VESA mounting holes. No problem. You can probably find a 3D printed design for an adapter or make (or adapt) your own. You might want to print a cable holder at the same time.

Honestly, we’ve thought of mounting a scope to the wall, but this seems nicer. We might still think about 3D printing some kind of adapter that would let you easily remove the scope without tools.

Of course, there is another obvious place to mount your scope. Monitor arms can also mount microscopes.

Continue reading “Your Scope, Armed And Ready”

Tool Demagnetizers And The Magnetic Stray Field

If you’ve ever found yourself wondering how those tool magnetizer/demagnetizer gadgets worked, [Electromagnetic Videos] has produced a pretty succinct and informative video on the subject.

The magnetizer/demagnetizer gadget after meeting its demise at a cutting disc. (Credit: Electromagnetic Videos, YouTube)

While the magnetizing step is quite straightforward and can be demonstrated even by just putting any old magnet against the screwdriver’s metal, it is the demagnetization step that doesn’t make intuitively sense, as the field lines of the magnets are supposed to align the (usually ferromagnetic) material’s magnetic dipole moments and thus create an ordered magnetic field within the screwdriver.

This is only part of the story, however, as the magnetic field outside of a magnet is termed the demagnetizing field (also ‘stray field’). A property of this field is that it acts upon the magnetization of e.g. ferromagnetic material in a way that reduces its magnetic moment, effectively ‘scrambling’ any existing magnetization.

By repeatedly moving a metal tool through this stray field, each time further and further away from the magnet, the magnetic moment reduces until any magnetization has effectively vanished. It is the kind of simple demonstration of magnetism that really should be part of any physics class thanks to its myriad of real-world uses, as this one toolbox gadget shows.

Continue reading “Tool Demagnetizers And The Magnetic Stray Field”

ESP32 Oscilloscope Skips Screen For The Browser

An oscilloscope can be an expensive piece of equipment, but not every measurement needs four channels and gigahertz sampling rates. For plenty of home labs, old oscilloscopes with CRTs can be found on the used marketplace for a song that are still more than capable of getting the job done, but even these can be overpowered (not to mention extremely bulky). If you’re looking for something even cheaper, and quite a bit smaller, this ESP32 scope from [BojanJurca] might fit the bill.

The resulting device manages to keep costs extremely low, but not without a trade-off. For this piece of test equipment, sampling is done over the I2C bus on the ESP32, which can manage a little over 700 samples per second with support for two channels. With the ESP32 connected to a wireless network, the data it captures can be viewed from a browser in lieu of an attached screen, which also keeps the size of the device exceptionally small. While it’s not a speed demon, that’s more than fast enough to capture waveforms from plenty of devices or our own circuit prototypes in a form factor that can fit even the smallest spaces.

Of course for work on devices with faster switching times, it’s always good to keep a benchtop oscilloscope around. But as far as we can tell this one is the least expensive, smallest, and most capable we’ve come across that would work for plenty of troubleshooting or testing scenarios in a pinch. We’ve seen others based on slightly more powerful microcontrollers like this one based on the STM32 and this other built around the Wio Terminal with a SAMD51, both of which also include built-in screens.

A man standing next to a log holds a wooden mallet and a grey froe with a wooden handle. The froe's long straight blade sits atop the end of the log. Several cuts radiate out from the center of the log going through the length of the wood.

Making Wooden Shingles With Hand Tools

While they have mostly been replaced with other roofing technologies, wooden shingles have a certain rustic charm. If you’re curious about how to make them by hand, [Harry Rogers] takes us through his friend [John] making some.

There are two primary means of splitting a log for making shingles (or shakes). The first is radial, like one would cut a pie, and the other is lateral, with all the cuts in the same orientation. Using a froe, the log is split in progressively smaller halves to control the way the grain splits down the length of the log and minimize waste. Larger logs result in less waste and lend themselves to the radial method, while smaller logs must be cut laterally. Laterally cut shingles have a higher propensity for warping and other issues, but will work when larger logs are not available.

Once the pieces are split out of the log, they are trimmed with an axe, including removing the outer sapwood which is the main attractant for bugs and other creatures that might try eating your roof. Once down to approximately the right dimensions, the shingle is then smoothed out on a shave horse with a draw knife. Interestingly, the hand-made shingles have a longer lifespan than those sawn since the process works more with the grain of the wood and introduces fewer opportunities for water to seep into the shingles.

If you’re looking for something more solarpunk and less cottagecore for your house, maybe try a green solar roof, and if you’ve got a glass roof, try cleaning it with the Grawler.

Continue reading “Making Wooden Shingles With Hand Tools”

Spectrum Analyzer Buyer’s Guide

Having a scope in a home lab used to be a real luxury, but these days, its fairly common for the home gamer to have a sophisticated storage scope (or two) hanging around. Dedicated spectrum analyzers are a bit less common, but they have also dropped in price while growing in capabilities. Want to buy your very own spectrum analyzer? [Kiss Analog] has a buyer’s guide for what to consider.

If you’ve already got a scope, it may have a Fast Fourier Transform (FFT) function, and he talks about how it could be used in place of a spectrum analyzer or vice versa. But it really depends on what you’re planning on using it for. If you’re doing compliance testing for emissions, an analyzer is invaluable. If you like building transmitters or even just oscillators for other purposes, viewing the output on a spectrum analyzer can show you how well or poorly your design is performing. Any application where you need to visualize large swaths of the RF spectrum is a candidate for a spectrum analyzer.

Towards the end of the video, you’ll get to see some actual uses on a Uni-T UTS3021B. While those are at the higher end of the hobby price spectrum (no pun intended), it has many features that would have required an instrument ten times that price in years gone by.

There are also some very inexpensive options out there. While it is true, to a degree, that you get what you pay for, it is also true that even these cheap options would be amazing to an engineer from the 1990s. Yes, of course. You could do it with a 555.

Continue reading “Spectrum Analyzer Buyer’s Guide”