Small, Quiet Air Compressor Puts 3D-Printed Parts To Best Use

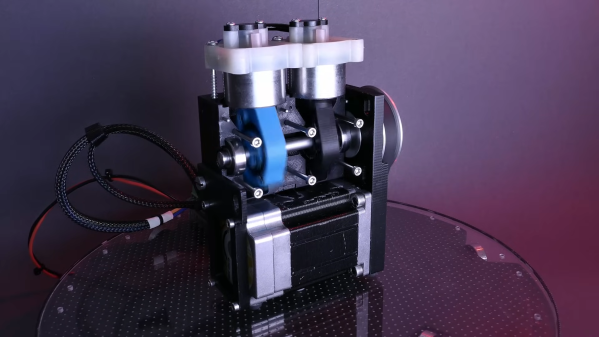
When the only tool you’ve got is a hammer, every problem starts to look like a nail. Similarly, while a 3D printer is a fantastic tool to have, it can make you think it’s possible to build all the things with printed parts. Knowing when to print ’em and when to machine ’em is important, a lesson that [Diffraction Limited] has taken to heart with this semi-printed silent air compressor.

The key to this compressor’s quiet operation is a combination of its small overall size. its relatively low output, and its strategic use of plastic components, which tend to dampen vibrations. The body of the compressor and the piston arms are the largest 3D-printed parts; the design calls for keeping printed parts in compression for longer life, while the parts of the load path in tension travel through fasteners and other non-printed parts. The piston design is interesting — rather than being attached to connecting rods via wrist pins, the machined Delrin pistons are solidly attached to the piston arms. This means they have to swivel within the cylinders, which are made from short pieces of metal tubing, with piston seals designed to move up and down in grooves on the pistons to allow air to move past them. The valve bodies atop each cylinder are salvaged from another compressor.

When powered by a NEMA23-frame BLDC motor via a belt drive, the compressor is remarkably quiet; not quite silent perhaps, but still impressively smooth, and capable of 150 PSI at low speeds. And as a bonus, the split crankcase makes it easy to open up and service, or just show off how it works. We’ve seen a variety of 3D-printed compressors, from screw-type to Wankel, but this one really takes the prize for fit and finish. Continue reading “Small, Quiet Air Compressor Puts 3D-Printed Parts To Best Use”

Garage Door Automation With No Extra Hardware

Home automation projects have been popular as long as microcontrollers have been available to the general public. Building computers to handle minutiae so we don’t have to is one of life’s great joys. Among the more popular is adding some sort of system to a garage door. Besides adding Internet-connected remote control to the action of opening and closing, it’s also helpful to have an indicator of the garage door state for peace-of-mind. Most add some sensors and other hardware to accomplish this task but this project doesn’t use any extra sensors or wiring at all.

In fact, the only thing added to the garage door for this build besides some wiring is the microcontroller itself. After getting the cover of the opener off, which took some effort, a Shelly Uni was added and powered by the 12V supply from the opener itself. The garage door opener, perhaps unsurprisingly, has its own way of detecting when the door is fully open or closed, so some additional wire was added to these sensors to let the microcontroller know the current state. Shelly Uni platforms have a WiFi module included as well, so nothing else was needed for this to function as a complete garage door automation platform.

[Stephen] uses Home Assistant as the basis for his home automation, and he includes all of the code for getting this platform up and running there. It wouldn’t be too hard to get it running on other openers or even on other microcontroller platforms; the real key to this build is to recognize that sometimes it’s not necessary to reinvent the wheel with extra sensors, limit switches, or even power supplies when it’s possible to find those already in the hardware you’re modifying. This isn’t always possible, though, especially with more modern devices that might already be Internet-connected but probably don’t have great security.

Cryo-EM: Freezing Time To Take Snapshots Of Myosin And Other Molecular Systems

Using technologies like electron microscopy (EM) it is possible to capture molecular mechanisms in great detail, but not when these mechanisms are currently moving. The field of cryomicroscopy circumvents this limitation by freezing said mechanism in place using cryogenic fluids. Although initially X-ray crystallography was commonly used, the much more versatile EM is now the standard approach in the form of cryo-EM, with recent advances giving us unprecedented looks at the mechanisms that quite literally make our bodies move.

Myosin-5 working stroke and walking on F-actin. (Credit: Klebl et al., 2024)

The past years has seen many refinements in cryo-EM, with previously quite manual approaches shifting to microfluidics to increase the time resolution at which a molecular process could be frozen, enabling researchers to for example see the myosin motor proteins go through their motions one step at a time. Research articles on this were published previously, such as by [Ahmet Mentes] and colleagues in 2018 on myosin force sensing to adjust to dynamic loads. More recently, [David P. Klebl] and colleagues published a research article this year on the myosin-5 powerstroke through ATP hydrolysis, using a modified (slower) version of myosin-5. Even so, the freezing has to be done with millisecond accuracy to capture the myosin in the act of priming (pre-powerstroke).

The most amazing thing about cryo-EM is that it allows us to examine processes that used to be the subject of theory and speculation as we had no means to observe the motion and components involved directly. The more we can increase the time resolution on cryo-EM, the more details we can glimpse, whether it’s the functioning of myosins in muscle tissue or inside cells, the folding of proteins, or determining the proteins involved in a range of diseases, such as the role of TDP-43 in amytrophic lateral sclerosis (ALS) in a 2021 study by [Diana Arseni] and colleagues.

As our methods of freezing these biomolecular moments in time improve, so too will our ability to validate theory with observations. Some of these methods combine cryogenic freezing with laser pulses to alternately freeze and resume processes, allowing processes to be recorded in minute detail in sub-millisecond resolution. One big issue that remains yet is that although some of these researchers have even open sourced their cryo-EM methods, commercial vendors have not yet picked up this technology, limiting its reach as researchers have to cobble something together themselves.

Hopefully before long (time-resolved) cryo-EM will be as common as EM is today, to the point where even a hobby laboratory may have one lounging around.

Do You Trust Your Cheap Fuses?

When a fuse is fitted in a power rail, it gives the peace of mind that the circuit is protected. But in the case of some cheap unbranded fuses of the type that come in kits from the usual online suppliers that trust can be illusory, as they fail to meet the required specification.

[Andreas Spiess] has used just these fuses for protection for years as no doubt have many of you, so it was something of a shock for him to discover that sometimes they don’t make the grade. He’s taken a look at the issue for himself, and come up with an accessible way to test your fuses if you have any of those cheap ones.

It’s an interesting journey into the way fuses work, as we’re reminded that the value written on the fuse isn’t the current at which it blows but the maximum it’s intended to take. The specification for fuses should have a graph showing how quickly one should blow at what currents above that level, and the worry was that this time would be simply too long for the cheap ones.

In the video below the break, he looks at the various set-ups required to test a fuse, and instead of a bank of large power supplies, he came up with a circuit involving an 18650 cell and three one ohm resistors in parallel. The resulting 1/3 ohm resistor should pass in the region of 10 A when connected across the 18650, so with a 5 A fuse in that circuit and a storage ‘scope he’s able to quickly test a few candidates. He found that the cheap fuses he had were slower to blow than a Bosch part but weren’t as worrisome as he’d at first thought. If you have any of these parts, maybe you should take a look at them too?

Continue reading “Do You Trust Your Cheap Fuses?”

Linux Fu: Getting Started With Systemd

I will confess. I started writing this post about some stupid systemd tricks. However, I wanted to explain a little about systemd first, and that wound up being longer than the tricks. So this Linux Fu will be some very fundamental systemd information. The next one will have some examples, including how to automount a Raspberry Pi Pico. Of course, by the end of this post, you’ll have only scratched the surface of systemd, but I did want to give you some context for reading through the rest of it.

Like many long-time Unix users, I’m not a big fan of systemd. Then again, I’m also waiting for the whole “windows, icon, mouse, pointer” fad to die down. Like it or not, systemd is here and probably here to stay for the foreseeable future. I don’t want to get into a flame war over systemd. Love it or hate it, it is a fact of life. I will say that it does have some interesting features. I will also say that the documentation has gotten better over time. But I will also say that it made many changes that perhaps didn’t need to be made and made some simple things more complicated than they needed to be.

In the old days, we used “init scripts,” and you can still do so if you are really motivated. They weren’t well documented either, but it was pretty easy to puzzle out the shell scripts that would run, and we all know how to write shell scripts. The systemd way is to use services that are not defined by shell scripts. However, systemd tries to do lots of other things, too. It can replace cron and run things periodically. It can replace inetd, syslog, and many other traditional services. This is a benefit or a drawback, depending on your point of view.

(Editor’s note: And this logging functionality was exactly what was abused in last week’s insane liblzma / ssh backdoor.)

Configuring systemd requires you to create files in one of several locations. In systemd lingo, they are “units.” For the purpose of this Linux Fu, we’ll look at only a few kinds of units: services, mounts, and timers. Services let you run programs in response to something like system start-up. You can require that certain other services are already running or are not running and many other options. If the service dies, you can ask systemd to automatically restart it, or not. Timers can trigger a service at a particular time, much like cron does. Another unit you’ll run into are sockets that represent — you guessed it — a network socket.

Continue reading “Linux Fu: Getting Started With Systemd”

WSPR To The Wind With A Pi Pico High Altitiude Balloon

They say that if you love something, you should set it free. That doesn’t mean that you should spend any more on it than you have to though, which is why [EngineerGuy314] put together this Raspberry Pi Pico high-altitude balloon tracker that should only set you back about $12 to build.

This simplified package turns a Pico into a tracking beacon — connect a cheap GPS module and solar panel, and the system will transmit the GPS location, system temperature, and other telemetry on the 20-meter band using the Weak Signal Propagation Reporter (WSPR) protocol. Do it right, and you can track your balloon as it goes around the world.

The project is based in part on the work of [Roman Piksayin] in his Pico-WSPR-TX package (which we covered before), which uses the Pico’s outputs to create the transmitted signal directly without needing an external radio. [EngineerGuy314] took this a step further by slowing down the Pico and doing some clever stuff to make it run a bit more reliably directly from the solar panel.

The system can be a bit fussy about power when starting up: if the voltage from the solar panel ramps up too slowly, the Pico can crash when it and the GPS chip both start when the sun rises. So, a voltage divider ties into the run pin of the Pico to keep it from booting until the voltage is high enough, and a single transistor stops the GPS from starting up until the Pico signals it to go.

It’s a neat hack that seems to work well: [EngineerGuy314] has launched three prototypes so far, the last of which traveled over 62,000 kilometers/ 38,000 miles.

Let Your Finger Do The Soldering With Solder Sustainer V2

Soldering is easy, as long as you have one hand to hold the iron, one to hold the solder, and another to hold the workpiece. For those of us not so equipped, there’s the new and improved Solder Sustainer v2, which aims to free up one of however many hands you happen to have.

Eagle-eyed readers will probably recall an earlier version of Solder Sustainer, which made an appearance in last year’s Hackaday Prize in the “Gearing Up” round. At the time we wrote that it looked a bit like “the love child of a MIG welder and a tattoo machine.” This time around, [RoboticWorx] has rethought that concept and mounted the solder feeder on the back of a fingerless glove. The solder guide is a tube that clips to the user’s forefinger, which makes much finer control of where the solder meets the iron possible than with the previous version. The soldering iron itself is also no longer built into the tool, giving better control of the tip and letting you use your favorite iron, which itself is no small benefit.

Hats off to [RoboticWorx] for going back to the drawing board on this one. It isn’t easy to throw out most of your design and start over, but sometimes it just makes sense.

Continue reading “Let Your Finger Do The Soldering With Solder Sustainer V2”