Fixing A Freezer Design Flaw With A Little Bit Of Heat

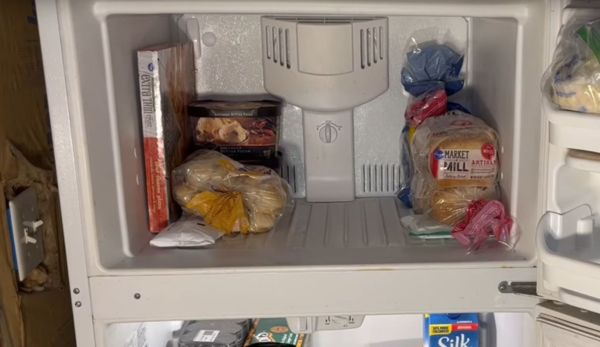
As a shining example of the law of unintended consequences, [Lou] demonstrates how certain types of freezer/refrigerator combinations fail to work in a cold environment, such as a garage during the winter. As [Lou] points out in his video (also linked after the break) – using the freezer unit in his own garage – the problem lies with devices that put the temperature sensor in the refrigerator section, but circulate cold air starting in the freezer section.

This works great in a home environment with a room temperature comfortable for humans, as the refrigerator will constantly warm up slightly due to heat from the outside, triggering the cooling cycle and ensuring the freezer section will stay nice and cold. When placed in, say, a garage when it’s around freezing, the refrigerator section will not warm up, and thus no more cooling cycle gets triggered.

As obviously the freezer section is supposed to stay significantly colder than roughly around 0°C, the freezer section can warm up enough to allow frozen goods to thaw out. The easy fix here as [Lou] demonstrates, is to add a constant source of warmth inside the refrigerator section, such as by keeping the refrigerator light on constantly.

Obvious complaints about the lack of energy efficiency and this combo unit’s optimistically broken sensor design aside, it is a fairly simple and effective fix. Even so, perhaps trading such a combo unit for one with a dedicated temperature sensor in the freezer section would prevent headaches like these.

Continue reading “Fixing A Freezer Design Flaw With A Little Bit Of Heat”

WS2812s On A 6502

We can still remember when the WS2812 LED first came into our consciousness, way back in the mists of time. The timing diagrams in the datasheet-of-questionable-veracity made it sound quite tricky, with tight timing tolerances and essentially a high-speed two-bit PWM data protocol at 500 kHz. It was a challenge to bit-bang with an ATtiny85 back then, but there’s no way something as old and crusty as an Apple II would be up to snuff, right?

[Anders Nielsen] took up the challenge of getting the venerable 6502 processor to drive Neopixels and won! After all, if the chip is good enough for Bender and the Terminator T-800, it should be able to blink some colored LEDs, right? The secret sauce is shift registers!

Specifically, [Anders] abuses the 74LS165 parallel-in, serial-out shift register for his dirty work. Instead of bit-banging the WS2812’s “long high is a 1, short high is a 0” signal directly, the first few bits of the shift register are hard-wired to VCC and the last few to GND.

The bits in the middle determine if the pulse shifted out is long or short, and they’re set by the 6502, through a 6522 VIA chip, just like the Apple II would have. Clocking the data out of the shift register handles the timing-critical stuff. Very clever!

Video below the break.

Continue reading “WS2812s On A 6502”

Eric Strebel peeks through his Pfaff 463 industrial sewing machine.

Simple Upgrades Make An Old Industrial Sewing Machine New Again

Well, this is a pleasant surprise: it seems that industrial designer [Eric Strebel] recently got a hold of an industrial sewing machine to tackle the softer side of prototyping. What doesn’t surprise us is that he did some upgrades to make it more user-friendly. Check them out in the video embedded below.

So, what’s the difference between a machine like this and what you might have around the house? Domestic sewing machines have a motor about the size of your fist, and it’s inside the machine’s body. Modern domestics can do light-duty work, but they can’t handle making bags and upholstery or sewing a bunch of layers of any material together. Industrial machines have either clutch or servo motors that are easily five times the size of a domestic’s motor, and are built into the table along with the machine.

Pfaff 463 industrial sewing machine with its new brushless DC servo motor.[Eric] found this Pfaff 463 on Craigslist. It was built somewhere around 1950, and it only does one thing — a single-needle, straight stitch, forward or reverse — but it will do it through damn near anything you want (unlike those computerized hunks of plastic made for home use nowadays). Again, these machines are always built into a table, and they come with a lamp.  While the machine itself may be a workhorse, the light is wimpy, so [Eric] replaced it with a goose-neck LED light that has a magnet for sticking it anywhere light is required around the machine.

No matter the size, electric sewing machines are driven with a foot pedal. On a domestic, the pedal is loose and you just put it on the floor wherever you want, but industrial foot pedals are built into the table frame. [Eric] drilled a bunch of new holes in the side of the pedal so he can move the connecting rod closer to the pivot point. This gives him better control with less footwork.

The biggest, baddest upgrade [Eric] did was to the motor. Although there was nothing wrong with the original  clutch motor, it makes the machine go very fast so that garment workers can fulfill their quotas. Because of this, it’s difficult to control. He upgraded to a brushless DC servo motor for greater precision and easier prototyping. He got really lucky, too, because it mounted directly into the old holes.

We agree wholeheartedly with [Eric]’s sentiment about old sewing machines, or any old machine for that matter. They tend to be overbuilt because planned obsolescence wasn’t a thing yet. If you can’t afford or find an industrial, an old Singer or something similar will likely serve your purpose, as long as you use the right needle.

If you already have an old domestic machine sitting around, you might be able to breathe new life into it with a 3D printer.

Continue reading “Simple Upgrades Make An Old Industrial Sewing Machine New Again”

Keynote Video: Jeremy Fielding Wants To Help You Get Moving

For many DIY hardware projects, the most movement it’s likely to see is when we pick the assembled unit up off the workbench and carry it to wherever it’s destined to spend the rest of its functional life. From weather sensors to smart mirrors, there’s a huge array of devices that don’t need to move one millimeter to function. But eventually, you’re likely to run into a project that’s a bit more dynamic. Maybe you’d like to motorize your window shades, or go all out and build a remote controlled rover. With these more active designs comes a whole slew of new problems you may never have encountered before.

Luckily for us, folks like Jeremy Fielding are out there and willing to share their knowledge. In his fascinating presentation for the 2021 Hackaday Remoticon, Building Hardware that Moves: the Fundamentals that Everyone Should Know, he took viewers on a whirlwind tour of what he’s learned about designing and building complex machines from his years of professional experience. Whether its a relatively simple articulated workbench for the shop, a gargantuan earthmoving machine, or a high-dexterity robotic arm, each project he’s worked on has presented unique challenges that needed to be solved.

Not all of Jeremy’s machines will fit in your average workshop.

A lot of the projects that Jeremy has worked on are on a much larger scale than what your average hobbyist is ever going to run into. When there’s an arrow pointing out the tiny human in a picture of you and the machine you’re currently working on, you know things are getting serious. But as anyone who’s watched his YouTube videos knows, he’s got a real knack for taking these high-level concepts and distilling them into something more digestible for the home gamer.

Continue reading “Keynote Video: Jeremy Fielding Wants To Help You Get Moving”

OpenCV Knows Where Your Hand Is

We have to say, [Murtaza]’s example game in his latest video isn’t very exciting. However, the OpenCV technique he uses to track a hand and determine its distance from a single camera is pretty interesting. The demo shows a random button on the screen and you have to use your hand to press the button which then moves so you can try again. The hand measurement seems accurate to a few centimeters which is good enough for many applications.

The Python code is actually quite straightforward. Essentially, the software tracks your hand and by estimating its relative size to determine how far away it is. Of course, your hand might also rotate, and [Murtaza] works through all the cases step-by-step. If we wanted to know a distance, we’d probably turn to ultrasonics or a time of flight sensor. The problem is, those sensors can’t tell your hand from anything else that happens to be in front of it. The use of a single camera to track and locate is pretty impressive.

If you haven’t used OpenCV before, the channel has a lot of tutorials and they are all worth watching. Computer vision is a great technique and can replace a lot of things in some applications. GPS, for example. Or, try this creepier tracking application next Halloween.

Continue reading “OpenCV Knows Where Your Hand Is”

How To Get Into Cars: E85 Fuel

If you’ve spent any time around the modified car scene in the last few years, you’ve probably heard about E85. Maybe you’ve even noticed a sweet smell emanating from the pitlane, or heard people cracking jokes about “corn juice.”

The blended fuel, which combines alcohol and traditional gasoline, can have significant performance benefits if used properly. Today, we’ll explore what those are, and how you can set your ride up to run on E85.

Continue reading “How To Get Into Cars: E85 Fuel”

Belt-drive 3D-printer extruder

Back-to-Back Belts Drive Filament In This Unique Extruder Design

It’s hard to say when inspiration will strike, or what form it’ll take. But we do know that when you get that itch, it’s a good idea to scratch it, because you might just end up with something like this cool new design for a 3D printer extruder as a result.

Clearly, the world is not screaming out for new extruder designs. In fact, the traditional spring-loaded, toothed drive wheel on a stepper really does the job of feeding filament into a printer’s hot end just fine, all things considered. But [Jón Schone], aka Proper Printing on YouTube, got the idea for his belt-drive extruder from seeing how filament manufacturers handle their products. His design is a scaled-down version of that, and uses a pair of very small timing belts that run on closely spaced gears. The gears synchronize the movement of the two belts, with the filament riding in the very narrow space between the belts. It’s a simple design, with the elasticity of the belt material eliminating the need for spring pre-loading of the drive gears.

Simple in design, but not the easiest execution. The video below tells [Jón]’s tale of printing woe, from using a viscous specialty SLA resin that was really intended for a temperature-controlled printer, to build tank damage. The completed extruder was also a bit too big to mount directly on the test printer, so that took some finagling too. But at the end of the day, the idea works, and it looks pretty cool doing it.

As for potential advantages of the new design, we suppose that remains to be seen. It does seem like it would eliminate drive gear eccentricity, which we’ve seen cause print quality issues before.

Continue reading “Back-to-Back Belts Drive Filament In This Unique Extruder Design”