The Rollercoaster Of Developing The Ultimate Hackable Keyboard

When designing anything with “hackable” in the punchline, scope creep is an integral part of the process. You end up trying to create something to potentially be an infinite number of things for an infinite number of users. [Zack Freedman] is going really deep down the rabbit hole with his MiRage keyboard and has been documenting the progress in his usual entertaining style, with some cautionary notes included.

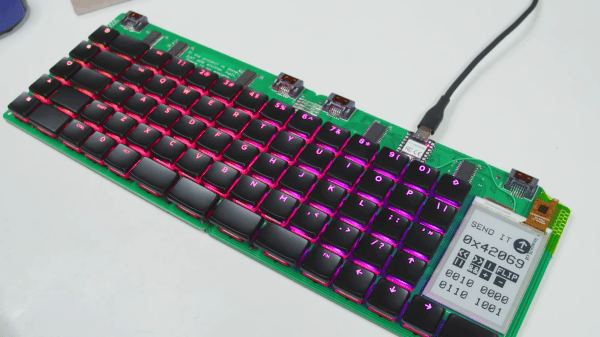
The most fascinating tale from this come about as a result of adding RGB LEDs beneath the keys, while still allowing everything to function when the keyboard is split in two. Thanks to an IO expander chip in one side of the board, a standard TRRS audio cable is enough to link both sides together. But the addition of addressable LEDs meant more lines were required.

[Zack] thought he had found a solution in the form of SATA cables, but it turns out all SATA cables internally connect pins 1,3, and 7, making them useless for this application. He realized he had no choice but to add a second microcontroller to the “dumb” side of the keyboard and return to I2C over a TRRS cable. However, the RP2040-based Seeed XIAO’s I2C absolutely refused to play along. After a fortnight of frustrating debugging, it turns out there was a bug in the pin definitions. Fortunately, this also revealed that the XIAO had an undocumented secondary I2C interface, which he plans to configure as a peripheral to make the keyboard almost infinitely expandable with additional keys.

An earlier version of the MiRage featured tactile OLED displays, but it turns out the thin panes of glass don’t handle repeated flexing well, so they had to be scrapped. In their place came a touchscreen E-paper display, but now this seems to be evolving into a pluggable module for any input device that your heart desires, including possibly a haptic SmartKnob. Another major update are PCB footprints that support both CHOC and MX switches.

It all started with the MiRage V1 keyboard intended to for use in an updated version of [Zack]’s cyberdeck. After realizing how many people were interested in the keyboard but not the cyberdeck, he shifted focus to refining the MiRage.

This project still has some way to go, so we’ll certainly be keeping our eye on it. In the meantime, we’ve recently covered another exceptionally customizable keyboard that might catch your fancy.

Continue reading “The Rollercoaster Of Developing The Ultimate Hackable Keyboard”

A 3D printed roller coaster model with light strips modelling the trains

How To Make A Model Roller Coaster Without Any Moving Parts

Roller coasters are not only great fun to ride, they’re also fascinating pieces of engineering. Building your own full-size coaster is sadly beyond most people’s means, so the average enthusiast will have to settle for simulation or modelling of their own designs. [Jon Mendenhall] is one of those who specialize in building model roller coasters and simulating their motion in intricate detail. His latest project is a scale model of VelociCoaster, a Jurassic Park-themed ride in Universal’s Islands of Adventure, that simulates the coaster’s ride without using any moving parts.

[Jon] achieves this by re-creating the trains’ motion using LED strips. A total of 3000 LEDs are spread along more than nine meters of track and make a mesmerizing light show of several trains whizzing along the track, accelerating and slowing down exactly like the real thing.

A 3D CAD model of a roller coasterIn his video, [Jon] explains the process of generating an accurate 3D model of the track starting from nothing more than an overhead view of the park as well as photos taken from various angles. The surrounding terrain and buildings are also included in his 3D model, as are the 128 supports that hold the track in place. The terrain and building were made from plywood and foam using a CNC machine, while the track and supports were 3D printed.

A Teensy microcontroller runs the whole show, with the LED strips split into five separate sections to allow a high enough frame rate for smooth animations. An infrared remote is used to start and stop the ride, as well as to adjust the speed; the model supports running the trains at a physically accurate speed, but because this looks rather dull, the regular setting is about three times as fast.

Looking for more roller coaster models? [Jon] made a similarly impressive model with a powered train before, and we’ve seen several models that actually coast along their tracks.

Continue reading “How To Make A Model Roller Coaster Without Any Moving Parts”

A model roller coaster

3D Printed Model Roller Coaster Accurately Simulates The Real Thing

While they don’t give the physical thrill of a real one, model roller coasters are always fun to watch. However, they actually make a poor analog of a full-sized ride, as gravitational force and aerodynamic drag don’t scale down in the same way, model roller coasters usually move way faster than the same design would in the real world. [Jon Mendenhall] fixed this deficiency by designing a model roller coaster that accurately simulates a full-sized ride.

The track and cart are all made of 3D printed pieces, which altogether took about 400 hours to print. The main trick to the system’s unique motion is that the cart is motorized: a brushless DC motor moves it along the track using a rack-and-pinion system. This means that technically this model isn’t a roller coaster, since the cart never makes a gravity-powered drop; it’s actually a small rack railway, powered by a lithium-ion battery carried on board the cart. An ESP32 drives the motor, receiving its commands through WiFi, while the complete setup is controlled by a Raspberry Pi that runs the cart through a predetermined sequence.

The design of the track was inspired by the Fury 325 roller coaster and simulated in NoLimits 2. [Jon] wrote his own software to generate all the pieces to be printed based on outputs from the simulator. This included all the track pieces as well as the large A-frames holding it up; some of these were too long to fit in [Jon]’s 3D printers and had to be built from smaller pieces. The physics simulation also provided the inputs to the controller in the form of a script that contains the proper speed and acceleration at each point along the track.

The end result looks rather slow compared to other model roller coasters, but actually feels realistic if you imagine yourself inside the cart. While it’s not the first 3D printed roller coaster we’ve seen, it’s probably the only one that accurately simulates the real thing. If you’re more interested in a roller coaster’s safety systems, we’ve featured them too.

Continue reading “3D Printed Model Roller Coaster Accurately Simulates The Real Thing”

Jared Holladay

The Safest Model Roller Coaster

[Jared Holladay] is a computer engineering student at the University of Cincinnati and a life-long roller coaster fanatic. A lot of people look at roller coasters as an exciting example of physics, like potential energy versus kinetic energy or inertia, and rightly so. [Jared] looks at them and wonders about the controls. Video also below and there is a feature-length explanation with more details. Some Hackaday readers and writers can identify the components, so we think his coaster model belongs here.

Like many folks in this field, he’s built K’nex models to get a handle on construction. He’s toured STEM shows with the tracks and undoubtedly wowed kids, adults, and physics teachers, but since he can speak to the programming, he is a triple threat. Now, he’s growing out of the toy construction plastic and moving into 3D printed parts with needle-fine tolerances.

His latest base is extruded aluminum, like what you’d want in a rigid CNC or printer. In addition to the industrial-grade surface, Rockwell Automation sent him a safety programmable logic controller, PLC, and a touchscreen HMI. Our fellows in the industry tell us those are far beyond the price scope of regular hobbyists. But fear not; your Arduino clones will suffice until you get your first grant.

The point of all the ruggedized hardware, aside from authenticity, is to implement safety features the same way you would in the industry. The redundant PLC connects to inductive prox sensors to check train speed and location. Other moving parts, like friction brakes, have sensors to report if there is a jam. After all, it’s no good if you can’t stop a train full of people. There are hundreds of things that can go wrong. Just ask [Jared] because he programmed on-screen indicators for all of them and classified them to let an operator know if they can keep the ride moving or if they need to call maintenance.

Not all homemade coasters are scale models, and some of the traditional ones have more than meets the eye.

Continue reading “The Safest Model Roller Coaster”

3D Printed Roller Coaster Looks Pretty Darn Fun

Rollercoasters are great fun if you can deal with the exhilaration without throwing up or otherwise screaming until you pass out. Of course, the big outdoors ones are a little hard to get to at the moment, what with a pandemic raging outside. However, [3d_coasters] has built a tabletop design that, while it’s too small to ride, is nonetheless quite impressive. (Video, embedded below.)

The coaster is of the launch design. It relies on an elastic cord that is wound up to high tension to launch the train up to speed, with the train then coasting around the rest of the curves on the track. The quality of the modelling is highly impressive, too. The doors at the boarding platform are even actuated to simulate riders boarding the train! Everything is controlled by an Arduino, a handful of micro servos, and a DC motor.

As you might imagine, this project didn’t happen overnight. 600 hours were logged in Fusion 360 developing the track, and slicing the models in Cura for 3D printing took a further 5 hours. The actual printing process itself took 800 hours, not including finishing, so this project certainly isn’t one for the faint of heart. The final model weighs a full 30 lbs.

Believe it or not, we’ve featured 3D printed rollercoasters before, too. Video after the break.

Continue reading “3D Printed Roller Coaster Looks Pretty Darn Fun”

Chatty Coaster Agitates, In A Friendly Way

Awkward silences can be highly uncomfortable. Thankfully, they’re a problem that can be solved by technology. Chatty Coaster aims to do just this, detecting pauses in conversation and interjecting with helpful questions to move things along.

The coaster is built around an Arduino Micro, which uses a microphone to detect audio levels in the room. When it detects an extended silence, it then fires off a sound clip using a SparkFun audio breakout board. The questions vary from plain to politically sensitive, so there’s a good chance you could get some spicy conversation as a result. Any talking device runs a risk of being more annoying than helpful, and there’s certainly a risk that Chatty Coaster could fall into this category. Choosing the right content seems key here.

Overall, while this may not be the ultimate solution to boring company, it could get a laugh or two and serves as a good way to learn how to work with audio on microcontrollers. Video after the break.

We’ll admit, when we were reading this one, we thought we had déjà vu. But this one’s a lot less blamey.

Continue reading “Chatty Coaster Agitates, In A Friendly Way”

Gaze Deeply Into These Infinity Mirror Coasters

Infinity mirrors have been gaining in popularity recently, thanks in no small part to the availability of low-cost RGB LED strips to line them with. Generally such pieces are limited to wall art, or the occasional table build, which is what makes these infinity mirror drink coasters from [MnMakerMan] so unique.

Built from an ATtiny85 and a WS2812B LED strip nestled into a 3D printed enclosure, these coasters are relatively cheap and easy to assemble should you want to run a few off before the holiday party season. [MnMakerMan] mentions the LEDs can consume a decent amount of energy, so he’s included a module to allow recharging of the internal 3.7 V 1500 mAh battery over USB.

Of course, a couple of PLA pieces and a custom PCB doesn’t make an infinity mirror. To achieve the desired effect, he’s created a stack consisting of a 4″ glass mirror, a 1/8″ thick plexiglass disc, and one-way mirror tint film. The WS2812B strip mounted along the circumference lights up the void between the two surfaces, and produces a respectable sense of depth that can be seen in the video after the break.

This isn’t the first high-tech piece of surface protection we’ve seen around these parts, as some very nice wirelessly charged supercapacitor coasters were entered into the 2019 Hackaday Prize. Of course, if you’re of the opinion that coasters should remain as cheap as possible, we’ve seen a number of automated attempts to add some flair to the classic paperboard discs.

Continue reading “Gaze Deeply Into These Infinity Mirror Coasters”