Giant Solderless LEGO NES Controller Gives Everyone Tiny Hands

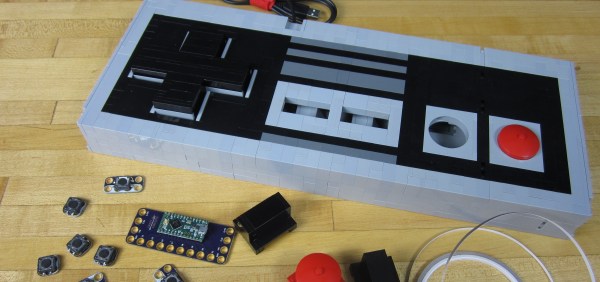
If you were thinking “I should spend $130 on LEGO bricks and build a giant USB NES controller just to see what that would be like,” but you were afraid of spending that much money, [BrownDogGadgets] has you covered. He built a giant NES controller out of LEGO. The controller is designed in LEGO Digital Designer, which lets you create a virtual model, then get a full list of parts which can be ordered online.

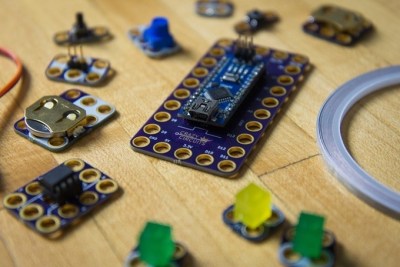
The electronics are based on a Teensy LC programmed to appear as a USB keyboard, and the buttons are standard push buttons. The insides are wired together with nylon conductive tape. LEGO was an appropriate choice because the Teensy and switches are built on top of LEGO compatible PCBs, so components are just snapped in place. The system is called Crazy Circuits and is a pretty neat way to turn electronics into a universal and reusable system.

If that controller is too big, they’ve also used the same circuit with some laser cut parts for your own controller. If you do want to go even bigger, take a look at [Baron von Brunk’s] LEGO NES controller, which used the electronics from a real controller.

Continue reading “Giant Solderless LEGO NES Controller Gives Everyone Tiny Hands”

Low Cost Optics Bench Project – Now With Lasercut Optics

[PWalsh] has a clever idea for learning and experimenting with basic optics: instead of using actual lenses, he’s using clear pieces of laser-cut acrylic cut into lens profiles instead. They are much easier to make, mount, adjust, and handle while still bending light in the same basic ways. It allows for simple hands-on experimentation with plenty of visual feedback – perfect for beginners.

Optical Group

This idea is part of [PWalsh]’s low-cost optics bench project, which uses laser-cut plastic to create adjustable optics bench components. We’ve covered this project before, but [PWalsh] expanded the idea with the concept of these simple laser-cut optics for basic experimentation; an addition that requires no additional tools and only a small amount of material. Features and value added for nearly zero cost is something we always love to see!

Continue reading “Low Cost Optics Bench Project – Now With Lasercut Optics”

Optics Laboratory Made From LEGO

16A lot of engineers, scientists, builders, makers, and hackers got their start as children with LEGO. Putting those bricks together, whether following the instructions or not, really brings out the imagination. It’s not surprising that some people grow up and still use LEGO in their projects, like [Steve] who has used LEGO to build an optics lab with a laser beam splitter.

[Steve] started this project by salvaging parts from a broken computer projector. Some of the parts were scorched beyond repair, but he did find some lenses and mirrors and a mystery glass cube. It turns out that this cube is a dichroic prism which is used for combining images from the different LCD screens in the projector, but with the right LEGO bricks it can also be used for splitting a laser beam.

The cube was set on a LEGO rotating piece to demonstrate how it can split the laser at certain angles. LEGO purists might be upset at the Erector set that was snuck into this project, but this was necessary to hold up the laser pointer. This is a great use of these building blocks though, and [Steve] finally has his optics lab that he’s wanted to build for a while. If that doesn’t scratch your LEGO itch, we’ve also featured this LEGO lab which was built to measure the Planck constant.

DIY Oscilloscope With A Scanning Laser

If you’ve ever used an old-school analog oscilloscope (an experience everyone should have!) you probably noticed that the trace is simply drawn by a beam that scans across the CRT at a constant rate, creating a straight line when there’s no signal. The input signal simply affects the y-component of the beam, deflecting it into the shape of your waveform. [Steve] wrote in to let us know about his home-built “oscilloscope” that works a lot like a simple analog oscilloscope, albeit with a laser instead of  a CRT.

[Steve]’s scope is built out of a hodgepodge of parts including Lego, an Erector set, LittleBits, and a Kano Computer (based on a Raspberry Pi). The Pi generates a PWM signal that controls the speed of a LittleBits motor. The motor is hooked up to a spinning mirror that sweeps the laser across some graph paper, creating a straight laser line.

After he got his sweep working, [Steve] took a small speaker and mounted a mirror to its cone. Next he mounted the speaker so the laser’s beam hits the mirror on the speaker, the spinning sweep mirror, and finally the graph paper display. The scope’s input signal (in this case, audio from a phone) is fed into the speaker which deflects the laser beam up and down as it is swept across the paper, forming a nice oscilloscope-like trace.

While [Steve]’s scope might not be incredibly usable in most cases, it’s still a great proof of concept and a good way to learn how old oscilloscopes work. Check out the video after the break to see the laser scope in action.

Continue reading “DIY Oscilloscope With A Scanning Laser”

Measuring The Planck Constant With Lego

For nearly 130 years, the kilogram has been defined by a small platinum and iridium cylinder sitting in a vault outside Paris. Every other unit of measurement is defined by reproducible physical phenomenon; the second is a precise number of oscillations of a cesium atom, and a meter is the length light travels in 1/299792458th of a second. Only the kilogram is defined by an actual object, until NIST and the International Committee of Weights and Measures defines it as a function of the Planck constant. How do you measure the Planck constant? With a Watt balance. How do you build a Watt balance? With Lego, of course.

A Watt balance looks like a double-armed scale where one weight can be compared to another weight of known mass. Instead of using two arms, a Watt balance only has one arm, brought into balance by a current flowing through a coil. The mechanical power in the balance – brought about by whatever is on the balance plate – can then be compared to the electrical power, and eventually the Planck constant. This will soon be part of the formal definition of the kilogram, and yes, a machine to measure this can be made out of Lego.

The only major non-Lego parts in the Lego Watt balance are a few coils of wire wound around a PVC pipe and a few neodymium magnets. These are placed on both arms of the balance, and a pair of lasers are used to make sure both arms of the balance are level. Data are collected by measuring the coils through a few analog pins on a Labjack and a Phidget. Once the voltage and current induced in each coil is measured, the Wattage can be calculated, then the Planck constant, and finally how close the mass on the balance pan is to a real, idealized kilogram. Despite being made out of Lego, this system can measure a gram mass to 1% uncertainty.

The authors have included a list of Lego parts, most of which could be found in any giant tub of Lego in an 8-year-old’s closet. The only really expensive item on the BOM is a 16-bit USB DAQ; apart from that, it’s something anyone can build.

Thanks [Matt] for the tip.

Tens Of Thousands Saved By Building A BAM Microscope Out Of LEGO

A Brewster Angle Microscope (BAM) can run you around $100,000. If you don’t have that lying around you could just use some LEGO pieces to build your own. Having been faced with no budget to buy the hardware, and needing the data to finish his PhD, [Matthew] figured out a way to build something passable on the cheap.

These microscopes bounce a light source off of a pool of water and into the lens of a camera. The thing is the angle of the sender and receiver must be just perfect at 53.1 degrees. [Matthew] was able to afford a used camera, and started experimenting with some lab equipment to mount the rig. But he just couldn’t get the adjustments right. Since he had to move the mounting hardware by hand it was impossible not to over or under shoot the corrections. But then he had a eureka moment. LEGO pieces have very accurate tolerances, and you can get geared and motorized parts. He leveraged the quality of the toy into a BAM whose alignment can be tweak with great precision.

It may not look like much, but you can see stearic acid floating through the microscope’s field of vision in the clip after the break. This is exactly the type of observations he needed to perform. Of course if you just need a microscope you can use a laser and a drop of water.

Continue reading “Tens Of Thousands Saved By Building A BAM Microscope Out Of LEGO”

Laser Light Show Features Full XY Control Via Homemade Galvanometers

[Rich] over at NothingLabs has put together a really cool laser light show that you really must see in an effort to win a laser cutter from Instructables.

His walkthrough discusses the mechanics of laser light shows – specifically how galvanometers are typically used to precisely aim mirrors in order to draw images and write text. Commercial galvanometers tend to be pretty expensive, so he opted to build his own, using relatively cheap and easy to find parts.

The galvanometers were constructed using a pair of old speaker woofers, a few Lego bricks, and some acrylic mirror squares. The mirrors were mounted on the speakers, which were then wired to an Arduino. He removed the batteries from a cheap red laser pointer and permanently wired it to the Arduino, which it now uses as a pulsed power source. Once he had everything built, he positioned the laser using a fog machine for guidance.

As you can see in the video below, the laser show is quite impressive. His homemade galvos provide a somewhat rough quality to the final projected image, and we like that a lot. It looks almost as if all of the text and images were hand drawn, which is a pretty cool effect.

Just as [Rich] mentions, we hope to see some cool hacks based off his work in the future.

If you are interested in some of our previous laser features, check these out.

Continue reading “Laser Light Show Features Full XY Control Via Homemade Galvanometers”