Etch-a-sketch made with LEDs

RGB LED Matrix Helps Etch-a-Sketch Scratch Out A 21st Century Existence

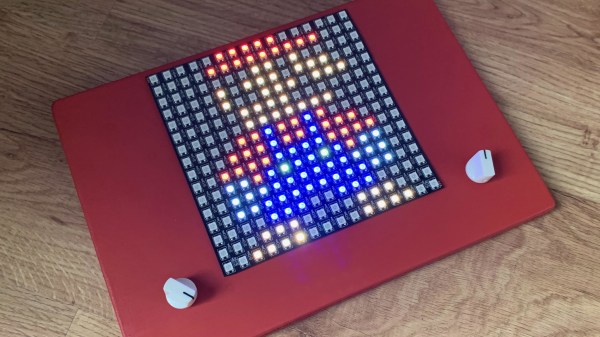
We never did crack open our Etch-a-Sketch, but we did scrape out a window large enough to really check out the mechanism inside. [MrLangford] is bringing the Etch-a-Sketch into the 21st century while at the same time, bringing an even bigger air of mystery, at least for the normies.

Instead of scraping aluminum powder off of plastic by driving a stylus on an x-y gantry with a pair of knobs, this bad boy uses rotary encoders to move the cursor around and put down squares of colored light. The familiar movements are there — the left knob moves the cursor left and right, and the right knob moves it up and down. But this wouldn’t be a 21st century toy without newfangled features. Push the left encoder down and it cycles through eight color choices, or push the right one down to go through them backwards. We hope one of the colors is setting it back to darkness in case you screw up. And while we’re dreaming up improvements, it would be awesome to add an accelerometer so you could shake it clear like a standard Etch-a-Sketch.

Inside the requisite red enclosure with white knobs are an Arduino Nano and a 16×16 RGB LED matrix. The enclosure is four sheets of 6mm MDF glued together, and we like the use of protoboard to distribute GND and 5 V in the name of keeping the thing slim.

If you’re not much of an artist, here’s a TV-sized Etch-a-Sketch build that can draw by itself.

LED Matrix Glasses Built With The Help Of Graph Paper

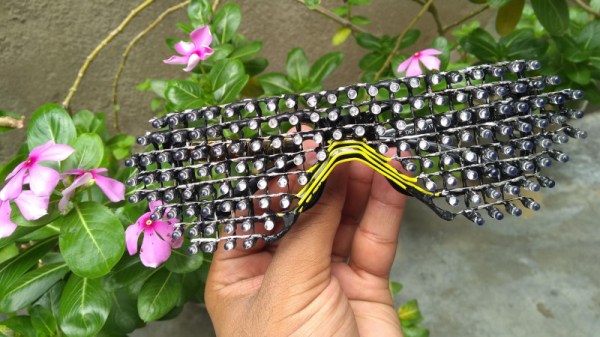
These days, there’s all manner of addressable LEDs out there that can be easily used to produce blinky, flashy projects. However, there’s nothing stopping makers from doing things the old fashioned way, and hacking together an matrix out of raw LEDs. [Deepak Khatri] did just that with his own custom build.

Rather than rely on a PCB or other substrate to hold the matrix together, [Deepak] elected to freeform the design instead. A matrix of holes was cut in a cardboard template with the aid of graph paper. LEDs were then inserted into the holes in the requisite pattern, and their own leads soldered together to create the frame for the glasses. Additional wires that were needed were then installed, doubling as a bridge to allow the glasses to rest comfortably on the nose. Black epoxy was then used on the back side to block the light from blinding the wearer. The matrix is controlled by a pair of shift registers addressed by a microcontroller, and the display animates impressively smoothly.

it’s a fun build, and one that we suspect looks particularly impressive at night. They’d also make it easy for your friends to spot you in a dark club. We’ve seen some impressively stylish LED glasses over the years, too, dating all the way back to [macetech]’s pair from 2012. Video after the break.

Continue reading “LED Matrix Glasses Built With The Help Of Graph Paper”

LED Matrix Hack Chat

Join us on Wednesday, June 9 at noon Pacific for the LED Matrix Hack Chat with Garrett Mace!

It’s pretty amazing how quickly light-emitting diodes went from physics lab curiosity to a mainstream commodity product made in the millions, if not billions. Everything about LEDs has gotten better, smaller, and cheaper over the years, going from an “any color you want as long as it’s red” phase to all the colors of the rainbow and beyond in a relatively short time. LEDs have worked their way into applications that just didn’t seem likely not that long ago, like architectural lighting, automotive applications, and even immense displays covering billboards, buildings, and sporting venues with multicolor, high-resolution displays.

It’s that latter application that seems to have provided a boon to electronics hobbyists, in the form of cheap and plentiful LED matrix modules. These are easily sourced at the usual places, and with their tightly packed pinpoints that can show any color at any intensity, they have a ton of fun and useful applications for the hacker. But how exactly do you put them to use? Usually the electronics end is pretty straightforward, but some of the math involved in figuring out how to address all these LEDs can be a little mind-bending.

To help us sort all this out, Garrett Mace will drop by the Hack Chat. You’ve probably seen Garrett’s cool LED matrix shades, which have gone through a ton of revisions and are a much-copied fashion accessory among the cool hackers. They look simple, but there are tricks to making them work right, and Garrett will share his secrets. Come with your questions on putting LED matrix modules to work, especially those odd-size modules and strange arrangements that defy simple Cartesian coordinates.

join-hack-chatOur Hack Chats are live community events in the Hackaday.io Hack Chat group messaging. This week we’ll be sitting down on Wednesday, June 9 at 12:00 PM Pacific time. If time zones have you tied up, we have a handy time zone converter.

Click that speech bubble to the right, and you’ll be taken directly to the Hack Chat group on Hackaday.io. You don’t have to wait until Wednesday; join whenever you want and you can see what the community is talking about.

Omnibot From The 80s Gets LED Matrix Eyes, Camera

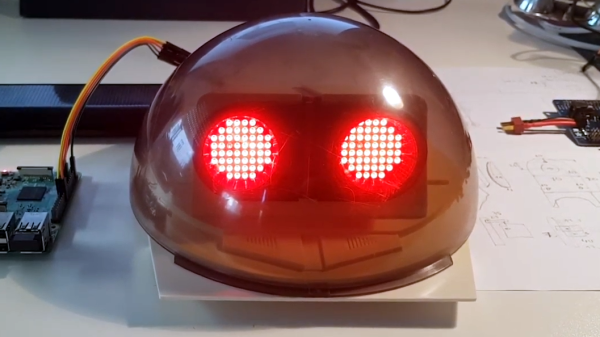
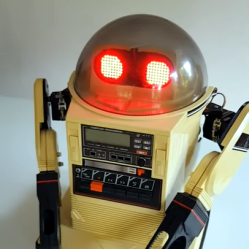
[Ramin assadollahi] has been busy rebuilding and improving an Omnibot 5402, and the last piece of hardware he wanted to upgrade was some LED matrix eyes and a high quality Raspberry Pi camera for computer vision. An Omnibot was something most technical-minded youngsters remember drooling over in the 80s, and when [ramin] bought a couple of used units online, he went straight to the workbench to give the vintage machines some upgrades. After all, the Omnibot 5402 was pretty remarkable for its time, but is capable of much more with some modern hardware. One area that needed improvement was the eyes.

The eyes on the original Omnibot could light up, but that’s about all they were capable of. The first upgrade was installing two 8×8 LED matrix displays to form what [ramin] calls Minimal Expressive Eyes (MEE), powered by a Raspberry Pi. With the help of a 3D-printed adapter and some clever layout, the LED matrix displays fit behind the eye plate, maintaining the original look while opening loads of new output possibilities.

Adding a high quality Raspberry Pi camera with wide-angle lens was a bit more challenging and required and extra long camera ribbon connector, but with the lens nestled just below the eyes, the camera has a good view and isn’t particularly noticeable when the eyes are lit up. Having already upgraded the rest of the hardware, all that remains now is software work and we can’t wait to see the results.

Two short videos of the hardware are embedded below, be sure to give them a peek. And when you’re ready for more 80s-robot-upgrading-action, check out the Hero Jr.

Continue reading “Omnibot From The 80s Gets LED Matrix Eyes, Camera”

TypeMatrix EZ-Reach 2030 Is Better Than Your Laptop Keyboard

Maybe you’re not ready to take the leap into a full-on ergonomic split keyboard. That’s okay, that’s cool, that’s understandable. They’re weird! Especially ones like my Kinesis Advantage with the key bowls and such. But maybe your poor pinkies are starting to get tired and you’re ready to start using your thumbs for more than just the space bar. Or you want to be able to type ‘c’ properly, with your middle finger.

In that case, the TypeMatrix could be the keyboard for you. Or maybe for travel you, because it’s designed as a quasi-ergonomic, orthonormal layout travel keyboard to pair with your laptop, and as such it sits directly over a laptop keyboard without blocking the track pad. (How do people use those things, anyway?)

Of course, you could use this as a desktop keyboard as well, although it’s unfortunate that Control and Shift are stuck on the pinkies. More about that later.

First Impressions

When I saw this keyboard on eBay, I was attracted by two things: the layout, and the dedicated Dvorak light. (And, let’s be honest — the price was right.) I’ve always found myself generally turned off by chocolate bar-style ortholinear keebs because they’re so incredibly cramped, but this one seemed a more acceptable because of the slight split.

The first thing I noticed was the fantastic number pad integration. The different colored keycaps are a nice touch, because the gray makes the number pad stand out, and the red Delete is easy to find since Num Lock is squatting in the upper right corner. Why does Delete always feel like an afterthought on compact keebs? I also like the location of the arrows, and it makes me think of the AlphaSmart NEO layout. Unfortunately, it comes at the cost of burying the right hand Enter down in no-man’s land where you can’t exactly hit it blindly with great accuracy right away. If only you could swap Shift and Enter without messing up the number pad!

Continue reading “TypeMatrix EZ-Reach 2030 Is Better Than Your Laptop Keyboard”

This Vintage LED Matrix Lives In A Gold Bathtub

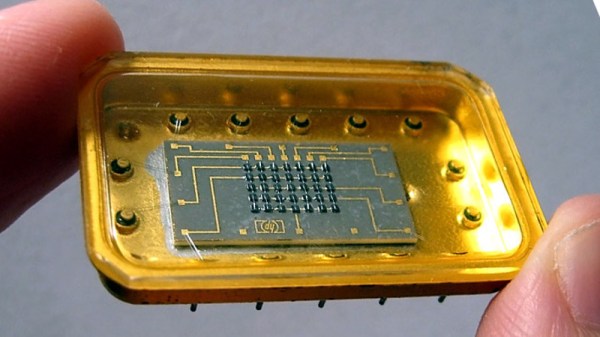
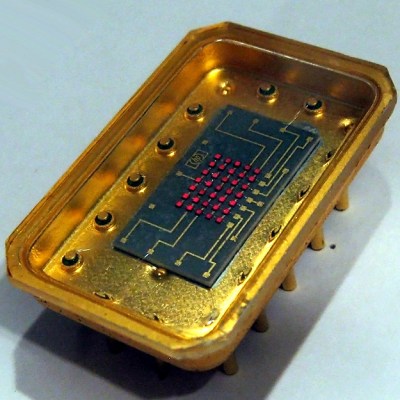
Early LED displays came in all sorts of configurations. Because the LED was fairly new technology, all kinds of ideas were getting tried, and with all that work there was plenty of opportunity for hardware that didn’t make the cut to fall into obscurity. That’s exactly what happened to the Hewlett-Packard 5082-7002, a 5×7 LED matrix display with something many of its brethren didn’t: an oversized gold tub to sit in.

It doesn’t seem that these displays were ever used in any actual products, and its origins are a mystery, but the device itself was nevertheless assigned an HP part number. Beyond that, not much is known about them, but [Industrial Alchemy] reminds us that many early LED devices were poorly documented and never produced in any real quantities. They became forgotten hardware, waiting to be rediscovered.

The 5082-7002 has a oversized gold tub that makes the 5×7 LED matrix mounted inside look puny by comparison, and reading any display made from these units would be difficult because the large size of the device would mean a lot of empty space between each character or digit. But it’s definitely got a striking look to it, no doubt about that.

What’s neat is that the 5802-7002 actually showed up in a video we featured with a look back at cool old LED technology. If you would like to (briefly) see the HP 5802-7002 a bit closer under a microscope, here is a link to the video, cued to 2:19.

Hex Matrix Clock Does It With Six Sides

LED matrixes were once a total headache, requiring careful consideration to make the most of limited I/O pins and available microcontroller resources. These days, addressable LED strings have made it all a cinch. Thus, going a little out of the box isn’t so daunting. [w.r.simpson] did just that with this hex-matrix clock.

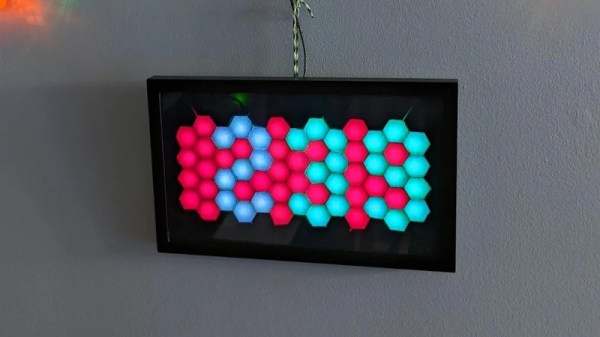
Relying on hexes instead of a normal Cartesian grid requires some attention to how the rows and columns are laid out, but the Instructable goes through the necessary coordinate system to address the display. The whole display was built without a 3D printer, instead relying on some basic craft skills and a picture frame as the enclosure. Strips of WS2812B LEDs were used to build the hexagonal matrix, run by a Adafruit Metro Mini 328. To give each hexagonal pixel, or hexel, a crisp outline, a shadow grid was built using black paper to stop the light bleeding between the display segments when switched on. Smoked plexiglas wasn’t available, so instead, tinted window film was used to darken the front of the display.

The result is impressive; while some glue marks from the shadow grid are visible closeup, from a distance the final product looks incredibly futuristic thanks to the hexagonal layout. We can imagine this would make a great set dressing in a futuristic film clip; we fully expect to see this concept in the background of the next Ariana Grande single. If this build isn’t enough six-sided fun to sate your appetite, consider getting into Super Hexagon too!