Glowing LED Cubes From The Future

Sometimes people don’t believe you when you tell them something. You may have to go out of your way to convince those skeptics. Well, [AlexTheGreat] was having a hard time convincing people that he was from the future. He thought building some cool looking glowing LED cubes would help his story.

Underneath the fancy exterior covering is a cube made from pieces of clear acrylic sheet that are hot-glued together. There isn’t much inside the cube, just an LED, resistor, button cell battery and an on/off switch. A hole in one of the cube sides allows access to the on/off switch. Once all the components are verified to work, the interior of the cube is filled with hot glue to diffuse the light.

LED Cube from the future
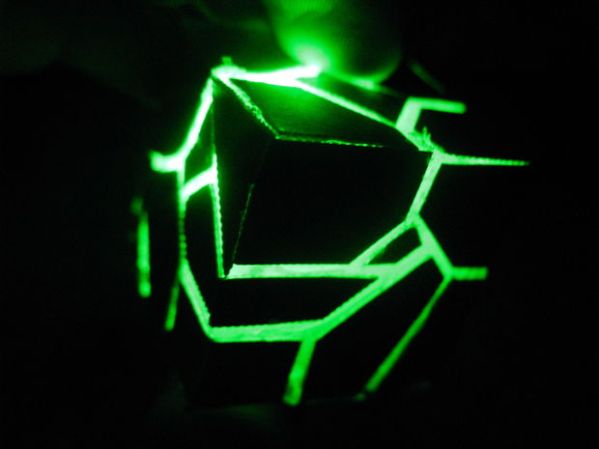
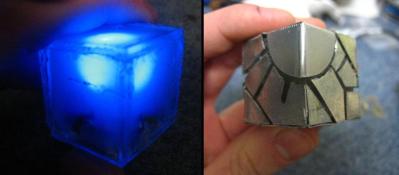
The exterior is thin sheet metal cut into cool shapes and bent around the plastic cube. Like the rest of the components, these metal covers are held on with hot glue. They do a great job of blocking the LED light ensuring it shines out of the creatively arranged gaps. We’re not sure if these will convince anyone that [AlexTheGreat] is from the future but they are certainly darn cool looking!


L3D Cube Takes The Work Out Of Building An LED Cube

Building an LED cube usually means a heck of a lot of delicate soldering work. Bending jigs, assembly jigs, and lots of patience are the name of the game. The problem multiplies if you want to build with RGB LEDs. [Shawn and Alex] are hoping to change all that with their L3D cube. Yes, L3D is a Kickstarter campaign, but it has enough good things about it that we’re comfortable featuring it here on Hackaday. What [Shawn and Alex] have done is substitute WS2812b surface mount LEDs for the 5mm  or 3mm through hole LEDs commonly used in cubes. The downside is that the cube is no longer visible on all sides. The upside is that it becomes a snap to assemble.

The L3D cube is open source hardware. The source files are available from separate software and hardware Github repositories. Not next week, not when they hit their funding goal, but now. We seriously like this, and hope all crowdfunding campaigns go this route.

The L3D cube uses an open source Spark Core as its processor and WiFi interface. Using WS2812b’s means less I/O pins, and no LED driver chips needed. This makes it perfect for a board like Spark or Arduino.  On the software side, the team has created a Processing Library which makes it easy to create animations with no coding necessary.

L3D has all the features one would expect from an LED cube – a microphone for ambient sound visualizations, and lots of built in animations. It seems [Shawn and Alex] have also created some sort of synchronization system while allows multiple cubes to work together when stacked. The team is hoping someone will come up with a 3D printed light diffuser to make these cubes truly a 360 degree experience.

The L3D cube campaign is doing well, [Shawn and Alex] are close to doubling their $38,000 goal. Click past the break to check out their Kickstarter video!

Continue reading “L3D Cube Takes The Work Out Of Building An LED Cube”

LED Cube In An Elongated Cube Be Jammin’

LED cube and drive electronics inside an acrylic case

We get a lot of tips about LED cubes. They’re a great build to explore a lot of different things, from the circuit design, to current source and sink, and of course there’s the firmware. Why don’t we see a million of them on the front page? Well, we have seen a lot, but most of what is sent our way doesn’t exhibit such a clean build. It’s obvious that [Justin] took a lot of pride in his work on this 4x4x4 single-color cube.

Hidden away under one of the protoboards is an Arduino that drives it. A lot of the components were salvaged from the e-waste bin at his University. This includes the 12V AC wall wart he uses to power the device. A bridge rectifier converts to DC, and in addition to powering the LEDs there are a couple of USB charging ports. After the break you can see and hear it in action. The cube pulses to the music but the flip of a switch will disconnect the speaker if you want some peace and quiet to go with the light show.

If you’re looking for a challenge, this 8x8x8 RGB offering is several orders of magnitude harder to pull off… block out a lot of extra time if you do decide to take the plunge. We also heard that [Benchoff] might try to make a cube with some of those through-hole ws2812 pixels.

Continue reading “LED Cube In An Elongated Cube Be Jammin’”

Gaming On An 8x8x8 LED Cube

LEDCube

Building an LED cube is a great way to learn how to solder, while building something that looks awesome. Without any previous experience with soldering or coding, [Anred] set out to create a simple 8x8x8 LED cube gaming platform.

Rather than reinventing the wheel, [Andred] based the LED cube off of three separate Instructables. The resulting cube came out great, and the acrylic casing around it adds a very nice touch. Using an Arduino Mega, the 74HC574, and a few MOSFET’s to drive his LEDs, the hardware is fairly standard. What sets this project apart from many other LED cube builds, is the fact that you can game on it using a PlayStation 1 controller. All the necessary code to get up and running is included in the Instructable (commented in German). Be sure to see the cube in action after the break!

It would be great to see a wireless version of this LED cube game. What kind of LED cube will gaming be brought to next? A tiny LED cube? The biggest LED cube ever? Only time will tell.

Continue reading “Gaming On An 8x8x8 LED Cube”

Tiny 3x3x3 SMD LED Cube

led cube

LED cubes are cool, but they’re usually pretty big and clunky. [One49th] set out to make one of the smallest LED cubes we’ve seen yet, and he’s shared how he did it in his Instructable!

His first LED cube was the traditional kind, and it turned out pretty nice. But he wanted to go smaller — what about using SMD’s? What he did next was no simple feat — in fact, we’d be willing to call him an artist with a soldering iron. The array is just over one centimeter across.

Using a combination of vices and pliers he soldering each SMD onto his structure one by one. Each LED anode is tied together on each horizontal layer. Each cathode is tied together on each vertical column. This allows the TinyDuino to control any one LED by knowing which of the 9 columns and 3 layers the LED is on. Send a high signal to chosen layer, and a low signal to the column to light the LED. Doing this quickly allows you to create the illusion of different LEDs being on at the same time. Take a look through his image gallery to see just how tight the soldering quarters were, it’s definitely not something we’re planning on doing anytime soon!

Looking for a bigger cube? Check out this gorgeous 7x7x7 one that is capable of 142 frames per second!

7x7x7 LED Cube Driven By Arduino Mega

Sure, the physical build itself looks great, but it’s what [Michael] did with the firmware that impresses us the most. He’s using an Arduino Mega to drive the 7x7x7 cube and manages to squeeze out what he calls 142 frames per second with the setup. We’re not sure FPS is the right measurement, as we believe it’s the multiplexing rate that he’s trying to describle. It takes 144 uS to scan the entire matrix once. He performs the scan seven times per frame and the result is a flicker-free appearance, even to cameras.

You can see a video demonstration after the break. Since [Michael] emailed us directly with more details about the build we’ve pasted those below the fold as well.

If you’re looking for a more entry-level Arduino LED cube this 4x4x4 project is just the thing.

Continue reading “7x7x7 LED Cube Driven By Arduino Mega”

8x8x8 LED Cube And The Board That Drives It

Check out the LED cube which [Thomas], [Max], and [Felix] put together. But don’t forget to look at that beautiful PCB which drives it… nice! But hardware is only part of what goes into a project like this one. After the soldering iron had cooled they kept going and wrote their own software to generate patterns for the three-dimensional display.

Looking at a clean build like this one doesn’t drive home the amount of connections one has to make to get everything running. To appreciate it you should take a look at this other 512 LED cube which has its wires showing. You can see from the schematic (available in the project repository) that all of these lines are managed by a series of shift registers. The board itself connects to a computer from which it gets the visualization commands. A Java program they call CubeControl can push letters or turn the cube into a VU meter.

The team built at least two of these. This smaller version uses red LEDs, while the larger one shown in the video after the break has blue ones.

Continue reading “8x8x8 LED Cube And The Board That Drives It”