Hackaday Podcast 218: Open Source AI, The Rescue Of Salyut 7, The Homework Machine

This week, Editor-in-Chief Elliot Williams and Kristina Panos have much in the way of Hackaday news — the Op Amp Challenge is about halfway over, and there are roughly three weeks left in the Assistive Tech challenge of the 2023 Hackaday Prize. Show us what you’ve got on the analog front, and then see what you can do to help people with disabilities to live better lives!

Kristina is still striking out on What’s That Sound, which this week honestly sounded much more horrendous and mechanical than the thing it actually is. Then it’s on to the hacks, beginning with the we-told-you-so that even Google believes that open source AI will out-compete both Google’s own AI and the questionably-named OpenAI.

From there we take a look at a light-up breadboard, listen to some magnetite music, and look inside a pair of smart sunglasses. Finally, we talk cars, beginning with the bleeding edge of driver-less. Then we go back in time to discuss in-vehicle record players of the late 1950s.

Check out the links below if you want to follow along, and as always, tell us what you think about this episode in  the comments!

Download and savor at your leisure.

Continue reading “Hackaday Podcast 218: Open Source AI, The Rescue Of Salyut 7, The Homework Machine”

Op-Amp Challenge: Interactive Analog LED Wave Array

A while back, [Chris Lu] was studying how analog circuits, specifically op-amps can be used to perform mathematical operations and wondered if they could be persuaded to solve differential equations, such as the wave equation. After sitting on the idea for a few years, it was time to make it a reality, and the result is an entry into the Op-Amp Challenge.

Unlike many similar interactive LED matrix displays that are digital in nature (because it’s a lot easier), this design is pure analog, using many, many op-amps. A custom PCB houses a 4×4 array of compute units, each with a blue and white LED indicating the sign and magnitude of the local signal.

The local input signal is provided by an IR photodiode, AC coupled to only respond to change, with every other circuit sharing a sensor to keep it simple. Each circuit is connected to its immediate neighbors on the PCB, and off the PCB via board-to-board connectors. This simple scheme makes this easily scalable if desired in the future.

[Chris] does a great job of breaking down the math involved, which makes this project a neat illustration of how op-amp circuits can implement complex mathematical problems in an easy-to-understand process. Even more op-amps are pressed into service for generating the split-rail voltage reference and for amplifying the weak photodiode signals, but the computation circuit is the star of the show.

We like analog computing a fair bit around these parts. Here’s a little something we were previously drooling over.

Continue reading “Op-Amp Challenge: Interactive Analog LED Wave Array”

This Week In Security: TPM And BootGuard, Drones, And Coverups

Full disk encryption is the go-to solution for hardening a laptop against the worst-case scenario of physical access. One way that encryption can be managed is through a Trusted Platform Module (TPM), a chip on the motherboard that manages the disk encryption key, and only hands it over for boot after the user has authenticated. We’ve seen some clever tricks deployed against these discrete TPMs, like sniffing the data going over the physical traces. So in theory, an integrated TPM might be more secure. Such a technique does exist, going by the name fTPM, or firmware TPM. It uses a Trusted Execution Environment, a TEE, to store and run the TPM code. And there’s another clever attack against that concept (PDF).

It’s chip glitching via a voltage fault. This particular attack works against AMD processors, and the voltage fault is triggered by injecting commands into the Serial Voltage Identification Interface 2.0 (SVI2). Dropping the voltage momentarily to the AMD Secure Processor (AMD-SP) can cause a key verification step to succeed even against an untrusted key, bypassing the need for an AMD Root Key (ARK) signed board firmware. That’s not a simple process, and pulling it off takes about $200 of gear, and about 3 hours. This exposes the CPU-unique seed, the board NVRAM, and all the protected TPM objects.

So how bad is this in the real world? If your disk encryption only relies on an fTPM, it’s pretty bad. The attack exposes that key and breaks encryption. For something like BitLocker that can also use a PIN, it’s a bit better, though to really offer more resistance, that needs to be a really long PIN: a 10 digit PIN falls to a GPU in just 4 minutes, in this scenario where it can be attacked offline. There is an obscure way to enable an “enhanced PIN”, a password, which makes that offline attack impractical with a secure password.

And if hardware glitching a computer seems to complicated, why not just use the leaked MSI keys? Now to be fair, this only seems to allow a bypass of Intel’s BootGuard, but it’s still a blow. MSI suffered a ransomware-style breach in March, but rather than encrypt data, the attackers simply threatened to release the copied data to the world. MSI apparently refused to pay up, and source code and signing keys are now floating in the dark corners of the Internet. There have been suggestions that this leak impacts the entire line of Intel processors, but it seems likely that MSI only had their own signing keys to lose. But that’s plenty bad, given the lack of a revocation system or automatic update procedure for MSI firmware. Continue reading “This Week In Security: TPM And BootGuard, Drones, And Coverups”

Tricorder Tutorial Isn’t Just For Starfleet Cadets

For many of us, the most difficult aspect of a project comes when it’s time to document the thing. Did you take enough pictures? Did you remember all the little details that it took to put it together? Should you explain those handful of oddball quirks, even though you’re probably the only person in the world that knows how to trigger them?

Well, we can’t speak to how difficult it was for [Mangy_Dog] to put together this training video for his incredible Star Trek: Voyager tricorder replica, but we certainly approve of the final product. Presented with a faux-VHS intro that makes it feel like something that would have been shown to cast members during the legendary run the franchise had in the 1990s, the video covers the use and operation of this phenomenal prop in exquisite detail.

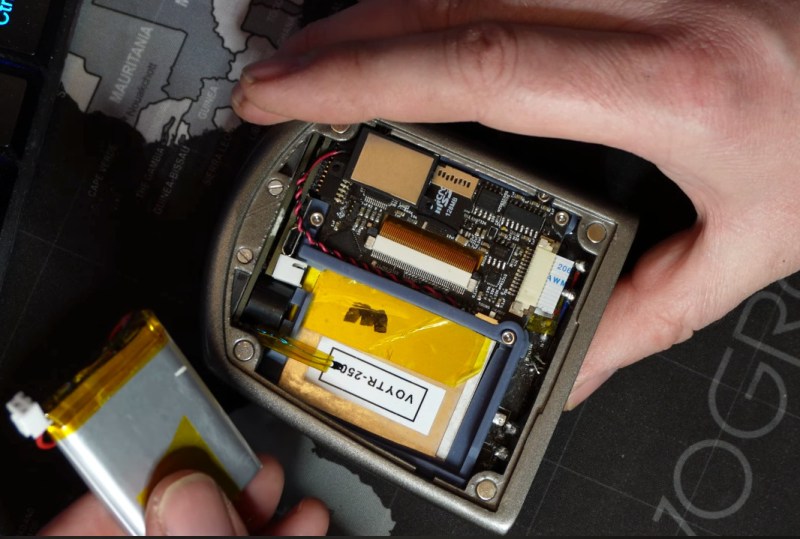
Replaceable batteries are standard again in the 2370s.

Now to be fair, [Mangy_Dog] has sold a few of his replicas to other Trek aficionados, and we’re willing to bet they went for a pretty penny. As such, maybe it’s not a huge surprise he’d need to put together a comprehensive guide on how to operate the device’s varied functions. Had this been a personal project there wouldn’t have been the need to record such a detailed walk-through of how it all works — so in that regard, we’re fortunate.

One of the most interesting things demonstrated in this video is how well [Mangy_Dog] managed to implement mundane features such as brightness and volume control without compromising the look of the prop itself. Rather than adding some incongruous switches or sliders, holding down various touch-sensitive buttons on the device brings up hidden menus that let you adjust system parameters. The project was impressive enough from the existing images and videos, but seeing just how deep the attention to detail goes is really a treat.

Previously we took a look at some of the work that [Mangy_Dog] has put into these gorgeous props, which (unsurprisingly) have taken years to develop. While they might not be able to contact an orbiting starship or diagnose somebody’s illness from across the room, it’s probably fair to say these are the most realistic tricorders ever produced — officially or otherwise.

Continue reading “Tricorder Tutorial Isn’t Just For Starfleet Cadets”

Laser Projector Built From An Old Hard Drive

Spinning hard drives are being phased out of most consumer-grade computers in favor of faster technology like solid-state drives and their various interfaces. But there’s still millions of them in circulation that will eventually get pulled from service — so what do we do with them? If you’ve got one that would otherwise be going in the garbage, they can be turned into some other interesting devices like this laser text projector.

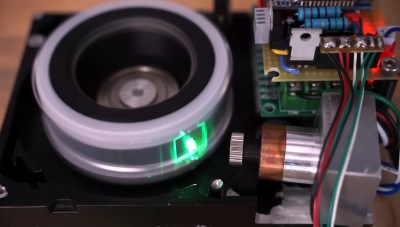
Even the slowest drives spin at around 5000 RPM, which is perfect for this type of application. The device works by mounting twelve mirrors, each at a slightly different angle, on a drum which is spun by the drive’s motor. Bouncing a laser off of the spinning drum results in a projection of twelve horizontal lines. By rapidly switching the laser on and off depending on which mirror it’s pointing at, the length of each line can be controlled.

Thanks to persistence of vision, that allows you to show text on the surface that the laser is projected on. At speeds this high, it took [Ben] of Ben Makes Everything quite a few iterations to get it to a usable space. From sensors that were too slow to lasers not bright enough to 3D prints that were not accurate enough, he goes through the design of his build and the process in excellent detail.

After solving all of the problems including building his own constant-current laser power supply, and burning up a few laser diodes in the process, [Ben] has a laser projector capable of displaying readable text at a great distance which is also portable, running on a 12 V power supply. There are some possible areas of improvement that he notes as well, such as an unbalanced 3D printed part causing a bit of a wobble and the Arduino controller not being fast enough for more text. But it’s an impressive project nonetheless, similar to a two-mirror version we saw some time ago but with the ability to display text as well.

Continue reading “Laser Projector Built From An Old Hard Drive”

A 4-Player Arcade Hidden Inside A Coffee Table

[Ed] from 50% Awesome on YouTube wanted to build a retro gaming system with a decent screen size, but doesn’t have a great deal of space to site it in, so a good compromise was to make a piece of useful furniture and hide all the fun parts inside.

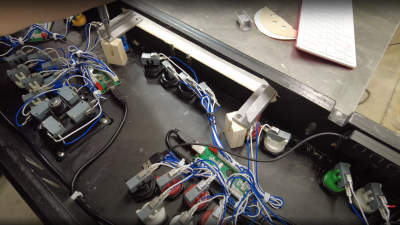
Building an arcade machine usually involves a lot of wiring

This video two-part build log shows a lot of woodwork, with a lot of mistakes (happy accidents, that are totally fine) made along the way, so you do need to repeat them. Essentially it’s a simple maple-veneered plywood box, with a thick lid section hosting the display and some repositioned speakers. This display is taken from a standard LG TV with the control PCB ripped out. The power button/IR PCB was prised out of the bezel, to be relocated, as were the two downwards-facing speakers. The whole collection of parts was attached to a front panel, with copious hot glue, we just hope the heavy TV panel was firmly held in there by other means!

Continue reading “A 4-Player Arcade Hidden Inside A Coffee Table”

Reverse Engineering An Oil Burner Comms Board, With A Few Lucky Breaks

Here’s a question for you: How do you reverse engineer a circuit when you don’t even have it in hand? It’s an interesting problem, and it adds a level of difficulty to the already iffy proposition that reverse engineering generally presents. And yet, not only did [themole] find a way to replicate a comms board for his oil burner, he extended and enhanced the circuit for integration into his home automation network.

By way of backstory, [themole] has a wonky Buderus oil burner, which occasionally goes into safety mode and shuts down. With one too many cold showers as a result, he looked for ways to communicate with the burner controller. Luckily, Buderus sells just the thing — a serial port module that plugs into a spare slot in the controller. Unluckily, the board costs a bundle, and that’s even if you can find it. So armed with nothing but photos of the front and back of the board, the finding of which was a true stroke of luck, he set about figuring out the circuit.

With only a dozen components or so and a couple of connectors, the OEM board gave up its secrets pretty easily; it’s really just a level shifter to make the boiler talk RS-232. But that’s a little passé these days, and [the78mole] was more interested in a WiFi connection. So his version of the card includes an ESP32 module, which handles wireless duties as well as the logic needed to talk to the burner using the Buderus proprietary protocol. The module plugs right into the burner controller and connects it to ESPHome, so no more cold showers for [themole].

We thought this one was pretty cool, especially the way [themole] used the online photos of the board to not only trace the circuit but to get accurate — mostly — measurements of the board using an online measuring tool. That’s a tip we’ll keep in our back pocket.

Thanks to [Jieffe] for the tip.