Classic Calculator Goes RPN, With New Brain

In the era of the smartphone, an electronic calculator may seem a bit old-hat. But they continue to hold a fascination in our community, both when used for their original purpose, and as objects for hardware hacking in their own right. After their first few years when they were a rare and exclusive gadget, they were manufactured in such huge numbers as to be readily available for the curious hacker. [Suikan] has taken one of these plentiful models and done something special for it, creating a new mainboard, and a firmware which transforms it into a reverse Polish, or RPN, scientific calculator.

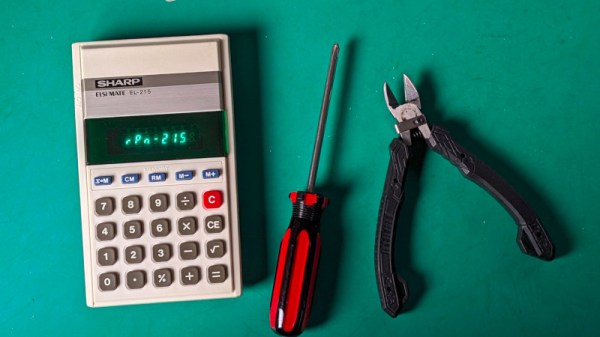
The Sharp EL210 and EL215 were ubiquitous early-1980s calculators without scientific functions, and with a VFD display. We remember them being common during our schooldays, and they and similar models can still be found on a trawl through thrift stores.

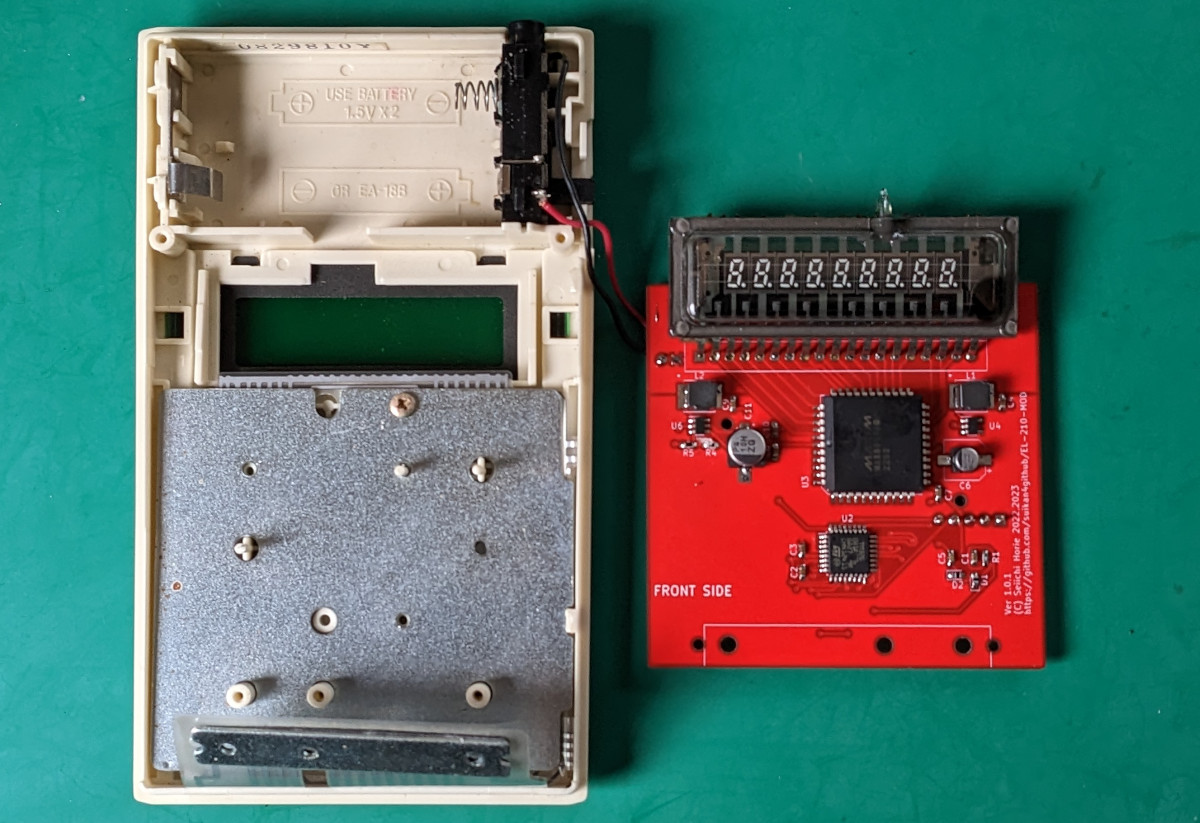
On the board is one of the STM32 microcontrollers and a Maxim VFD driver, and fitting it is simply a case of soldering the Sharp’s VFD to it, placing it in the calculator, and attaching the keyboard. The firmware meanwhile uses the orange C key from the original calculator as a function key, alternating between standard and scientific operations.

If you’re curious about RPN, we’ve taken a look at it here in the past.

A Deep Dive Into A 1980s Radio Shack Computer Trainer

For those of us who remember Radio Shack as more than just an overpriced cell phone store, a lot of the nostalgia for the retailer boils down to the brands on offer. Remember the Realistic line of hi-fi and stereo gear? How about Archer brand tools and parts? Patrolman scanners, Micronta test instruments, and don’t forget those amazing Optimus speakers — all had a place in our development as electronics nerds.

But perhaps the most formative brand under the Radio Shack umbrella was Science Fair, with a line of kits and projects that were STEM before STEM was a thing. One product that came along a little too late for our development was the Science Fair Microcomputer Trainer, and judging by [Michael Wessel]’s deep dive into the kit, we really missed the boat. The trainer was similar to the earlier “100-in-1”-style breadboarding kits, with components laid out on a colorful cardboard surface and spring terminals connected to their leads, making it easy to build circuits using jumper wires. The star of the show in the microcomputer trainer was a Texas Instruments TMS1100, which was a pretty advanced chip with a 4-bit CPU with its own ROM and RAM as well as a bunch of IO lines. The trainer also sported a peppy little 400-kHz crystal oscillator clock, a bunch of LEDs, a seven-segment display, a speaker, and a rudimentary keyboard.

The first video below is a general introduction to the trainer and a look at some basic (not BASIC) programs. [Michael] also pulls out the oscilloscope to make some rough measurements of the speed of the TMS1100, which turns out to be doing only about 400 instructions per second. That’s not much, but in the second video we see that it was enough for him to nerd-snipe his collaborator [Jason] into coding up an 80-nibble Tower of Hanoi solver. It’s a little awkward to use, as the program runs in spurts between which the user needs to check memory locations to see which disc to move to which peg, but it works.

It looks like people are rediscovering the Microcomputer Trainer all of a sudden. It might be a good time to pick one up.

Continue reading “A Deep Dive Into A 1980s Radio Shack Computer Trainer”

Integration Taught Correctly

[Math the World] claims that your calculus teacher taught you integration wrong. That’s assuming, of course, you learned integration at all, and if you haven’t forgotten it. The premise is that most people think of performing an integral as finding the area under a curve or as the “antiderivative.” However, fewer people think of integration as adding up many small parts. The video asserts that studies show that students who don’t understand the third definition have difficulty applying integration to real-world problems.

We aren’t sure that’s true. People who write software have probably looked at numerical integration like Simpson’s rule or the midpoint rule. That makes it pretty obvious that integration is summing up small bits of something. However, you usually learn that very early, so you’re forgiven if you didn’t get the significance of it at the time.

Continue reading “Integration Taught Correctly”

The DeDeterminator Uses Quantum Physics To Make Decisions So You Don’t Have To

Are you making your own decisions and mainlining causality like a sucker? Why go through the agony, when you could hand over the railway switch of determinism to a machine that can decide things for you! Enter the DeDeterminator, a decision machine from [Oliver Child].

The construction is simple enough, being built inside a small tin. One kind of wishes it had a secret third “PERHAPS” bulb that illuminates only when the universe’s continued existence has been called into question.

The idea is simple. At the press of a button, the DeDeterminator illuminates a bulb—indicating either yes or no. The decision for which bulb to illuminate is truly random, as it’s determined by the radioactive decay of a Americium-241 alpha particle source. A Geiger-Muller tube is used to detect alpha particles, with the timing between detections used to determine the yes-or-no output of the device.

It’s a neat concept, and it’s kind of fun knowing that your decision is both out of your hands and as random as it could possibly be. Would the universe guide you wrong? Who could possibly question the reasoning of the particles? The only rational move could be to comply with whatever directive the box hath given. Just don’t ask it to make any decisions with dangerous outcomes.

We’ve featured other projects using radioactive decay for random number generation before, though they weren’t quite as philosophically intriguing as the DeDeterminator. Mostly they’re just about cryptographic security and such, but some do deal with causality in imaginary spaces, which has its own magic about it.

Meanwhile, if you’ve untangled the quantum chains of cause and effect, or you’ve just found a way to break RSA encryption using a Pi Pico, do drop us a line, won’t you?

An image showing the new KiCad feature that allows you to easily generate schematic labels from IC symbol pin names

KiCad 8 Makes Your Life Better Without Caveats

A few days ago, KiCad 8 was released, and it’s a straight upgrade to any PCB designer’s quality of life. There’s a blog post as usual, and, this year, there’s also a FOSDEM talk from [Wayne Stambaugh] talking about the changes that we now all get to benefit from. Having gone through both of these, our impression is that KiCad 8 developers went over the entire suite, asking: “this is cool, but could we make it better”? The end result is indeed a massive improvement in a thousand different ways, from small to fundamental, and all of them seem to be direct upgrades from the KiCad 7 experience.

Continue reading “KiCad 8 Makes Your Life Better Without Caveats”

Radioactive 3D Printed Flower Glows And Glows

Glow-in-the-dark projects aren’t that uncommon. You can even get glow-in-the-dark PLA filament. However, those common glowing items require a charge from light, and the glow fades very quickly. [Ogrinz Labs] wasn’t satisfied with that. His “Night Blossom” 3D-printed flower glows using radioactive tritium and will continue to glow for decades.

Tritium vials are available and often show up in watches for nighttime visibility. The glow doesn’t actually come directly from the radioactive tritium (an isotope of hydrogen). Instead, the radioactive particles excite phosphor, which glows in the visible spectrum.

Once you have the vials, it is easy to understand how to finish off the project. The flower contains some long tubes inside each petal. There are also a few tiny vials in the center. The whole assembly goes together with glue.

Continue reading “Radioactive 3D Printed Flower Glows And Glows”

DietPi Version 9.1: Now With Raspberry Pi 5 Support And More

DietPi recently released version 9.1, which among other changes includes new images for the Raspberry Pi 5, Radxa Rock 4 SE and NanoPi R5S/R5C & 6. The Radxa Rock 4 SE image was necessary because the Rock 4’s RK3399 SoC is subtly different from the RK3399-T’s SoC in terms of memory support, which prevents a Rock 4 image from booting on the Rock 4 SE. Meanwhile the Raspberry Pi 5 image is all new and still a bit rough around the edges, with features like the changing of the resolution and camera module support not working yet. These new images are all available for testing.

We covered DietPi previously with their 8.12 release, along with the reasons why you might want to use DietPi over Armbian and Raspberry Pi OS. Essentially DietPi’s main focus is on performance combined with a small installed size, with the included configuration tools and the setup allowing for many more features to be tweaked than you usually find. If the performance improvements, lower RAM usage and faster boot times seen with the Raspberry Pi 4 holds up, then DietPi can just give the Raspberry Pi 5 a nice little boost, while saving power in the process.

Thanks to [StephanStS] for the tip.