A Turing-Complete CPU In Sunvox? Why Not!

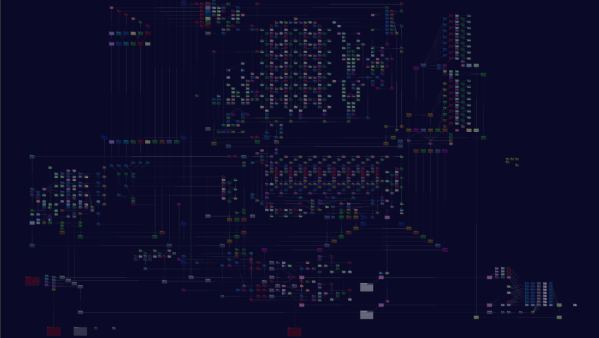
Day-time software engineer and part-time musician, [Logickin,] knows a thing or two about programming the SunVox modular synthesiser and tracker software. Whilst the software is normally used for creating music and sound effects, they decided to really push it, and create the VOXCOM-1610, a functional turing-complete CPU inside SunVox, just for fun.

For those who haven’t come across SunVox before now, this software is a highly programmable visual environment for building up custom synthesisers, piecing signals together to create rhythms — that’s the ‘tracker’ bit — as well as interfacing to input devices such as MIDI and many others. It does look like a lot of fun, but just like CPUs created in Minecraft, just because, this seems to be the first time someone has built one inside this particular music app. The VOXCOM 1610 is a fully functional 10 Hz, 16-bit computer. It boasts 2KB of ROM, 256 bytes of RAM (expandable to 128 KB), and 8 general registers for data exchange between components. If you don’t fancy manually poking bits into the ROM to enter your software, then you’re in luck as [Logickin] has provided an assembler (in Java) that should ease the process a lot. The ABI will look very familiar to anyone who’s ever touched assembler before, although as you’d expect, it is quite light on addressing modes.

Now, all that is needed is for someone to port Doom to this and we’ll have it all. We think that is unlikely to happen. For those who pay attention, we did see one neat SunVox project in the past, which is certainly eye-catching as well as eardrum-bursting.

Thanks to [elbien] for the tip!

A Love Letter To My Lost Amiga

My first love was a black wedge. It was 1982, and I had saved up to buy a Sinclair ZX81. That little computer remains the only one of the huge number that I have owned over the years about which I can truly say that I understood its workings completely; while I know how the i7 laptop on which this is being written works I can only say so in a loose way as it is an immensely complex device.

Computing allegiance is fickle, and while I never lost an affection for the little Sinclair I would meet my true electronic soulmate around eight years later as an electronic engineering student. It no longer graces my bench, but this was the computer against which all subsequent machines I have owned would be measured, the one which I wish had not been taken from me before its time, and with which I wish I could have grown old together. That machine was a Commodore Amiga, and this is part love letter, part wistful musing about what could have been, and part rant about what went wrong for the best desktop computer platform ever made. Continue reading “A Love Letter To My Lost Amiga”

Clover Computer: A Modern Z8000 CP/M Machine

Seeing some old Zilog 16-bit chips on eBay recently, [Scott Baker] was curious enough to snap them up and build himself a Z8000 computer. It started as a two-board solution, then he added a display module. Instead of layering the boards vertically à la a PC/104 stack, [Scott] decided to build them flat. His first backplane was triangular, but he opted for a square to accommodate one more expansion board in the future. The assembled contraption resembles a clover, hence the name Clover Computer.

The Z8000 was Zilog’s first 16-bit microprocessor, introduced in 1979. It was not hugely popular for a variety of reasons (the Z8000 Wikipedia article has some interesting details). The Z8000 was eclipsed in the marketplace by Intel’s 8088 and Motorola’s 32-bit 68000. One interesting point is that the Z8000 did not use microcode, and as a result, its transistor count was significantly less than its contemporaries. The Z8000 was used in some military applications, and despite its limited commercial success, it continued to be available from Zilog and licensed second sources up until 2012.

[Scott]’s design splits the system into a CPU board, a memory and serial board, and a display board. Along the way, he learns 1980’s era tricks from the Olivetti M20, one of the few computer systems designed around the Z8000. He also manages to find a recent Z8000 implementation of CP/M by GitHub user [], which [Scott] forked and adapted to his project (see project repo here). He succeeds in getting everything working, and ports a monitor, Tiny Basic, and Zork.

Check out his project write-up introductory link, and see it in action in the video below the break. Did you ever use or encounter the Z8000? Let us know in the comments!

Continue reading “Clover Computer: A Modern Z8000 CP/M Machine”

FPGA Retrocomputer: Return To Moncky

Part of the reason that retrocomputers are still so popular despite their obsolescence is that it’s possible to understand the entire inner workings of a computer like this, from the transistors all the way up to the software. Comparatively, it will likely be a long time (if ever) before anyone is building a modern computer from discrete components. To illustrate this point, plenty of 8-bit computers are available to either restore from original 80s hardware or to build from kits. And if you’d like to get even deeper into the weeds you can design your own computer including the instruction set completely from the ground up using an FPGA.

This project, called the Moncky project, is a step above the usual 8-bit computer builds as it is actually a 16-bit computer. It is built around an Arty Spartan-7 FPGA dev board running around 20 MHz and has access to 2 x 128 kB dual-port RAM for memory. To access the outside world there is a VGA output, PS/2 capability, SPI, and uses an SD card as a hard drive. This project really shines in the software, though, as the project creator [Kris Demuynck] builds everything from scratch in order to illustrate how everything works for educational purposes, and is currently working on implementing a C compiler to make programming the computer easier.

All of the project files, as well as all of the code, are available on the project’s GitHub page if you’d like to follow along or build on this homebrew 16-bit computer. It’s actually the third iteration of this computer, with the Moncky-1 and Moncky-2 being used to develop the more basic building blocks for this computer. While it’s not the first 16-bit computer we’ve seen implemented on an FPGA, it is one of the few that builds its own RISC instruction set and associated software rather than cloning a known existing processor. We’ve also seen some interesting x86 implementations on an FPGA as well.

Thanks to [koen-ieee] for the tip!

Homebrew 16-Bit Computer Is A Wire-Wrapped Work Of Art

Breadboard 8-bit computer builds seem all the rage these days, and with good reason: building your own CPU from the board up using discrete logic chips is a great way to really learn how microprocessors work. Not to mention that it’s an incredible flex. But once you’ve conquered the eight-bit, what do you do? Easy: build a 16-bit computer from 74HC logic chips.

Attentive readers will likely remember this computer’s builder, [Paulo Constantino], from his previous work on 8-bit breadboard computers. As gloriously entropic as that tangled mass of wires was, it must have been a nightmare for [Paulo] to maintain. And so when the time came to upgrade, he wisely chose a more integrated construction method. The construction method is wire-wrapping, with multiple cards plugged into backplane and connected by ribbon cables. The whole card cage is far neater than the previous build, and seems to lend itself to rapid modifications. The top card in the cage acts as a control panel for now; eventually, [Paulo] planes to put a real front panel on the cage to support all the switches and blinkenlights such builds demand. Stretch goals include supporting audio and video and getting the machine online so anyone can log in.

The video below is an overview of the current state of the machine; earlier videos in the playlist cover the design and build in more detail. We hope to see schematics soon, and we’d love to know where to get some of those wire-wrap PCBs for projects of our own.

Continue reading “Homebrew 16-Bit Computer Is A Wire-Wrapped Work Of Art”

Slack, Now On Windows 3.1

Slack is either an online collaboration tool, or a religion, depending on who you talk to. Naturally, it’s accessible across all manner of modern platforms, from Windows and MacOS to smartphones. However, some prefer to go further back. At a recent company hackathon, [Yeo Kheng Meng] decided to create a Slack client for Windows 3.1.

This is how you learned to program before the Internet.

Programming for an older OS, in this case, Windows For Workgroups 3.11, requires setting up a viable development environment. Visual C++ 1.52 was pressed into service in this case, being the last version capable of targeting Windows 3.11. The development environment is run on a Windows 2000 virtual machine running on a Mac laptop. This was chosen for its ability to run 16-bit apps, and its Samba compatibility with both Windows 3.11 and Windows 10 and modern Macs.

There were several challenges to face along the way. Old school Windows simply isn’t capable of dealing with HTTPS, necessitating a proxy to handle the exchange of packets with Slack servers. Additionally, memory management was a hassle due to the limits of the 16-bit architecture. Thankfully, an old programming manual from the era was of great help in this regard.

At the end of the hackathon, a usable Slack client was up and running, complete with garish colors from the early Windows era. There’s a few key features missing, such as the ability to resolve user IDs, but overall, the concept works. We’ve seen [Yeo]’s work with this vintage OS before too. Video after the break.

Continue reading “Slack, Now On Windows 3.1”

Vintage Programmer Gets Modern Chip Adapter

While trying to revive a Donkey Kong Jr arcade board, [Jelmer Bruijn] found himself in the market for an EPROM programmer and became the proud owner of a 1990’s era Dataman S4. Despite its age, it’s a fairly nice tool which allows you to read and write a laundry list of different EPROM types, all without being tied to a computer. The only catch is that a few types of chips need an adapter to work in the Dataman S4, some of which are unsurprisingly no longer available.

After some above and beyond support from the current crew at Dataman set him on the right track, [Jelmer] decided to try his hand at reverse engineering how the old adapters worked so he could build his own. His ultimate goal was to read 40 pin EPROMs on the 32 pin Dataman S4, but in the end he says the information he gathered should be applicable for building other adapters if you ever find yourself in need of such things.

As you might expect, there’s a bit more to the project than a simple pin adapter. [Jelmer] assumed some kind of shift register or latching arrangement would be required to make up for the shortage of pins on the Dataman S4’s ZIF socket. It was just a matter of figuring out how it all went together.

Luckily, [Jelmer] found that the programmer would happily attempt to perform operations on a 16 bit EPROM even though no adapter was physically present. This gave him a chance to probe around with a logic analyzer to figure out what it was trying to accomplish. The trick turned out to be splitting the 16 bit bus into two 8 bit buses which are requested sequentially.

With careful observation, close studying of 16 bit chip datasheets, and much brow furrowing, he was eventually able to come up a design that used five 74xx573 latches and put a schematic together in Eagle. There were a few kinks to iron out when the boards finally arrived, but ultimately the design worked on the first try. [Jelmer] says the same technique should work for 42 pin EPROMs, but as Dataman still actually sell adapters for those he decided not to supply schematics for it.

[Jelmer] tells us that he was inspired to send this success story our way after reading how our very own [Elliot Williams] took the long away around to erase a couple UV EPROMs recently While this isn’t the first time we’ve seen somebody have to hack support for 16 bit EPROMs into their programmer, it’s good to see that the manufacturer at least had the customer’s back in this case.