Art of 3D printer in the middle of printing a Hackaday Jolly Wrencher logo

What To Expect From 3D Scanning, And How To Work With It

3D scanning and 3D printing may sound like a natural match for one another, but they don’t always play together as easily and nicely as one would hope. I’ll explain what one can expect by highlighting three use cases the average hacker encounters, and how well they do (or don’t) work. With this, you’ll have a better idea of how 3D scanning can meet your part design and 3D printing needs.

How Well Some Things (Don’t) Work

Most 3D printing enthusiasts sooner or later become interested in whether 3D scanning can make their lives and projects easier. Here are a three different intersections of 3D scanning, 3D printing, and CAD along with a few words on how well each can be expected to work.

Goal Examples and Details Does it work?
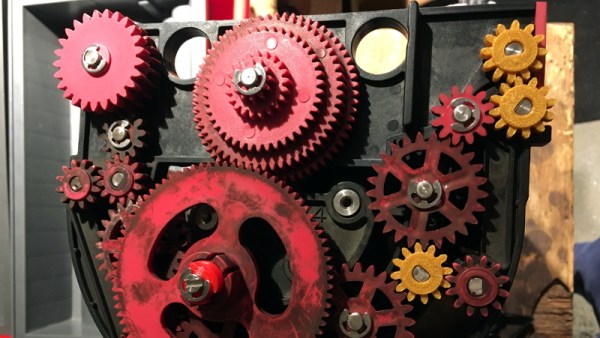
Use scans to make copies of an object.
  • 3D scan something, then 3D print copies.
  • Objects might be functional things like fixtures or appliance parts, or artistic objects like sculptures.
Mostly yes, but depends on the object
Make a CAD model from a source object.
  • The goal is a 1:1 model, for part engineering purposes.
  • Use 3D scanning instead of creating the object in CAD.
Not Really
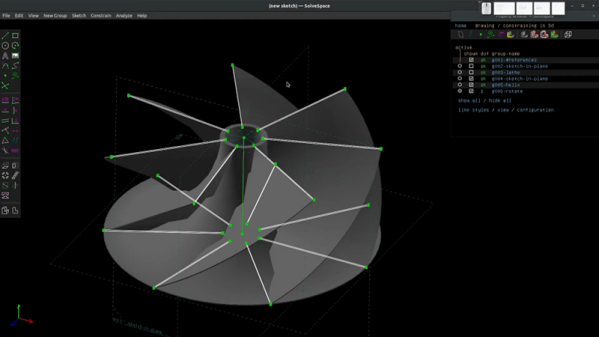
Digitize inconvenient or troublesome shapes.
  • Obtain an accurate model of complex shapes that can’t easily be measured or modeled any other way.
  • Examples: dashboards, sculptures, large objects, objects that are attached to something else or can’t be easily moved, body parts like heads or faces, and objects with many curves.
  • Useful to make sure a 3D printed object will fit into or on something else.
  • Creating a CAD model of a part for engineering purposes is not the goal.
Yes, but it depends

In all of these cases, one wants a 3D model of an object, and that’s exactly what 3D scanning creates, so what’s the problem? The problem is that not all 3D models are alike and useful for the same things.

Continue reading “What To Expect From 3D Scanning, And How To Work With It”

FreeCAD Vs SolveSpace

When you are ready to design real things, you’ll find simple CAD programs can be pretty limiting. Serious modern designs tend to use parametric modeling where you don’t necessarily set dimensions and positions of everything but instead constrain the design by describing the relationship between different elements. For example, you can create a vertical line and constrain other lines to be parallel, perpendicular, or form a given angle with that line. There are many tools that can do that, including FreeCAD and SolveSpace, two programs that [Joko Engineeringhelp] uses to create a complex compressor blade and it really shows the differences and similarities between the two tools.

You probably don’t need this particular design, but watching over someone’s shoulder while they do a complex design can be very valuable. Being able to see the differences between the two tools might convince you to learn one or the other or maybe even switch.

Continue reading “FreeCAD Vs SolveSpace”

A Word Clock You Don’t Have To Actually Build To Enjoy

The great thing about word clocks is that while they all follow the same principle of spelling out the time for you, they come in so many shapes, sizes, and other variations, you have plenty of options to build one yourself. No matter if your craft of choice involves woodworking, laser cutting, PCB design, or nothing physical at all. For [Yasa], it was learning 3D modeling combined with a little trip down memory lane that led him to create a fully functional word clock as a rendered animation in Blender.

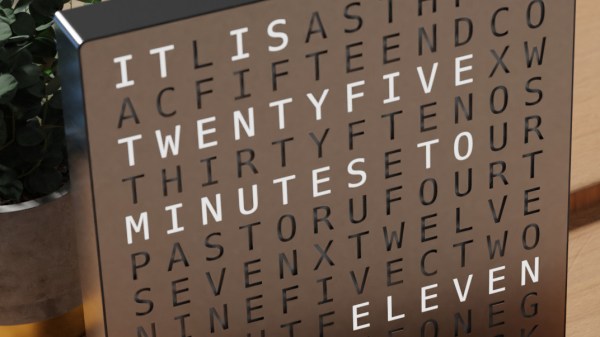
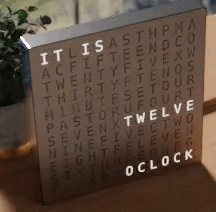
Inspired by the picture of a commercially available word clock, [Yasa] remembered the fun he had back in 2012 when he made a Turkish version for the Pebble watch, and decided to recreate that picture in Blender. But simply copying an image is of course a bit boring, so he turned it into an actual, functioning clock by essentially emulating a matrix of individually addressable LEDs using a custom texture he maps the current time to it. And since the original image had the clock positioned by a window, he figured he should have the sun move along with the time as well, to give it an even more realistic feel.

Of course, having the sun situation in real-time all year round would be a bit difficult to render, so [Yasa] choose to base the scene on the sun during spring equinox in his hometown Stockholm instead. You can see the actual clock showing your local time (or whichever time / time zone you set your device to) on his website, and his write-up is definitely a fun read you should check out if you’re interested in all the details or 3D modeling in general — or just to have a look at a time lapse of the clock itself. As he states, the general concept could be also used to model other word clocks, so who knows, maybe we will see this acrylic version or a PCB version of it in the future.

3DBuzz Closes With A Final Gift

If you wanted to learn about creating modern computer games, 3DBuzz had some of the best tutorials around. In fact, some of the tutorials about C#, C++, Android, and math would be useful for anyone, while the ones about game art and modeling in Maya are probably mostly for game developers. While these were once available only by subscription, the company — now defunct — has left them available for download via this BitTorrent file.

We don’t know enough about things like Blender and Maya to evaluate the material, but it is well regarded and the ones we do know something about seem very high quality. There are, for example, many videos about C++ and C# that are very professional and cover quite a few topics.

Continue reading “3DBuzz Closes With A Final Gift”

Vintage Print Processor Fixed With 3D Printing

If you don’t know what a print processor is, don’t feel bad. There’s precious few people out there still running home darkrooms, and the equipment used for DIY film development is about as niche as it gets today. For those looking to put together their own darkroom in 2019, buying second hand hardware and figuring out how to fix it on your own is the name of the game, as [Austin Robert Hermann] found out when he recently purchased a Durst Printo Print Processor on eBay.

The auction said the hardware was in working order, but despite the fact that nobody would ever lie on the Internet, it ended up being in quite poor condition. Many of the gears in the machine were broken, and some were simply missing. The company no longer supports these 1990’s era machines, and the replacement parts available online were predictably expensive. [Austin] determined his best course of action was to try his hand at modeling the necessary gears and having them 3D printed; two things he had no previous experience with.

Luckily for [Austin], many of the gears in the Printo appeared to be identical. That meant he had several intact examples to base his 3D models on, and with some educated guesses, was able to determine what the missing gears would have looked like. Coming from an animation background, he ended up using Cinema 4D to model his replacement parts; which certainly wouldn’t have been our first choice, but there’s something to be said for using what you’re comfortable with. Software selection not withstanding, he was able to produce some valid STLs which he had printed locally in PLA using an online service.

Interestingly, this is a story we’ve seen play out several times already. Gears break and wear down, and for vintage hardware, that can be a serious problem. But if you’ve got a couple intact gears to go by, producing replacements even on an entry level desktop 3D printer is now a viable option to keep these classic machines running.

Hackaday Superconference: 3D Printing For Electronics

For her day job, Amie D Dansby works as a software simulation developer, creating simulations for video games. In her free time, she’s implanting the key to her Tesla in her arm, building cordwood jewelry and cosplay swords, and seeking out other adventures in electronics and 3D printing. Amie has made a name for herself in the 3D printing community, and she is surrounded by fans when she attends the RepRap meetups and Maker Faires.

She was also popular at this year’s Hackaday Superconference, where she gave a talk on the integration of 3D printing and electronics. Amie’s work concentrates on props and cosplay, which is a skill unto itself, and you only need to look at some of the old Mythbusters, the documentary footage from ILM, or even model makers to realize this is an arcane art that takes a lot of skill. Lucky for us, Amie was there to show us the tricks she’s picked up over the years to make building a one-off piece easier than you could imagine.

Continue reading “Hackaday Superconference: 3D Printing For Electronics”

How To Reverse Engineer Mechanical Designs For 3D Modeling

If you’re interested in 3D printing or CNC milling — or really any kind of fabrication — then duplicating or interfacing with an existing part is probably on your to-do list. The ability to print replacement parts when something breaks is often one of the top selling points of 3D printing. Want some proof? Just take a look at what people made for our Repairs You Can Print contest.

Of course, to do that you need to be able to make an accurate 3D model of the replacement part. That’s fairly straightforward if the part has simple geometry made up of a primitive solid or two. But, what about the more complicated parts you’re likely to come across?

In this article, I’m going to teach you how to reverse engineer and model those parts. Years ago, I worked for a medical device company where the business model was to duplicate out-of-patent medical products. That meant that my entire job was reverse engineering complex precision-made devices as accurately as possible. The goal was to reproduce products that were indistinguishable from the original, and because they were used for things like trauma reconstruction, it was critical that I got it right.

Continue reading “How To Reverse Engineer Mechanical Designs For 3D Modeling”