Alternatives To Pins And Holes For 3D Printed Assemblies

When we have two 3D printed parts that need to fit together, many of us rely on pins and holes to locate them and fix them together. [Slant 3D] has explored some alternative ideas in this area that may open up new avenues for your own designs.

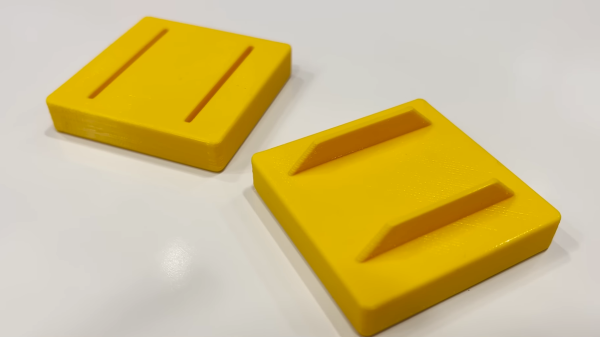
Their first idea was to simply chamfer the pins and holes. This allows the object to be printed in a different orientations without compromising the fit. It also makes the features less brittle and creates a broader surface for gluing. Another alternative is using fins and slots, which again add robustness compared to flimsy pins. By chamfering the edges of the fins, they can be printed vertically for good strength and easy location without the need for support material.

Neither option requires much extra fuss compared to typical pin-and-hole designs. Plus, both are far less likely to snap off and ruin your day. Be honest, we’ve all been there. Meanwhile, consider adding folded techniques to your repertoire, too.

Continue reading “Alternatives To Pins And Holes For 3D Printed Assemblies”

Cheap Deburring Tool Is Game Changer For 3D Printing

3D printing’s real value is that you can whip up objects in all kinds of whacky geometries with a minimum of fuss. However, there’s almost always some post-processing to do. Like many manufactured plastic objects, there are burrs, strings, and rough edges to deal with. Fussing around with a knife to remove them is a poor way to go. As explained by [Adrian Kingsley-Hughes] on ZDNet, a deburring tool is the cheap and easy solution to the problem.

If you haven’t used one before, a deburring tool simply consists of a curved metal blade that swivels relative to its straight handle. You can drag the curved blade over the edge of a metal, wooden, or plastic object, and it neatly pulls away the burrs. There’s minimal risk of injury, unlike when pulling a regular blade towards yourself. The curved, swiveling blade is much less liable to slip or jump, and if it does, it’s far less likely to cut you.

For plastic use, just about any old deburring tool will do. They last a long time with minimal maintenance. They will wear out faster when used on metals, but you can get replacement blades cheap if you happen to need them. It’s a tool every workshop should have, particularly given they generally cost less than $20.

Given the ugly edges and rafts we’re always having to remove from our 3D prints, it’s almost egregious that printers don’t come with them bundled in the box. They’re just a bit obscure when it comes to tools; this may in fact be the first time Hackaday’s ever covered one. If you’ve got your own quality-of-life hacks for 3D printing, sound off below, or share them on the tipsline! We have able staff waiting for your email.

3D Printed Post Modern Grandfather Clock

Projects can often spiral, not down or up, but out. For [Derek] he started playing around with a 3D printed escapement mechanism and thought it was a wonderful bit of engineering. But with a simple drum and weight, it only had a runtime of a few minutes. What started as a simple “can I make it run longer” spiraled into a full-blown beautiful grandfather clock.

A gear drive, a ratcheted winding sprocket, and a ball chain gave the clock about one hundred minutes of runtime. Adding a recharging mechanism was fairly straightforward. The weight automatically rewinds with the help of an ESP32, a motor, and some limit switches. While an ESP32 is absolutely overkill for this simple project, it was cheap and on hand. A quick hall effect sensor to detect the pendulum passing made it into a proper clock. Considering it’s a printed plastic clock, losing only 2-3 seconds per day is incredibly good. The whole thing is wrapped in a gorgeous wood case with a distinct design.

Surprisingly, everything was designed in OpenSCAD and Blender. [Derek] includes some great tips such as cleaning out the ball bearings to make them run smoother and suggestions on how to make a plastic clock move without binding. Clock making is a complex and sometimes arcane art, which makes watching the process all the more interesting.

A cat skull enclosed in a domed security camera enclosure with green LEDs illuminating the eye sockets, sitting on a table with other skulls and rocks.

Cat Skull For Internet Connection Divination

[Emily Velasco] has an internet provider that provides sub-par connectivity. Instead of repeatedly refreshing a browser tab to test if the network is up, [Emily] decided to create an internet status monitor by embedding indicator lights in a cat skull…for some reason.

The electronics are straightforward, with the complete parts list consisting of an Arduino Nano 33 IoT device connected to a pair of RGB LEDs and 50 Ohm resistors. The Nano attempts to connect to a known site (in this case, the Google landing page) every two seconds and sets the LEDs to green if it succeeds or red if it fails.

The cat skull is thankfully a replica, 3D printed by one of [Emily]’s Twitter acquaintances, and the whole project was housed in a domed security camera enclosure. [Emily] mounts the LEDs into the skull to create a “brain in a jar” effect.

The source is available on GitHub for those wanting to take a look. We’ve featured internet connectivity status indicators in the form of traffic lights here before, as well as various network status monitors and videoconferencing indicator lights.

Helmke-Part-Counter Dispensing Parts

Dispense 60 Bolts In 2.3 Seconds

We’ve covered a number of projects that assist makers who need to fill orders for their small businesses, or kitting. [Helmke] has sorted thousands of pieces of hardware that they include with 3D printed parts sold online. They have been developing an alternative, a modular system for sorting and packaging specific quantities of parts.

Animated GIF of Helmke-Part-Counter Sorting Parts

After the break, check out the latest video from their small but growing channel for a very clear walk-through of the counting system they’ve been iterating on. The 2nd video in the series explores solenoids, Geneva drives, and ultimately a sprocket to dispense a variable number of bolts from the sorting machine. The approach gives consistent results, easily to vary quantities, and is fast! These videos are also rich with lots of small details you might want to explore on your own like magnetic part feeding, discussions of different sensors for detecting and counting parts, 3D printed gear box designs, and we love the use of stackable crates for project enclosures.

We hope to see more videos from [Helmke] in the series as the project matures for deeper dives into the existing mechanisms and new features they develop next. Hungry for more? We’ve brought you everything from cutting and stripping wire, to SMD tape, to resistors, to laser-cut parts. Continue reading “Dispense 60 Bolts In 2.3 Seconds”

Ikea Clock Gets Wanderlust

We always enjoy unique clocks, and a recent 3D print from [David Kingsman] caught our eye. It converts an Ikea clock into a very unusual-looking “wandering hour” clock that uses a Geneva drive to show a very dynamic view of the current time. The concept is based on an earlier wandering clock, but [David] utilized a different mechanism.

To read the clock, you note which hour numeral is in range of the “minute arc” and read the time directly. So if the 12 hour is over the 20-minute mark, the time is 12:20. Besides the clock, you need a fair number of printed parts, although they all look like relatively simple prints. You’ll also need 13 bearings and some metric hardware. A piece of cardboard used for the face rounds out the build.

Modifying the clock is more than just taking it apart. There is a template file to print, and you’ll need to align it and drill holes as indicated.

If you haven’t seen a Geneva drive before, it translates a continuous rotation into intermittent rotation. This isn’t the first clock we’ve seen use this kind of drive, although the last one we saw represented time differently. If you want something even more mechanical, try a chain-driven clock.

Making The One Ring By Electroplating Gold On A 3D Print

Electroplating is a great way to add strength or shine to a 3D print. However, we don’t see too many people trying it with gold. [HEN3DRIK] isn’t afraid to experiment, though, and pulled off some amazing, high-quality jewelry-grade plating!

The design for the project was the so-called Ring of Power from Lord of the Rings. The print was created on a resin printer at a high quality level, washed thoroughly to remove any remaining resin, and then cured. The print was then post-processed with sandpaper to make it as smooth as possible. Conductive paint was then applied, ready to take on the plating layers. [HEN3DRIK] first started by plating copper to build up a tough base layer, then nickel to prevent mixing between the copper and gold. The gold is then finally plated on top. Plating the copper is done with the ring constantly rotating to get as even a coat as possible. In contrast, the gold plating is done with a brush to avoid wasting the highly-expensive plating solution.

The final result is a gleaming gold ring that probably feels strangely light in the hand. The technique is time consuming, thanks to the need to plate multiple layers, but the results are to die for. We’ve seen [HEN3DRIK]’s fine work before, too. Video after the break.

Continue reading “Making The One Ring By Electroplating Gold On A 3D Print”