A Simple And Effective 3D Filament Splicer

There are times in every 3D print enthusiast’s life when it would be convenient to join two pieces of filament. The problem with simply melting them together is that the resulting join has a blob of plastic surrounding it which has difficulty making it through the printer’s internals. [Pete Prodoehl] has a solution, in the form of a well-executed splicing jig that’s sure to leave a join which will glide through your printer.

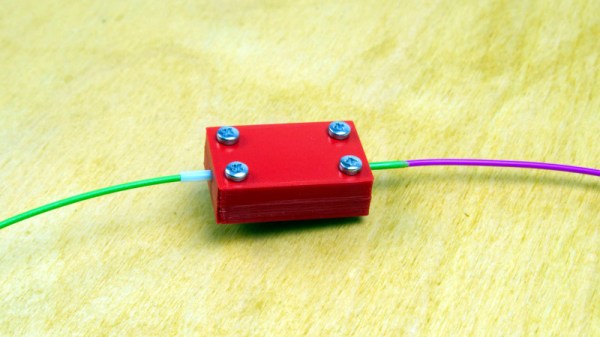
The trick lies in performing the join in a space only marginally wider than the filament width, in the case of 1.75 mm filament a short piece of 1.775 mm PTFE tube encased in a 3D printed clamp. A 90-degree cut piece of filament is fed through the tube and heated with a candle, then withdrawn into the tube where a 45-degree cut piece is pushed in to fuse with it. The result is a seamless and bulge-less join, that can pass through an extruder without issue and print continuous pieces from different filaments.

It’s a very effective technique, but it’s not the only one we’ve seen over the years. This one by comparison heats the filament in a hair straightener, and relies on gently pulling the join apart as it solidifies in order to reduce the bulge.

10-Foot High 3D Printer Based On Ender 3

There are two main ways to 3D print large things. You can either make lots of small 3D prints and stick them together, or you can use a larger 3D printer. [Emily the Engineer] went the latter route by making her Ender 3 a full 10 feet tall.

The best Doug Dimmadome hat we’ve seen in a while, printed on the 10-foot Ender 3. If you’re unfamiliar, Doug Dimmadome is the owner of the Dimmsdale Dimmadome.

The Ender 3’s modular construction made this feat straightforward in the early steps. The printer was simply disassembled, with longer aluminium extrusions bolted in their place. New wheels were resin printed via Onshape to to run along the new extrusions, which were of a slightly different profile to the original parts. Wiring was also a hurdle, with the 10-foot printer requiring a lot longer cables than the basic Ender 3.

An early attempt to make the Z-axis work with a very long threaded rod failed. Instead, a belt-driven setup was subbed in, based on existing work to convert Ender 3s to belt drive. With a firmware mod and some wiring snarls fixed, the printer was ready to try its first high print. Amazingly, the printer managed to complete a print at full height, albeit the shaking of the tall narrow print lead to some print quality issues. The frame and base were then expanded and some struts installed to add stability, so that the printer could create taller parts with decent quality.

While few of us would need a 10-foot high Ender 3, it’s easy to see the value in expanding your printer’s build volume with some easy mods. [Emily] just took it to the extreme, and that’s to be applauded. Video after the break.

Continue reading “10-Foot High 3D Printer Based On Ender 3”

Looking Inside A 3D Printer Nozzle With Computed Tomography

Have you ever wondered what’s actually going on inside the hotend of your 3D printer? It doesn’t seem like much of a mystery — the filament gets melty, it gets squeezed out by the pressure of the incoming unmelty filament, and lather, rinse, repeat. Or is there perhaps more to the story?

To find out, a team from the University of Stuttgart led by [Marc Kreutzbruck] took the unusual step of putting the business end of a 3D printer into a CT scanner, to get a detailed look at what’s actually going on in there. The test setup consisted of a Bondtech LGX extruder and an E3D V6 hot end mounted to a static frame. There was no need for X-Y-Z motion control during these experiments, but a load cell was added to measure extrusion force. The filament was a bit specialized — high-impact polystyrene (HIPS) mixed with a little bit of tungsten powder added (1% by volume) for better contrast to X-ray. The test system was small enough to be placed inside a micro CT scanner, which generated both 360-degree computed tomography images and 2D radiographs.

The observations made with this experimental setup were pretty eye-opening. The main take-home message is that higher filament speed translates to less contact area between the nozzle wall and the melt, thanks to an air gap between the solid filament and the metal of the nozzle. They also saw an increased tendency for the incoming filament to buckle at high extruder speeds, which matches up with practical experience. Also, filament speed is more determinative of print quality (as measured by extrusion force) than heater temperature is. Although both obviously play a role, they recommend that if higher print speed is needed, the best thing to optimize is hot end geometry, specifically an extended barrel to allow for sufficient melting time.

Earth-shattering stuff? Probably not, but it’s nice to see someone doing a systematic study on this, rather than relying on seat-of-the-pants observations. And the images are pretty cool too.

Silencing A 3D Printer With Acoustic Foam Isn’t That Easy

3D printers are supremely useful tools, but their incessant whining and droning can be distracting and tiresome. [Handy Bear] decided to try some simple ways to quieten down their printer using acoustic foam, with mixed results.

The video starts by exploring two different acoustic foams; one black, one white. The latter was found to hold a flame when ignited, making it a poor choice for a 3D printer with many hot components. The black foam, advertised for use in automotive installations, was reluctant to burn at all, and so made a safer choice.

The UP Mini 3 printer is then disassembled to receive its soundproofing treatment. The printer’s various panels all got a healthy lashing of thick sticky insulating foam. This took some work, thanks to the need to cut around various ribs and screw bosses on the panels. Cut appropriately, though, the printed was able to be reassembled neatly with its foam hidden inside.

Unfortunately, the work didn’t have a great effect on the printer’s sound output. That’s perhaps unsurprising, given it still has uninsulated panels like the front window which are still free to radiate sound. The foam did help cut down on fan noise and high-pitch sounds from the printer, but the annoying medium and low pitched noises from the printer’s motors were still very audible.

Using an enclosure or a quieter stepper driver are probably more effective DIY methods to quiet a noisy printer; share your own ideas in the comments. Video after the break.

Continue reading “Silencing A 3D Printer With Acoustic Foam Isn’t That Easy”

IKEA’s Billy Bookshelf Is A Useful 3D Printing Enclosure

The results from your 3D printer may be improved if you use a dedicated enclosure for the job. This is particularly helpful for printing certain materials which are more sensitive to cold drafts or other thermal disruptions to the working area.  If you want an elegant solution to the problem, consider getting yourself an IKEA Billy bookshelf, says [wavlew].

The Billy makes a remarkably elegant 3D printing workstation, overall. It’s got a nifty slide-out drawer that makes a perfect mounting point for a 3D printer. It lets you slide out the printer for maintenance, using the controls, or extracting finished prints. It also naturally features plenty of storage for your filament, tools, and other accoutrements. When it comes to the business of actually printing though, you just slide the printer inside and shut the door. Its thermal and noise isolating performance can also be further improved by adding a silicone door seal.

We love this idea. Too often, 3D printers are left chugging away on messy desks, where they’re subject to blasts from AC vents and other disruptions. Having everything tidily tucked away in a cupboard neatens things significantly, and could also prove helpful if you pursue fume extraction, too.

If you’ve identified any other nifty maker applications for IKEA furniture, be sure to let us know!

Checking Belt Tension Gets Easier For (Some) Prusa 3D Printers

Belts on a 3D printer should be tight enough, but not too tight. That can be an iffy thing to get right for someone who lacks familiarity with CNC platforms. Prusa Research aims to make it a bit easier with a web app that can measure tension via your mobile phone’s microphone and diagnose belt tightness, at least for their MK4 and XL printers.

Using different tools to analyze belt tightness (including belt acoustics) have been tried in the past with mixed results, but this is a pretty focused approach that aims to give exact guidance for specific printer models. It’s pretty useful to provide someone with a reliable go/no-go number, after all.

What happens to a printer if a belt’s tension is not right? Well, there’s actually a pretty forgiving range within which the printer will mostly work fine, but not as well as it could be. Loose belts can have novices chasing other problems, and overly-tightened belts definitely put extra strain on parts. It’s one of those things that’s worth a little extra work to get right.

3D printable tension meter is a different option for Prusa MK3 and Mini printers, if one has some Prusament PETG to print it in.

Everything about belt tension for Prusa printers is covered in their documentation, but did you know there’s also neat 3D printable tension meter for Prusa MK3 and Mini printers? It’s meant to be printed in Prusament PETG (printing in other materials may have different results) but it’s a pretty neat idea for a tool.

If you have a Prusa MK4 or XL and want to try their new method, go here and allow access to your device’s microphone. Then select a printer model and an axis to test. Gently strum the upper part of the belt (avoid touching the bottom belt in the process) and watch live results telling you whether the belt is too tight, too loose, or just right. Prusa have a video demonstrating the process, also embedded below.

Continue reading “Checking Belt Tension Gets Easier For (Some) Prusa 3D Printers”

Tensioning 3D Prints For Lightweight, Strong Parts

Desktop 3D printers have come a long way over the past decade. They’re now affordable for almost anyone, capable of printing in many diverse materials, and offer a level of rapid prototyping and development not feasible with other methods. That said, the fact that they are largely limited to printing different formulations of plastic means there are inherent physical limitations to what the machines are capable of, largely because they print almost exclusively in plastic. But augmenting prints with other building techniques, like this method for adding tensioning systems to 3D printed trusses can save weight and make otherwise unremarkable prints incredibly strong.

The build from [Jón Schone] of Proper Printing consists of printed modular sections of truss which can be connected together to make structural components of arbitrary length. To add strength to them without weight, a series of Kevlar threads are strung from one end of the truss to the other on the interior, and then tensioned by twisting the threads at one end. Similar to building with prestressed concrete, this method allows for stronger parts, longer spans, less building material, and lighter weight components. The latter of which is especially important here, because this method is planned for use to eventually build a 3D printer where the components need to be light and strong. In this build it’s being used to make a desk lamp with a hinged joint.

For other innovative 3D printer builds, [Jón] has plenty of interesting designs ranging from this dual extrusion system to this 3D printed wheel for a full-size passenger vehicle. There’s all kinds of interesting stuff going on at that channel and we’ll be on the edge of our seats waiting to see the 3D printer he builds using this tensioned truss system.

Continue reading “Tensioning 3D Prints For Lightweight, Strong Parts”