Have 3D Printer, Will Travel

We keep hearing that the desktop computer is dying — everyone wants a mobile device like a laptop, a tablet, or a big horkin’ phone. We suppose [eponra] wants the same thing for 3D printers, since he’s provided plans for “flatpack” a portable 3D printer that can fit in a spool box.

As you might imagine, this isn’t going to give you maximum build volume. The printer’s folded down dimensions are 220x210x75mm. The build plate is fairly small at 120x114x144mm. However, it does have a heated bed and an LCD display. One note, though: you do need an external power supply that does not fit in the box. However, [eponra] notes that with an AC-powered bed, it would be possible to get everything in the box.

Continue reading “Have 3D Printer, Will Travel”

Make Your Own Color Gradient 3D Printing Filament

Color gradient filament is fun stuff to play with. It lets you make 3D prints that slowly fade from one color to another along the Z-axis. [David Gozzard] wanted to do some printing with this effect, and learned how to make his own filament to do the job. 

[David] intended to 3D print a spectrogram of a gravity wave, and wanted the graph to go from blue to yellow. Only having a single-color printer, he needed color shift filament, but couldn’t find any blue-to-yellow filament online.

The resulting color-shifting print looks great, demonstrating the value of the technique.

Thus, he elected to create it himself. He started by creating a spiral model in Fusion 360, with a hexagonal cross-section and slowly tapering off to a point. Slicing and printing this in blue results in a filament that slowly fades down to a point. The opposite shape can then be printed in yellow, tapering from a point up to a full-sized filament. The trick is to print one shape, then the other, by mashing the G-code together and changing the filament from blue to yellow along the way. The result is the blue and yellow plastic gets printed together into a single filament that gradually changes from one to the other.

Notably, the filament is smaller than the original filaments used to create it, so it’s necessary to run slightly different settings when using it. [David] has shared the models on Thingiverse for those eager to recreate the technique at home. His resulting gravity wave print is impressive, demonstrating that this technique works well!

We’ve seen similar different techniques used for creating multi-color filaments before, too. Video after the break.

Continue reading “Make Your Own Color Gradient 3D Printing Filament”

3D Printing The Key To A Bass Clarinet

Playing music as part of a group typically requires that not only are all of the instruments tuned to each other, but also that the musicians play in a specific key. For some musicians, like pianists and percussionists, this is not terribly difficult as their instruments are easy to play in any key. At the other end of the spectrum would be the diatonic harmonica, which is physically capable of playing in a single key only. Other orchestral instruments, on the other hand, are typically made for a specific key but can transpose into other keys with some effort. But, if you have 3D printed your instrument like this bass clarinet from [Jared], then you can build it to be in whichever key you’d like.

The bass clarinet is typically an instrument that comes in the key of B flat, but [Jered] wanted one that was a minor third lower. Building a traditional clarinet is not exactly the easiest process, so he turned to his 3D printer. In order to get the instrument working with the plastic parts, he had to make a lot of the levers and keys much larger than the metal versions on a standard instrument, and he made a number of design changes to some of the ways the keys are pressed. Most of his changes simply revert back to clarinet designs from the past, and it’s interesting to see how simpler designs from earlier time periods lend themselves to additive manufacturing.

While [Jared] claims that the two instruments have slightly different tones, our amateur ears have a hard time discerning the difference. He does use a standard clarinet bell but other than that it’s impressive how similar the 3D printed version sounds to the genuine article. As to why it’s keyed differently than the standard, [Jared] points out that it’s just interesting to try new things, and his 3D printer lets him do that. We’d be happy to have another instrument in our 3D printed orchestra, too.

Continue reading “3D Printing The Key To A Bass Clarinet”

3D Print Yourself A Tiny Steam Train Complete With Smoke Effects

Model trains are fun, but sometimes little whirring motors in electric models feel a long way from the hulking metal beasts of the real railways. [Lewis] of [DIY Machines] adds back some of the flavor with this little steam train build, smoke effects included!

The body of the train itself is 3D printed in PLA. It’s designed to O-gauge scale, and comes complete with models for 3D printed track as well. The parts are given a coat of paint to better approximate the finish of the real thing; sometimes bare plastic just won’t suffice, after all.

Propulsion is thanks to an onboard battery and a simple gearmotor, driven by a HG7881 motor driver. An ESP32-CAM is responsible for running the show, allowing the train to be commanded wirelessly. As a bonus, the camera is mounted in the very front of the train, allowing one to watch a livestream of its progress about the tracks. Meanwhile, the smoke effect is thanks to a small water atomizer fitted in the train’s chimney, which makes the train look that little bit more authentic.

The combination of a self-powered train and 3D-printed tracks is a compelling one. [Lewis] has been able to leave his PETG 3D-printed track outside for over two years and it’s still in working order. That’s not something easy to achieve when using metal rails to deliver power.

Overall, this is a fun way to get into building your own model trains, and is a lot more hands-on than simply buying pre-built models from a store. From there, the sky is really the limit for your creativity! Video after the break.

Continue reading “3D Print Yourself A Tiny Steam Train Complete With Smoke Effects”

3D Printed String Vase Shows What’s Possible

Overhangs are the bane of the melty-plastic 3D printing world. Often, we try to avoid them with creative print alignments, or we compensate with supports. However, [3DPrintBunny] decided to embrace overhangs in the extreme in the design of her creative 3D-printed string vase.

The design is intended to be printed with a larger nozzle, on the order of 0.8 mm or so, at a layer height of 0.6 mm. Under these conditions, the printer nozzle bridges the gap between the vase’s pillars with a single string of molten filament. With the settings just so, the molten filament stays attached during the bridging operation, and creates a fine plastic string between the pillars. Repeat this across the whole design, and you get an attractive string vase.

Amazingly, [3DPrintBunny] didn’t have to do any fancy slicer tricks to achieve this. Stock slicer settings got the job done just fine, and she reports that the model should print on most FDM printers. For her own examples, she printed in a special silver/bronze dual color PLA filament.

It recalls us of efforts to create synthetic hair-like fibers by taking advantage of stringing in 3D printers. Video after the break. Continue reading “3D Printed String Vase Shows What’s Possible”

Giant 3D Printer Aims To Produce Life-Sized Boat

As 3D printers become more ubiquitous, the number of custom designs and styles of printers has skyrocketed. From different printing materials and technologies to the movements of the printing head, we’ve seen all kinds of different takes on these tools. But one thing that has been largely limited to commercial and industrial use has been large print sizes —  leaving consumer level prints to be split into several pieces to fit together later. Not so with this giant 3D printer from [Ivan], though.

The design goals for this build are to print an entire boat that [Ivan] can captain himself, and additionally an entire go kart chassis in a single piece. It’s part of a contest between him and another YouTuber and as far as we can tell he’s well on his way to completing the challenge. The printer will be able to churn through 4 kg of filament per day, and has a printable volume of 1000x1000x1420 millimeters, or just shy of 1.5 cubic meters.

While this video is just the first step of building the frame and the printer guides, we can’t wait to see the next steps in the process. It’s one of the largest 3D printers we’ve ever seen, at least outside of printers designed for building entire houses out of concrete.

Continue reading “Giant 3D Printer Aims To Produce Life-Sized Boat”

The printer in question - it's tall, about a meter and a half tall, in fact!

Hackaday Prize 2022: $40k Stratasys Printer Fix Costs $1

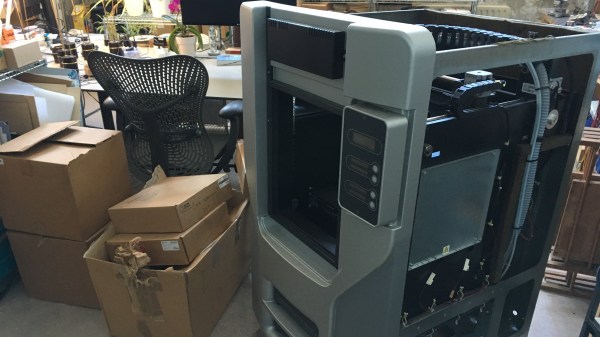
Companies don’t treat equipment in the same way that we, hobbyists, do. When it comes to reassessing equipment state, there’s calculations to be done – how many failures it’s experienced, what’s the rate of the support contract for it (often increasing as equipment ages), and whether it’d be more price-efficient to just buy a new one. Hobbyists aren’t tied to commercial support contracts that prohibit DIY repair, however. We can investigate things and try our luck, and in many cases, the repair will be super simple and satisfying! Today’s lucky repair story is about [Gregor], who has acquired a written-off ±$40k Stratasys 3D printer for peanuts, and repaired it with $1 in parts.

The error code shown on the display indicated an extruder changer error — yes, this is a dual extruder printer! Earlier, [Gregor] noted that some of the chamber lighting LEDs failed, very likely because of the constant heat in the chamber. After investigating the infrared LED responsible for extruder change detection, it indeed had failed as well, presumably for the same reason. After the installation of a new SMD LED, the error message went away. Thus concludes the story of [Gregor] getting himself a new professional-grade printer! He also documents other possible failure modes, some just as easy to fix. In short, if you ever spot a Stratasys Dimension printer for sale, you might want to consider it!

As it turns out, this isn’t the only Stratasys success story we’ve seen on Hackaday.io. After you’ve repaired your newly obtained Stratasys, you might want to bypass the cartridge DRM, by the way. Got repairs of your own to share, industrial printer or otherwise? Submit it for the 2022 Hackaday Prize, there’s still a few days left in the Hack it Back round!