X-Ray Sleuthing Unveils The Fake In Your Adaptors

Lets face it, the knock-off variety of our favourite adaptors, cables and accessories are becoming increasingly challenging to spot. We would be the first to admit, to have at some point, been stooped by a carefully crafted counterfeit by failing to spot the tell-tale yet elusive indicators such as the misplaced font face, the strategically misspelled logo or perhaps the less polished than expected plastic moulding and packaging. When you finally come around to using it, if you are lucky the item is still more or less functionally adequate, otherwise by now the inferior performance (if not the initial cost!) would have made it pretty obvious that what you have is infact a counterfeit.

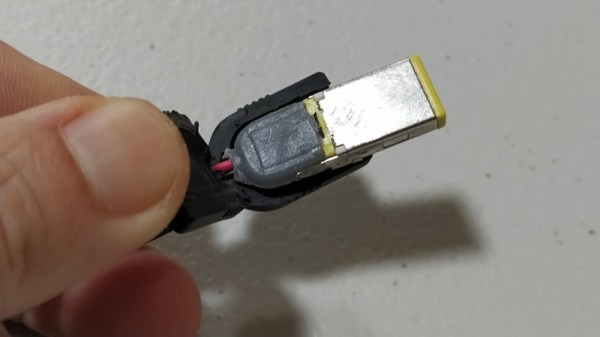
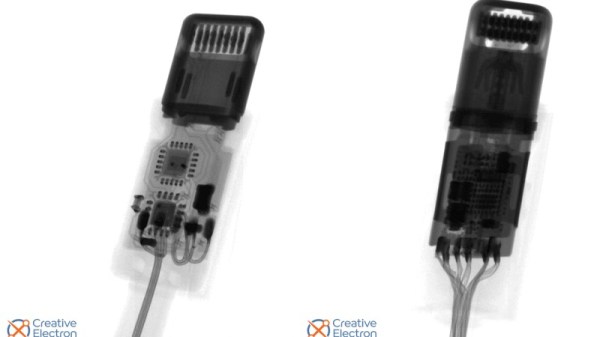
[Oliver] recently found himself in a similar situation, after acquiring a seemingly original Lightning to Headphone Adaptor. Rather than dismay, [Oliver] decided to channel this energy into an excellent forensic investigation to uncover just what exactly made this imitation so deceptive. He began by comparing the packaging, printed typeface and the plastic moulding, all of which gave very little away. [Oliver] concluded that atleast superficially, the clone was rather good and the only way to settle this was to bring out the X-ray, of course!  

The resulting images of the innards make it blatantly obvious as to why the adaptor is indeed very fake. For a start, compared to the original adaptor, the clone hosts a far more thin BOM count! If you are really serious in getting some training to better spot counterfeits, check out a post we featured earlier on the subject!

Hacking A ThinkPad USB-C Adapter

USB-C has brought the world much more powerful charging options in a slimline connector. With laptop chargers and portable battery packs using the standard, many with older hardware are converting their devices over to work with USB-C. [victorc] was trying to do just that, purchasing an adapter cable to charge a ThinkPad. Things didn’t quite work out of the box, so some hacking was required.

The problem was the power rating of the adapter cable, versus the battery pack [victorc] was trying to use. In order to allow the fastest charging rates, the adapter cable features a resistor value which tells the attached Lenovo laptop it can draw up to 90 W. The battery pack in question could only deliver 45 W, so it would quickly shut down when the laptop tried to draw above this limit.

To rectify this, [victorc] looked up the standard, finding the correct resistor value to set the limit lower. Then, hacking open the cable, the original resistor on the Lenovo connector was removed, and replaced with the correct value. With this done, the cable works perfectly, and [victorc] is able to charge their laptop on the go.

For all the benefits USB-C has brought, there’s been plenty of consternation, too. Whether this clears up, only time will tell!

Mobile Power From Cordless Tool Batteries

For years, [Michael Davis] has been using a large lead-acid battery to power the electronic components of his custom Dobsonian telescope; but that doesn’t mean he particularly enjoyed it. The battery was heavy, and you always had to be mindful of the wires connecting it to the scope. Looking to improve on the situation somewhat, he decided to build an adapter for Ryobi cordless tool batteries.

[Michael] had already seen similar 3D printed adapters, but decided to make his the traditional way. Well, sort of. He used a CNC router to cut out the distinctive shape required to accept the 18 V lithium-ion battery pack, but the rest was assembled from hardware store parts.

Bent mending plates with nuts and bolts were used to create adjustable contacts, and a spring added to the top ensures that there’s always a bit of tension in the system so it makes a good electrical contact. This setup makes for a very robust connector, and as [Michael] points out, the bolts make a convenient place to attach your wires.

With the logistics of physically connecting to the Ryobi batteries sorted out, the next step was turning that into useful power for the telescope. A stable 12 V is produced by way of a compact DC-DC converter, and a toggle switch and fuse connect it to a pair of automotive-style power sockets. Everything is held inside of a wooden box that’s far smaller and lighter than the lead-acid monster it replaced, meaning it can get mounted directly to the telescope rather than laying on the ground.

If you want to build a similar adapter, the 3D printing route will potentially save you some time and effort. But we have to admit that the heavy-duty connection [Michael] has rigged up here looks quite stout. If you’ve got an application where the battery could be knocked around or vibrated lose, this may be the way to go.

Slide Your Switch Into A Gamecube Controller

The Gamecube was certainly a divisive design when it was released back in 2001, but the fact that people are still happily hacking away at its controller nearly 20 years later proves that Nintendo must have gotten something right. The latest project from Nintendo wizard [Bill Paxton] turns the unique Gamecube controller into an even more unique mobile dock for the Switch.

To build this “Gamecube Grip”, [Bill] literally cut an original controller and its PCB in half so they could be relocated on either end of the 3D printed central frame. Internally, the controller PCB is wired up to a GC+ board, which is an open hardware project that uses a PIC18F25K22 microcontroller to bring enhanced features to the classic peripheral such as adjustable stick dead zones and rumble intensity. From there, it’s connected to the switch with a GBros adapter from 8bitdo.

The grip also includes an Anker PowerCore 20,100 mAh battery that should keep the system going for hours, and some components liberated from a third party Switch dock. Everything has been finished off with the attention to detail that we’ve come to expect from [Bill] and his projects, including the seemingly flawless glossy paint job that’s something of hallmark for his custom gaming creations.

Continue reading “Slide Your Switch Into A Gamecube Controller”

Adapter Brings M.2 WiFi Cards To The Pinebook Pro

The Pinebook Pro is a considerably more capable machine than the $99 Pinebook released in 2017, but the open source laptop still isn’t exactly a powerhouse by modern standards. The system is intended to compete with mid-range Chromebooks, and to that end, few would argue it’s not worth the $199 price tag. But there’s still room for improvement, and at this price point that makes it a hardware hacker’s delight.

[TobleMiner] has recently released the design files for a drop-in adapter that allows you to install M.2 wireless cards like the Intel AX200 in the Pinebook Pro. With the latest-and-greatest WiFi 6 technology onboard, transfer rates as high as 600 Mbps have been demonstrated on this relatively low-cost Linux laptop. It sounds like there’s a possibility the adapter will be offered officially through the Pine store at some point in the future, but in the meantime, you can always spin up your own copy if you feel the need for speed on your Pinebook Pro.

The adapter takes the place of the official M.2 SSD upgrade board, which means users will need to choose between expanded storage and an upgraded wireless card. But [TobleMiner] hints that a version of the adapter with a second M.2 slot should be possible in the future. The design also features pads to install an optional voltage regulator, as testing has shown that the Pinebook Pro’s 3.3 V line can fluctuate a bit depending on battery level.

We took a close look at the original Pinebook when it was released, and came away cautiously optimistic. The Pro model appears to be an improvement in every way imaginable, and upgrades like this show just what’s possible when users are free to explore their hardware.

DIY Magsafe Charger Feeds Off 12 V Solar Battery

[Steve Chamberlin] has a spiffy solar-charged 12 V battery that he was eager to use to power his laptop, but ran into a glitch. His MacBook Pro uses Apple’s MagSafe 2 connector for power, but plugging the AC adapter into the battery via a 110 VAC inverter seemed awfully inefficient. It would be much better to plug it into the battery directly, but that also was a problem. While Apple has a number of DC power adapters intended for automotive use, none exist for the MagSafe 2 connector [Steve]’s mid-2014 MacBook Pro uses. His solution was to roll his own MagSafe charger with 12 VDC input.

Since MagSafe connectors are proprietary, his first duty was to salvage one from a broken wall charger. After cleaning up the wires and repairing any frayed bits, it was time to choose a DC-DC converter to go between the MagSafe connector and the battery. The battery is nominally 12 volts, so the input of the DC-DC converter was easy to choose, but the output was a bit uncertain. Figuring out what the MagSafe connector expects took a little educated guesswork.

The original AC adapter attached to the charger claimed an output of 20 volts, another Apple adapter claimed a 14.85 V output, and a third-party adapter said 16.5 volts. [Steve] figured that the MagSafe connectors seemed fine with anything in the 15 to 20 V range, so it would be acceptable to use a 12 V to 19 V DC-DC boost converter which he had available. The result worked just fine, and [Steve] took measurements to verify that it is in fact much more efficient than had he took the easy way out with the inverter.

MagSafe has been displaced by USB-C nowadays, but there are plenty of MagSafe devices still kicking around. In a pinch, keep in mind that a little bit of filing or grinding is all that’s needed to turn MagSafe 1 into MagSafe 2.

An Adapter To Solve Your ESP-01 Breadboard Woes

The ESP-01 launched the ESP8266 revolution back in 2014, and while today you’re far more likely to see somebody use a later version of the chip in a Wemos or NodeMCU development board, there are still tasks the original chip is well suited for. Unfortunately, they can be tricky to use while prototyping because they aren’t very breadboard friendly, but this adapter developed by [Miguel Reis] can help.

Of course, the main issue is the somewhat unusual pinout of the ESP-01. Since it was designed as a daughter board to plug into another device, the header is too tight to fit into a breadboard. The adapter that [Miguel] has come up with widens that up to the point you can put it down the centerline of your breadboard and have plenty of real estate around it.

The second issue is that the ESP-01 is a 3.3 V device, which can be annoying if everything else in the circuit is running on 5 V. To get around this, the adapter includes an SPX3819 regulator and enough capacitors that the somewhat temperamental chip gets the steady low-voltage supply it needs to be happy.

[Miguel] has released the schematics and board files so you can spin up your own copy of the adapter, but they’re also available for around $3 USD from his Tindie store.