Amazing Mechanical Linkages And The Software To Design Them

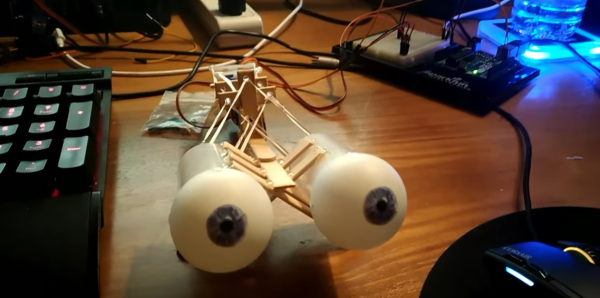
Most of us are more bits-and-bytes than nuts-and-bolts, but we have the deepest appreciation for the combination of the two. So, apparently, does [rectorsquid]. Check out the design and flow of his rolling ball sculpture (YouTube, embedded below) to see what we mean. See how the arms hesitate just a bit as the ball is transferred? See how the upper arm gently places it on the ramp with a slight downward gesture? See how it’s done with one motor? There’s no way [rectorsquid] designed this on paper, right?

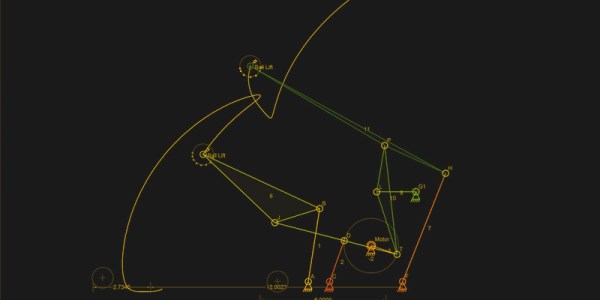
Of course he didn’t (YouTube). Instead, he wrote a simulator that lets him try out various custom linkages in real time. It’s a Windows-only application (sigh), but it’s free to use, while the video guides (more YouTube) look very comprehensive and give you a quick tour of the tool. Of special note is that [rectorsquid]’s software allows for sliding linkages, which he makes very good use of in the rolling ball sculpture shown here.

We’ve actually secretly featured [rectorsquid]’s Linkage software before, in this writeup of some amazing cosplay animatronic wings that used the program for their design. But we really don’t want you to miss out if you’re doing mechanical design and need something like this, or just want to play around.

If you’d like to study up on your nuts and bolts, check out our primer on the ubiquitous four-bar linkage, or pore through Hackaday looking for other great linkage-powered examples, like this automatic hacksaw or a pantograph PCB probe for shaky hands.

Anyone know of an open-source linkage simulator that can also output STL files for 3D printing? Or in any format that could be easily transformed into OpenSCAD? Asking for a “friend”.

Continue reading “Amazing Mechanical Linkages And The Software To Design Them”

Alas, Poor Yorick! He Hath Not Amazon Prime

If you are looking around for a Halloween project, you might consider The Yorick Project from [ViennaMike]. As you can see in the video below, it marries a Raspberry Pi acting as an Amazon Alexa with an animatronic skull.

This isn’t the most technically demanding project, but it has a lot of potential for further hacking. The project includes a USB microphone, a servo controller, and an audio servo driver board. It looks like the audio servo board is controlling the jaw movement and based on the video, we wondered if you might do better running it completely in software.

Continue reading “Alas, Poor Yorick! He Hath Not Amazon Prime”

Look At Me With Your Special Animatronic Eyes

Animatronics for movies is often about making something that works and is reliable in the short term. It doesn’t have to be pretty, it doesn’t have to last forever. [Corporate Sellout]  shows us the minimalist approach to building animatronics with this pair of special eyes.  These eyes move in both the pan and tilt. Usually, that means a gimbal style mount. Not in this case. The mechanical assembly consists of with popsicle sticks, ping-pong balls, film canisters and dental floss.

The frame for the eyes is made of simple popsicle sticks hot glued together. The eyes themselves are simple ping-pong balls. Arduino powered servos control the movement. The servos are connected to dental floss in a cable arrangement known as a pull-pull system. As each servo moves, one side of the arm pulls on a cable, while the other provides enough slack for the ping-pong ball to move.

Mounting the ping-pong balls is the genius part of this build. They simply sit in the open end of a couple of film canisters. the tension from the dental floss holds everything together. We’re sure it was a finicky setup to build, but once working, it’s reliable. Only a glue joint failure or stretch in the dental floss could cause issues.

There are plenty of approaches to Animatronic eyes. Check out the eyes in this Stargate Horus helmet, which just won our Sci-Fi contest. More recently we saw Gawkerbot, which uses a CD-ROM drive to provide motion for a creepy robot’s eyes.

Continue reading “Look At Me With Your Special Animatronic Eyes”

Gawkerbot Is Watching You

While sick with the flu a few months ago, [CroMagnon] had a vision. A face with eyes that would follow you – no matter where you walked in the room. He brought this vision to life in the form of Gawkerbot. This is no static piece of art. Gawkerbot’s eyes slowly follow you as you walk through its field of vision. Once the robot has fixed its gaze upon you, the eyes glow blue. It makes one wonder if this is an art piece, or if the rest of the robot is about to pop through the wall and attack.

Gawkerbot’s sensing system is rather simple. A PIR sensor detects motion in the room. If any motion is detected, two ultrasonic sensors which make up the robot’s pupils start taking data. Code running on an ATmega328 determines if a person is detected on the left or right, and moves the eyes appropriately.

[CroMagnon] used an old CD-ROM drive optics sled to move Gawkerbot’s eyes. While the motor is small, the worm drive has plenty of power to move the 3D-printed eyes and linkages. Gawkerbot’s main face is a 3D-printed version of a firefighter’s smoke helmet.

The ultrasonic sensors work, but it took quite a bit of software to tame the jitters noisy data stream. [CroMagnon] is thinking of using PIR sensors on Gawkerbot 2.0. Ultrasonic transducers aren’t just for sensing. Given enough power, you can solder with them. Ultrasonics even work for wireless communications.

Check out the video after the break to see Gawkerbot in action.

Continue reading “Gawkerbot Is Watching You”

Raspberry Pi And Alexa Make Teddy Ruxpin Smarter Than The Average Bear

Behold the unholy union of Amazon’s Alexa and that feature-limited animatronic bear from the 80s, Teddy Ruxpin. Alexa Ruxpin?

As if stuffing Alexa inside a talking fish weren’t bad enough, now Amazon’s virtual assistant can talk to you through the creepy retro plush thanks to [Tinkernut]’s trip down memory lane. Having located a Teddy Ruxpin on eBay for far less than the original $70 that priced it out from under his childhood Christmas tree, [Tinkernut] quickly learned that major surgery would be necessary to revive the Ruxpin. The first video below shows the original servos being gutted and modern micro servos grafted in, allowing control of the mouth, eyes, and nose via an Arduino.

With the bear once again in control of its faculties, [Tinkernut] embarked on giving it something to talk about. A Raspberry Pi running AlexaPi joined the bear’s recently vacated thorax with the audio output split between the bear’s speaker and the analog input on the Arduino. The result is a reasonable animation, although we’d say a little tweaking of the Arduino script might help the syncing. And those eyes and that nose really need to get into the game as well. But not a bad start at all.

This isn’t the first time that Teddy Ruxpin has gone under the knife in the name of hacks, and it likely won’t be the last. And the way toy manufacturers are going, they might just beat us hackers to the punch.

Continue reading “Raspberry Pi And Alexa Make Teddy Ruxpin Smarter Than The Average Bear”

Animatronic Cosplay Wings

In recent years, Cosplay as a hobby has seen improvement in the props department by leaps and bounds. Thanks in part due to the rise of the Maker culture and the easy availability of design and manufacturing tools and processes. Case in point is this awesome set of Animatronic Wings that programmer [Nelson Stoldt] built for his daughter who wanted to be Nightmare Moon.

[Nelson] had no idea what he’d gotten himself in to when he answered “Sure, I can do that”. Making motorized cosplay wings that open up to 8 feet wide and close again at the flick of a switch without weighing a ton is not a trivial project. The final rig did end up tipping the scales at just over 9 kgs, but we guess that’s a load that Cosplayers are used to hauling around.

Using a nifty program called Linkage, he played around with a few different design approaches until he found a mechanism that worked well. If you ever want to build one of [Theo Jansen]’s Strandbeest, give this program a spin. Armed with this information, and a spreadsheet to help determine the exact length of each linkage element, he modelled the project in Sketchup. The wings are operated by a scissor mechanism that is driven by a motorized screw operated sliding carriage. Wing position is measured by a potentiometer coupled to one of the wing elements. Basically, he just built a huge, powerful servo.

Continue reading “Animatronic Cosplay Wings”

Hackaday Prize Entry: Real Life XEyes

There’s a lot of tech that goes into animatronics, cosplay, and costumes. For their Hackaday Prize entry, [Dasaki] and [Dylan] are taking the eyes in a costume or Halloween prop to the next level with animatronic eyes that look where the wearer of this crazy confabulation is looking. It’s XEyes in real life, and it promises to be a part of some very, very cool costumes.

The mechanics of this system are actually pretty simple — it’s just a few servos joined together to make a pair of robotic eyes move up and down, and left to right. This entire mechanism is mounted on a frame, to which is attached a very small camera pointed directly at the user’s (real) eye. The software is where things get fun. That’s a basic eye-tracking setup, with IR light illuminating the pupil, and a compute unit that can calculate where the user is looking.

For the software, [Dasaki] and [Dylan] have collected a bunch of links, but right now the best solutions are the OpenMV and the Eye of Horus project from last year’s Hackaday Prize. It’s a great project, and a really fun entry for the Automation portion of this year’s Hackaday Prize.