A workbench with a 3D printer, a home-made frame of metal tubing and 3D printed brackets and phone holders. 3 iOS devices and 1 Android phone arranged around the printer with a clock and 3 different camera angles around the print bed

Even 3D Printers Are Taking Selfies Now

We love watching 3D prints magically grow, through the power of timelapse videos. These are easier to make than ever, due in no small part to a vibrant community that’s continuously refining tools such as Octolapse. Most people are using some camera they can connect to a Raspberry Pi, namely a USB webcam or CSI camera module. A DSLR would arguably take better pictures, but they can be difficult to control, and their high resolution images are tougher for the Pi to encode.

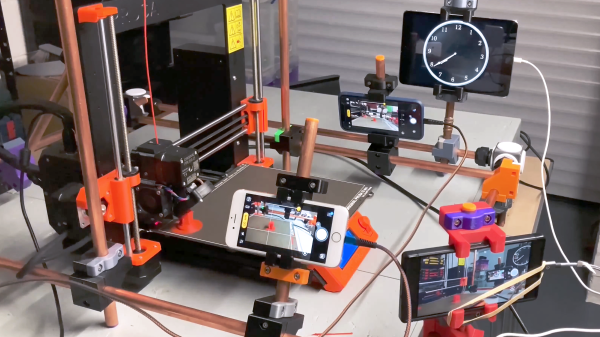
If you’re anything like us, you’ve got a box or drawer full of devices that can take nearly as high-quality images as a DSLR, some cast-off mobile phones. Oh, that pile of “solutions looking for a problem” may have just found one! [Matt@JemRise] sure has, and in the video after the break, you can see how not one but four mobile phones are put to work.

Continue reading “Even 3D Printers Are Taking Selfies Now”

Blynk With Joy

Last time, I talked about how my storage situation and my cheap nature led me to build an RC joystick controller with a cell phone app and an ESP8266. The key to making this easy was to use the GUI builder called Blynk to make a user interface for an Android or Apple phone. Blynk can communicate with the ESP8266 and makes the project relatively simple.

ESP8266 and Arduino IDE

The ESP8266 Blynk code is straightforward. You do need to set up the Arduino IDE to build for the ESP8266. That can vary by board, but here’s the instructions for the board I was using (from Adafruit; see below).

adaesp

Depending on the type of ESP8266 device you are using, you may need a 3.3 V serial cable or some other means of getting the firmware into the device. For the Adafruit device I had, it has a 5 V-tolerant serial connection so a standard USB to serial dongle plugs right in. There’s also two switches on my device. To get into bootload mode, you have to push the one button down, hold it, and then press the reset button. Once you release the reset button you can release the other button. The red LED half-glows and the device is then waiting for a download.
Continue reading “Blynk With Joy”

The Joy Of The ESP8266 And Blynk

I’ll admit it. I can be a little cheap. I also find it hard to pass up a bargain. So when I saw a robot kit at the local store that had been originally $125 marked down to $20, I had to bite. There was only one problem. After I got the thing home, I found they expected you to supply your own radio control transmitter and receiver.

Normally, that wouldn’t be a problem but lately… let’s just say a lot of my stuff is in storage and I didn’t have anything handy. I certainly didn’t want to go buy something that would double the cost of this robot that I really didn’t need to begin with.

However, I did have a few ESP8266 modules handy. Good ones, too, from Adafruit with selected 5 V I/O compatibility and an onboard regulator. I started thinking about writing something for the ESP8266 to pick up data from, say, a UDP packet and converting it into RC servo commands.

joymainSeemed like a fair amount of work and then I remembered that I wanted to try Blynk. If you haven’t heard of Blynk, it is a user interface for Android and Apple phones that can send commands to an embedded system over the Internet. You usually think of using Blynk with an Arduino, but you can also program the embedded part directly on an ESP8266. I quickly threw together a little prototype joystick.
Continue reading “The Joy Of The ESP8266 And Blynk”