Redundant Automated Water Filler For Your Coffee

We’ve always wondered why we have indoor plumbing if it isn’t hooked up to our coffee pots. We probably drink as much coffee as water anyway, so why not just hook up a water line to refill the pot? [Loose Cannon] aka [LC] has been working on just that problem, with a whole lot of extra features, creating a very robust automatically-filled, gravity-fed, vacuum-sealed water tank for whatever appliance you have that could use it, including your coffee pot.

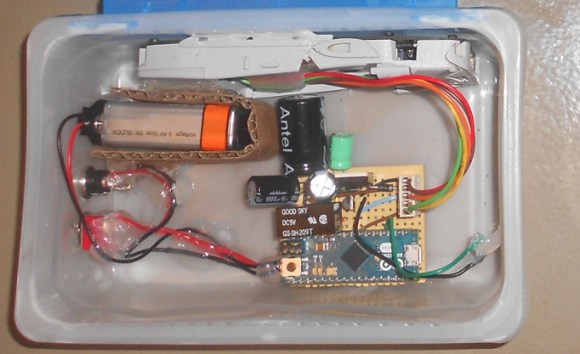
[LC] tapped into the 1/4″ water line from the ice maker, which has the added bonus of being a common size for solenoid valves. He’s using an eTape sensor to measure the water level in the reservoir, but he ALSO is using a flow meter in the line itself to double-check that the reservoir won’t overflow. The flow meter allows a hard limit to be set for the maximum amount of water allowed into the tank. He’s used an Arduino Micro to tie the project together, which also handles a real-time clock so the tank can be filled on a schedule.

The tank that [LC] was trying to fill was vacuum-sealed as well, which made things a little trickier. Without a vacuum on the tank, the water would just run out of the overflow valve. This is an interesting project that goes way beyond the usual automatic water supplies for coffee pots we’ve seen before.

Automated Bed Warmer Control For Chilly Nights

For most of the Northern Hemisphere, winter is in full swing right now. That means long, chilly nights. We assume [LC] is in one of these climes because it seems like his bed warmer wasn’t doing quite a good enough job of getting his bed up to a reasonable temperature before he climbed in. To alleviate some of his discomfort, he hacked into the control unit and added some automation.

The original controller uses a mechanical potentiometer to set the heat level. [LC] added a digital potentiometer which he can switch to in order to allow the automation (using a real-time clock to handle scheduling) to take over control of the bed warmer. This also preserves the original functionality of the controller. There is also an Arduino involved which handles the override from mechanical to digital potentiometer when a capacitive touch sensor is activated. This means that when someone attempts to take manual control of the device, the Arduino can switch the override circuit off.

There is quite a bit of detail on the project site about this hack, including the source code for the controller. [LC] also mentions that this could be interfaced to the web to allow remote control of the bed warmer. This is a great hack, and also fits into the idea of heating the person, not the room.

Mobile Planter Chases The Sun

There are two types of people: ones with green thumbs, and ones that kill their cacti  because they forgot to water them for over a year. Sadly, we are of the latter group. We currently have a resilient spider plant that looks like it could use more sun. Now there’s a way for it to catch those rays wherever they may shine, thanks to [Dot Matrix] of Instructables. She made a mobile planter that actively seeks out sunlight.

The planter’s base was made of plywood, topped with fake grass and a watering can to hold the plant. Anything above the planter base can be modified to whatever desired aesthetic. A CRT planter may be too heavy, but there are countless ways to personalize it. [Dot] used an Afinia 3D printer to make various mounts and brackets with ABS plastic. The planter was controlled by an Arduino Micro and used a pair of 0.5W solar panels and Parallax PING))) sensors to decide how it should move from its current position. If the planter would fall or hit an object moving forward, it would reverse and turn on wheels powered by Parallax continuous rotation servos. It would evaluate its new position, repeating the process if it was in danger. Once the planter was safe, it used the solar panels to detect the most sunlight: the sum of the panels determines the area’s brightness while the individual panels’ readings were used to move the planter towards a brighter area. The sun-seeking continued until the sunniest spot was found (defined in the code). Here, the planter remained idle for 10 minutes before restarting the process.

We think [Dot’s] planter is a fun way to keep plants happy and healthy in spite of us. See a video of the planter after the break.

Continue reading “Mobile Planter Chases The Sun”

3D Printed Virtual Reality Goggles

gaming-loop

Oculus, as we know, was acquired by Facebook for $2 billion, and now the VR community has been buzzing about trying to figure out what to do with all this newly accessible technology. And adding to the interest, the 2nd iteration of the development kits were released, causing a resurgence in virtual reality development as computer generated experiences started pouring out from of every corner of the world. But not everyone can afford the $350 USD price tag to purchase one of these devices, bringing out the need for Do-It-Yourself projects like these 3D printed wearable video goggles via Adafruit.

The design of this project is reminiscent of the VR2GO mobile viewer that came out of the MxR Lab (aka the research environment that spun out Palmer Lucky before he created Oculus). However, the hardware here is more robust and utilizes a 5.6″ display and 50mm aspheric lenses instead of a regular smart phone. The HD monitor is held within a 3D printed enclosure along with an Arduino Micro and 9-DOF motion sensor. The outer hood of the case is composed of a combination of PLA and Ninjaflex printing-filament, keeping the fame rigid while the area around the eyes remain flexible and comfortable. The faceplate is secured with a mounting bracket and a pair of aspheric lenses inside split the screen for stereoscopic video. Head straps were added allowing for the device to fit snugly on one’s face.

At the end of the tutorial, the instructions state that once everything is assembled, all that is required afterwards is to plug in a 9V power adapter and an HDMI cable sourcing video from somewhere else. This should get the console up and running; but it would be interesting to see if this design in the future can eliminate the wires and make this into a portable unit. Regardless of which, this project does a fantastic job at showing what it takes to create a homemade virtual reality device. And as you can see from the product list after the break, the price of the project fits under the $350 DK2 amount, helping to save some money while still providing a fun and educational experience.

Continue reading “3D Printed Virtual Reality Goggles”

Mustachioed Rover Simultaneously Manly, Adorable

[Rick], an Adafruit learning system contributor, is excited by the implications of STEM’s reach into K-12 education. He was inspired to design Red Rover, a low-cost robot that can be easily replicated by anyone with access to a 3-D printer.

This adorable autonomous rover is based on the adafruit Trinket microcontroller, but will also rove under the power of an Arduino micro. It really is quite simple—the Trinket drives two continuous rotation micro servos and pretty much any flavor of rangefinder you like. [Rick] tested it with Parallax PING))), Maxbotix, and Grove sensors, and they all worked just fine.

What’s truly awesome about Red Rover are the track treads. [Rick] initially experimented with flexible filament. While he had good results, it was not a cost-effective solution. What you see in the picture and the short video after the break are actually rubber bracelets from Oriental Trading.

The plastic part count comes in at seven, all of which can be printed together at once. [Rick]’s gallery includes both small and large chassis and three different servo mounts. The Red Rover guide builds on other adafruit guides for Trinket general use, servo modification, and Trinket-specific servo control.

Update: Added [Rick]’s demo video after the break!

Continue reading “Mustachioed Rover Simultaneously Manly, Adorable”

Arduino-Based Power Failure Alert System

arduinoPowerFailBox

When the power went out at his parents’ shop and ruined the contents of their fridge, [Lauters Mehdi] got to work building a custom power failure alert system to prevent future disasters. Although some commercial products address this problem, [Lauters] decided that he could build his own for the same cost while integrating a specific alert feature: one that fires off an SMS to predefined contacts upon mains power failure.

The first step was to enable communication between an Arduino Micro and a Nokia cell phone. His Nokia 3310 uses FBus protocol, but [Lauters] couldn’t find an Arduino library to make the job easier. Instead, he prototyped basic communication by running an Arduino Uno as a simple serial repeater to issue commands from the computer directly to the phone, and eventually worked out how to send an SMS from the ‘duino. [Lauters] then took the phone apart and tapped into the power button to control on/off states. He also disconnected the phone’s battery and plugged it into an attached PCB. The system operates off mains power but swaps to a 1000mAH 9V backup battery during a power outage, logging the time and sending out the SMS alerts. A second message informs the contacts when power has been restored.

Head over to [Lauters’s] project blog for schematics and photos, then see his GitHub for the source code. If you want to see other SMS hacking projects, check out the similar build that keeps a remote-location cabin warm, or the portable power strip activated by SMS.

USB NeXT Keyboard

USB NeXT Keyboard

[Ladyada] and [pt] had an old keyboard from NeXT, but since it used a custom protocol it wasn’t usable with modern hardware. So they built a custom device to convert the NeXT protocol to USB.

The device uses a Arduino Micro to read data from the keyboard and communicate as a HID device over USB. It connects to the keyboard using the original mini-DIN connector, and is housed in the classic Altoids tin enclosure.

Since the protocol used by NeXT isn’t standard, they had to figure it out and write some code to interpret it. The keyboard communicates bidirectionally with the computer, so they needed to send the correct frames to key data back.

Fortunately, they hit on a Japanese keyboard enthusiast’s site, which had protocol specifications. They implemented this protocol on the Micro, and used the Keyboard library to create a HID device.

The final product is an adapter for NeXT to USB, which allows for the old keyboards to be used on any computer with USB. It’s a good way to bring back life to some otherwise unusable antique hardware.