3D Printed Cookies, Sort Of

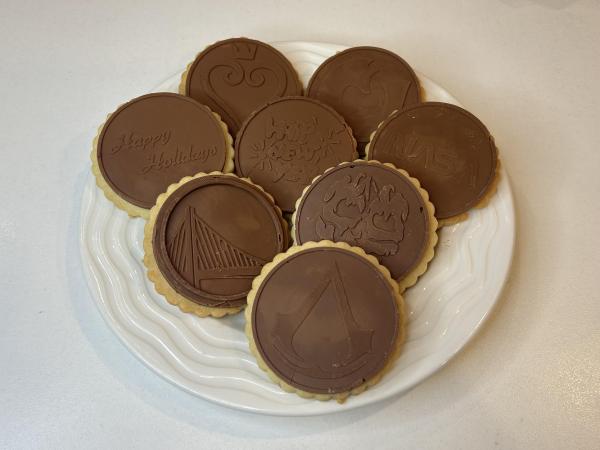
Are there any cookies that taste better than the ones you make yourself? Well, maybe, but there’s a certain exquisite flavoring to effort. Just ask [jformulate], who created these custom chocolate-topped butter cookies using a mixture of 3D printing, silicone, and of course, baking and tempering.
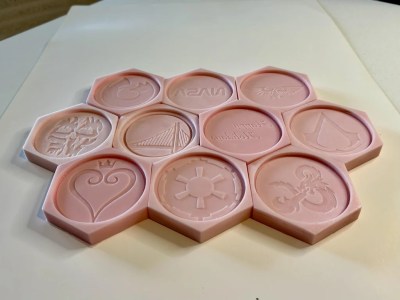
[jformulate] did this project along with a makerspace group, and the first thing they did was decide on some images for the cookies. Once a hexagon-shaped mold was created in Fusion360, the images were added in. Some had to be height-adjusted in order for the detail to come out.

Once these positives were printed, it was time to make the food-safe silicone molds that would form the custom chocolate toppers. If you don’t have a vacuum de-gasser, [jformulate] recommends pouring a thin stream from a high place to avoid air bubbles. You can always tap the mold several times on a flat surface as well to bring trapped air to the top.

Finally, it’s time to make cookies. [jformulate] has good instructions for tempering chocolate, as well as a recipe for the butter cookies that support the designs. As a bonus, [jformulate] shows how to make a fish-shaped hot chocolate bomb, and made Jolly Rancher (sadly not Wrencher) medallions using the silicone molds and a microwave.

For the semi-disappointed, directly 3D printing cookies is definitely a thing.

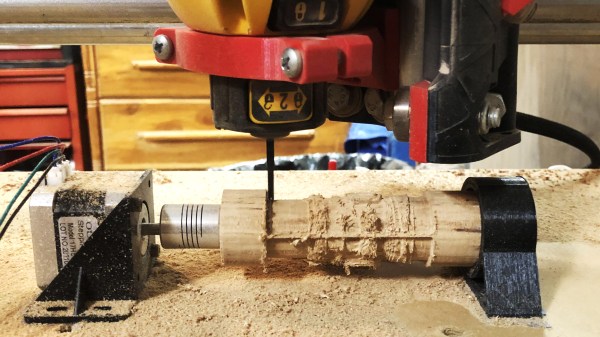
Wood game piece being carved by a CNC mill with a hacked rotary axis

This $12 CNC Rotary Axis Will Make Your Head Spin

[legolor] brings us a great, cheap rotary axis to add to your small 3 axis CNC mills. How are you going to generate G-Code for this 4th axis? That’s the great part, and the hack, that [legolor] really just swapped the Y axis for the rotation. To finish the workflow and keep things cheap accessible to all there’s a great trick to “unwrap” your 3D model so your CAM software of choice thinks it’s still using a linear Y axis and keeps your existing workflow largely intact. While this requires an extra step in Blender to do the unwrapping, we love the way this hack changes as little of the rest of your process as possible. The Blender script might be useful for many other purposes too.

Wood game pieces carved from wood by a CNC mill with a hacked rotary axis

The results speak for themselves too! We thought the 3D printed parts were suspect in a CNC setup, but for the small scale of game pieces and milling wood, the setup is stable enough to produce a surprisingly accurate and detailed finish. If you want to try the same approach with something larger or a tougher material, [legolor] has a suggestion of a tailstock setup that’s still under $100 USD. Continue reading “This $12 CNC Rotary Axis Will Make Your Head Spin”

Never Lose A Piece With 3D Printed Sliding Puzzles

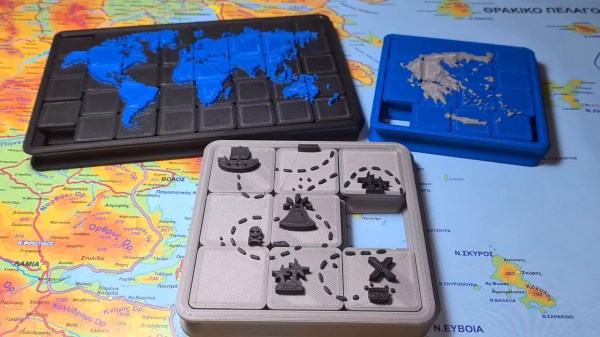
Have you ever been about to finish a puzzle, when suddenly you realize there are more holes left than you have pieces? With [Nikolaos’s] 3D printed sliding puzzles, this will be a problem of the past!

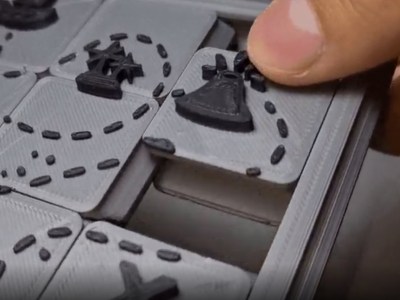
An image showing the sliding dovetails of the puzzle
The dovetails, integrated into each piece, keep the puzzle together but still allows pieces to move.

The secret of the puzzle is in the tongue and groove system that captures the pieces while allowing them to slide past each other and along the puzzle’s bezel. The tongues are along the top and right sides of the pieces shown here, with the grooves along the left and bottom. There is only one empty spot on the board, so the player must be methodical in how they move pieces to their final destinations. See this in action in the video after the break.

[Nikolaos] designed the puzzle in Fusion 360, and used this as an opportunity to practice with parameters. He designed the model in such a way that any size puzzle could be generated by changing just 2 variables. Once the puzzle is the proper size, the image is added by importing and extruding an SVG.

Another cool aspect of these puzzles is that they are print-in-place, meaning that when the part is removed from the 3D printer, it is ready to use and fully assembled. No need to remove support material or bolt and glue together multiple components. Print-in-place is useful for more than just puzzles, you could also use this technique to 3D print wire connectors!

Continue reading “Never Lose A Piece With 3D Printed Sliding Puzzles”

Robotic Biped Walks On Inverse Kinematics

Robotics projects are always a favorite for hackers. Being able to almost literally bring your project to life evokes a special kind of joy that really drives our wildest imaginations. We imagine this is one of the inspirations for the boom in interactive technologies that are flooding the market these days. Well, [Technovation] had the same thought and decided to build a fully articulated robotic biped.

Each leg has pivot points at the foot, knee, and hip, mimicking the articulation of the human leg. To control the robot’s movements, [Technovation] uses inverse kinematics, a method of calculating join movements rather than explicitly programming them. The user inputs the end coordinates of each foot, as opposed to each individual joint angle, and a special function outputs the joint angles necessary to reach each end coordinate. This part of the software is well commented and worth your time to dig into.

In case you want to change the height of the robot or its stride length, [Technovation] provides a few global constants in the firmware that will automatically adjust the calculations to fit the new robot’s dimensions. Of all the various aspects of this project, the detailed write-up impressed us the most. The robot was designed in Fusion 360 and the parts were 3D printed allowing for maximum design flexibility for the next hacker.

Maybe [Technovation’s] biped will help resurrect the social robot craze. Until then, happy hacking.

Continue reading “Robotic Biped Walks On Inverse Kinematics”

Generative Design Algorithms Prepare For Space

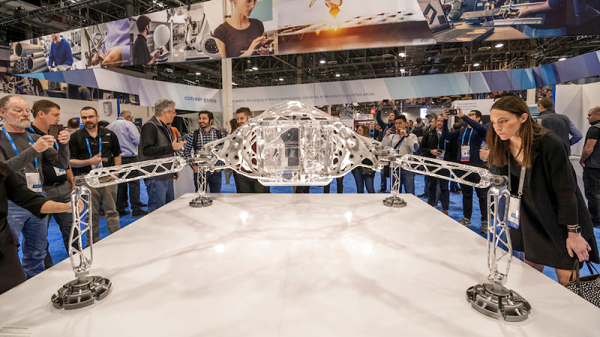
NASA is famously risk-averse, taking cautious approaches because billions of taxpayer dollars are at stake and each failure receives far more political attention than their many successes. So while moving the final frontier outward requires adopting new ideas, those ideas must first prove themselves through a lengthy process of risk-reduction. Autodesk’s research into generative design algorithms has just taken a significant step on this long journey with a planetary lander concept.

It was built jointly with a research division of NASA’s Jet Propulsion Laboratory, the birthplace of many successful interplanetary space probes. This project got a foot in the door by promising 30% weight savings over conventional design techniques. Large reduction in launch mass is always a good way to get a space engineer’s attention! Mimicking mother nature’s evolutionary process, these algorithms output very organic looking shapes. This is a relatively new approach to design optimization under exploration by multiple engineering software vendors. Not just Autodesk’s “Generative Design” but also “Topology Optimization” in SolidWorks, plus others. Though these shapes appear ideally suited to 3D printing, Autodesk also had to prove their algorithm could work with more traditional fabrication techniques like 5-axis CNC mills.

This is leading-edge research technology though some less specialized, customer-ready versions are starting to trickle out of research labs. Starting with an exclusive circle: People with right tiers of SolidWorks license, the paid (not free) tier of Autodesk Fusion 360, etc. We’ve looked at another recent project with nontraditional organic shapes, and we’ve looked at generative designs used for their form as well as their function. This category of CAD tools hold a lot of promise, and we’re optimistic they’ll soon become widely accessible so we can all put them to good use in our earthbound projects.

Possibly even before they fly to another planet.

[via Engadget]

A Custom Keyboard At Maximum Effort

No one loves hacked keyboards more than Hackaday. We spend most of our workday pressing different combinations of the same 104 buttons. Investing time in that tool is time well spent. [Max] feels the same and wants some personality in his input device.

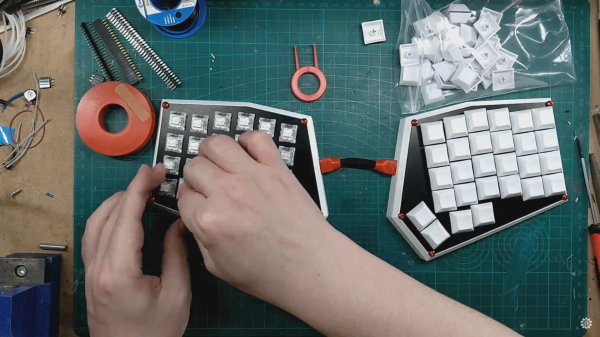
In the first of three videos, he steps us through the design and materials, starting with a layer to hold the keys. FR4 is the layer of fiberglass substrate used for most circuit boards. Protoboards with no copper are just bare FR4 with holes. Homemade CNC machines can glide through FR4, achieving clean lines, and the material comes in different mask colors so customizing an already custom piece is simple. We see a couple of useful online tools for making a homemade keyboard throughout the videos. The first is a keypad layout tool which allows you to start with popular configurations and tweak them to suit your weirdest desires. Missing finger? Forget one key column. Extra digit? Add a new key column. Huge hands? More spaces between the keys. [Max] copied the Iris keyboard design but named his Arke, after the fraternal sister to Iris which is fitting since his wrist rests are removable. Continue reading “A Custom Keyboard At Maximum Effort”

Repairs You Can Print: Racing The Clock For A Dishwasher Fix

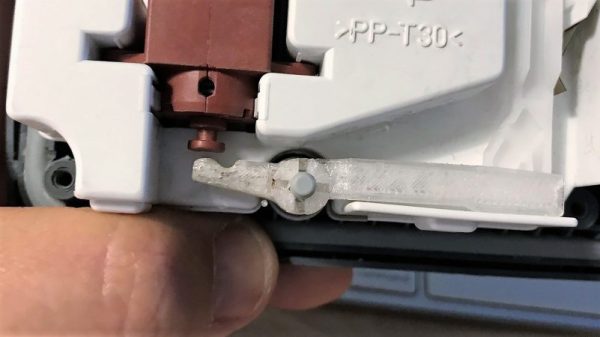
No matter how mad your 3D printing skills may be, there comes a time when it makes more sense to order a replacement part than print it. For [billchurch], that time was the five-hour window he had to order an OEM part online and have it delivered within two days. The race was on — would he be able to model and print a replacement latch for his dishwasher’s detergent dispenser, or would suffer the ignominy of having to plunk down $30 for a tiny but complicated part?

As you can probably guess, [bill] managed to beat the clock. But getting there wasn’t easy, at least judging by the full write-up on his blog. The culprit responsible for the detergent problem was a small plastic lever whose pivot had worn out. Using a caliper for accurate measurements, [bill] was able to create a model in Fusion 360 in just about two hours. There was no time to fuss with fillets and chamfers; this was a rush job, after all. Still, even adding in the 20 minutes print time in PETG, there was plenty of time to spare. The new part was a tight fit but it seemed to work well on the bench, and a test load of dishes proved a success. Will it last? Maybe not. But when you can print one again in 20 minutes, does it really matter?

Have you got an epic repair that was made possible by 3D printing? We want to know about it. And if you enter it into our Repairs You Can Print Contest, you can actually win some cool prizes to boot. We’ve got multiple categories and not that many entries yet, so your chances are good.