Scratch Built Toe Clamps Keep Your Work In Place

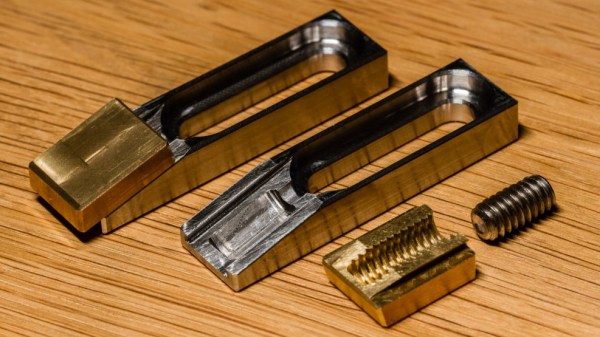
[Kevin] owns a benchtop CNC mill that has proven itself to be a capable tool, but after becoming familiar with some of its shortcomings, he has made a few modifications. In order to more efficiently hold and access workpieces on his custom fixturing table, he designed and made his own toe clamps and they look beautiful.
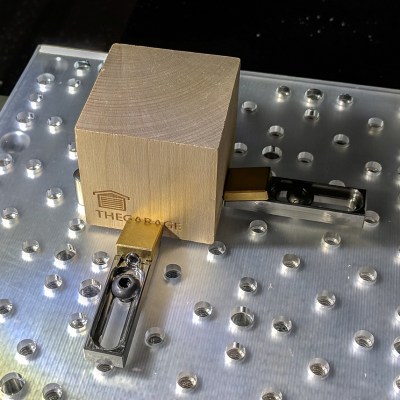
The usual way to secure a piece of stock to a fixturing table is to use top-down clamps, which hold the workpiece from the top and screw down into the table. However, this method limits how much of the stock can be accessed by the cutting tool, because the clamps are in the way. The most common way around this is to mount a vise to the table and clamp the workpiece in that. This leaves the top surface completely accessible. Unfortunately, [Kevin]’s benchtop Roland MDX-450 has a limited work area and he simply couldn’t spare the room. His solution was toe clamps, which screw down to the table and have little tabs that move inwards and downward. The tabs do the work of clamping and securing a piece of stock while maintaining a very low profile themselves.

The clamp bases are machined from stainless steel and the heads are brass, and the interface between the two is a set screw. Inserting a hex wrench and turning the screw moves the head forward or back, allowing a workpiece to be clamped from the sides with minimal interference. His design was done in Fusion 360 and is shared online.

Another option for when simple clamps won’t do the job is a trick from [NYC CNC], which is to use an unexpected harmony of blue painter’s tape and superglue which yields great results in the right circumstances.

Beats An Extension Cord

What does your benchtop power supply have that [Pete Marchetto]’s does not? Answer: an extension cord draped across the floor. How often have you said to yourself, “I just need to energize this doodad for a couple seconds,” then you start daisy chaining every battery in the junk drawer to reach the necessary voltage? It is not uncommon to see battery packs with a single voltage output, but [Pete] could not find an adjustable one, so he built his own and put it on Tindie.

Presumably, the internals are not going to surprise anyone: an 18650 battery, charging circuit, a voltage converter, display, adjustment knob, and a dedicated USB charging port. The complexity is not what intrigues us, it is the fact that we do not see more of them and still wind up taping nine-volt batteries together. [Editor’s note: we use one made from an old laptop battery.]

This should not replace your benchtop power supply, it does not have the bells and whistles, like current regulation, but a mobile source of arbitrary voltage does most of the job most of the time. And it’s what this build hasn’t got (a cord) that makes it most useful.

DIY Power Supply And TS100 Outlet Combo Shows Off Great Layout

Here’s a combination of two important electronics workbench tools into a single, cleanly-assembled unit. [uGen] created a DC power supply complete with a plug for the popular TS100 soldering iron, and it looks great! Most of the main components are familiar offerings, like a LM2596 DC to DC buck converter board and a DPS3003 adjustable DC power supply unit (we previously covered a DIY power supply based around the similar DPS5005.) The enclosure is an economical, featureless desktop instrument case whose panels were carefully cut to fit the necessary components. There’s one limitation to the combo: the unit uses a switch to either power an attached TS100 iron, or act as a general DC power supply. It cannot do both at once. So long as one doesn’t mind that limitation, it’s a nice bundle made from very affordable components.

It’s easy for something to look like a hack job, but to look clean and professional involves thoughtful measurement, planning, and assembly. Fortunately, [uGen] has supplied all the drawings and bill of materials for the project so there’s no need to start from scratch. Also, don’t forget that if the capabilities of the DPS power supply units leave you wanting a bit more, there is alternative firmware in the form of OpenDPS; it even offers a remote control feature by adding an ESP8266.

ATX Benchtop Conversion Retains Safety Features, Delivers Plenty Of Current.

atx-benchtop-psu

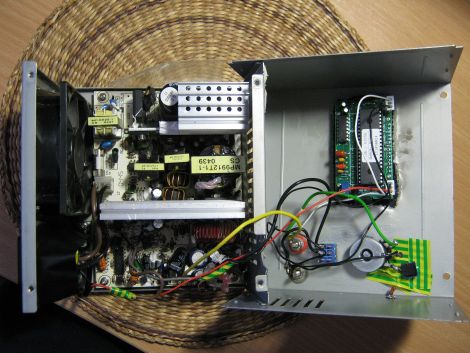
[Bogin] was looking to add a benchtop power supply to his array of tools, but he didn’t really find any of the online tutorials helpful. Most of what he discovered were simple re-wiring jobs utilizing LM317 regulators and shorted PS-ON pins used to keep the PSUs happily chugging along as if nothing had been changed. No, what [Bogin] wanted was a serious power supply with short circuit protection and loads of current.

He started the conversion by disassembling a 300 watt ATX power supply that uses a halfbridge design. After identifying the controller chip, a TL494 in this case, he proceeded to tweak the PWM feedback circuit which controls the supply’s output. A few snips here, a few passes with a soldering iron there, and [Bogin] was ready to test out his creation.

He says that it works very well, even under heavy load. His tutorial is specific to these sorts of PSUs, so we would be more than happy to feature similar work done with those that implement other design topologies. In the meantime, be sure to check out a video of the hacked power supply in action below.

Continue reading “ATX Benchtop Conversion Retains Safety Features, Delivers Plenty Of Current.”

Variable Capacitance/reistance Switch Box Has You Covered

variable_cap_resistor_box

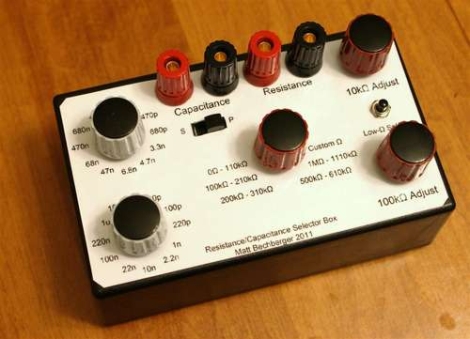
While working on electronics projects, it’s often necessary to test out different capacitance or resistance values as things are moving along. Depending on what you are testing, this can be a tedious process even when using a breadboard. Instructables user [mattthegamer463] recently built a very useful device that would help out in these situations, and would likely be a welcome addition to any Hackaday reader’s workbench.

His variable resistor/capacitor box makes it easy to test out any number of different resistance or capacitance values with a simple turn of a knob. He wired up a pair of pots to provide a wide range of resistance values, being sure to add a low-resistance safety as well as safety override switch for those of you who like to have things blow up in your face live dangerously. A set of 22 capacitors were wired up on a piece of perfboard, each of which can be selected using a pair of knobs. He added a simple switch to allow the capacitors to be toggled between parallel and series orientations as well.

[Matt] did a wonderful job here – this is a great project that can be customized in a multitude of ways to fit almost anyone’s specific needs.

PC Casemod-inspired Benchtop PSU

benchtop_psu

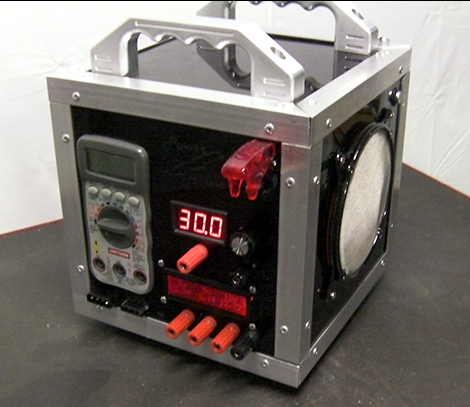
[Will] had a cheap power supply sitting around, and decided to turn it into a full-featured benchtop PSU. Inspired by some of the other benchtop supplies we have featured in the past, he decided that he wanted his PSU to be more than just a simple-looking box sitting on his work bench. Taking some cues from PC case modding, he put together a unit that is not only very useful, but also quite sharp looking.

The frame of the case was crafted from aluminum angle, while all of the other flat surfaces were made using black polycarbonate. He installed the standard 12v, 3.3v, and 5v terminals you would expect from any benchtop PSU, complete with an LCD display showing the voltages provided by each rail as measured by an Arduino stationed inside the case. Additionally, he installed a variable terminal capable of providing 1.3v-30v, along with its own LCD display. The most unique feature is the multimeter embedded in the front of the case, which makes it virtually impossible to lose.

The case is finished off as you might expect, if you have seen any of his previous work. It features LED lighting on the inside, large fans on either side of the case for optimal air flow, and a pair of machined aluminum handles.

Be sure to check out the quick video below of the PSU being powered on.

Continue reading “PC Casemod-inspired Benchtop PSU”