MOSFET Heater Is Its Own Thermostat

While we might all be quick to grab a microcontroller and an appropriate sensor to solve some problem, gather data about a system, or control another piece of technology, there are some downsides with this method. Software has a lot of failure modes, and relying on it without any backups or redundancy can lead to problems. Often, a much more reliable way to solve a simple problem is with hardware. This heating circuit, for example, uses a MOSFET as a heating element and as its own temperature control.

The function of the circuit relies on a parasitic diode formed within the transistor itself, inherent in its construction. This diode is found in most power MOSFETs and conducts from the source to the drain. The key is that it conducts at a rate proportional to its temperature, so if the circuit is fed with AC, during the negative half of the voltage cycle this diode can be probed and used as a thermostat. In this build, it is controlled by a set of resistors attached to a voltage regulator, which turn the heater on if it hasn’t reached its threshold temperature yet.

In theory, these resistors could be replaced with potentiometers to allow for adjustable heat for certain applications, with plastic cutting and welding, temperature control for small biological systems, or heating other circuits as target applications for this type of analog circuitry. For more analog circuit design inspiration, though, you’ll want to take a look at some classic pieces of electronics literature.

A multimeter connected to the EEPROM chip with crocodile clips, showing that there's a 0.652V diode drop between GND and one of the IO pins

Dead EPROM Dumped With Help Of Body Diodes

[Jason P], evidently an enjoyer of old reliable laser printing tech, spilled a drink (nitter) onto his Panasonic KX-P5400 SideWriter. After cleanup, everything worked fine — except that the PSU’s 5 V became 6.5 V during the accident, and the EPROM with LocalTalk interface firmware died, connection between VCC and GND seemingly interrupted inside the chip. Understandably, [Jason] went on Twitter, admitted the error of his ways, and sheepishly asked around for EPROM dumps.

Instead, [Manawyrm] wondered — would the chip have anti-ESD body diodes from GND to IO pins, by any chance? A diode mode multimeter check confirmed, yes! It was time for an outlandish attempt to recover the firmware. [Manawyrm] proposed that [Jason] connect all output pins but one to 5 V, powering the EPROM through the internal VCC-connected body diodes – reading the contents one bit at a time and then, combining eight dumps into a single image.

After preparing a TL866 setup, one hour of work and some PHP scripting later, the operation was a success. Apparently, in certain kinds of cases, dead ROM chips might still tell their tales! It’s not quite clear what happened here. The bond wires looked fine, so who knows where the connection got interrupted – but we can’t deny the success of the recovery operation! Need a primer on dumping EPROMs that are not dead? Here you go.

Continue reading “Dead EPROM Dumped With Help Of Body Diodes”

1337-sp34k Keyboard

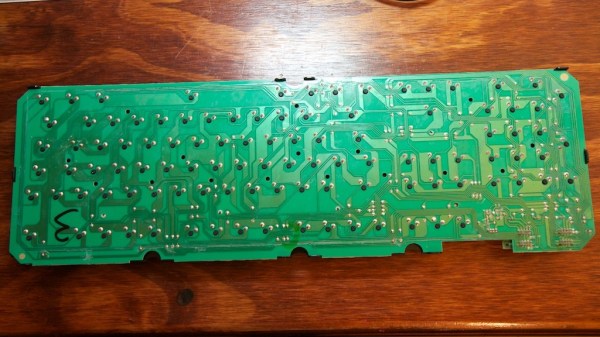
What started off as a quick prank-hack to re-map a colleague’s keyboard turned into a deep dive in understanding how keyboards work. [ch00f] and his other work place colleagues are in a habit of pulling pranks on each other. When [ch00f]’s buddy, who is an avid gamer and montage parody 1337-sp34k (leet speak) fan, went off on a holiday, [ch00f] set about re-mapping his friend’s keyboard to make it spit out words his friend uses a lot – “SWAG” “YOLO” and “420”. But remapping in software is too simple, his hack is a hardware remapping!

The keyboard in question used mechanical keys mounted on a keyboard sized PCB. Further, it was single sided, with jumper links used in place of front side tracks. This made hacking easier. The plan was to use keys not commonly used – Scroll Lock, Print Screen, and Pause/Break – and get them to print out the words instead. The signal tracks from these three keys were cut away and replaced with outputs from a microcontroller. The original connections were also routed to the microcontroller, and a toggle switch used to select between the remapped and original versions. This was eventually not implemented due to a lack of space to install the toggle switch. [ch00f] decided to just replace the keyboard if his friend complained about the hack. A bit of work on the ATMega PCB and firmware, and he was able to get the selected keys to type out SWAG, YOLO and 420.

And this is where a whole can of worms opened up. [ch00f] delves in to an explanation on the various issues at hand – keyboard scanning/multiplexing, how body-diodes in switching FET’s affected the scanning, ghosting and the use of blocking diodes. Towards the end, he just had the word SWAG activated by pressing the Pause/Break key. But he does get to the bottom of why the keyboard was behaving odd after he had wired in his hack, which makes for some interesting reading. Don’t miss the video of the hack in action after the break.

Continue reading “1337-sp34k Keyboard”