Reverse Engineering The Quansheng Hardware

In the world of cheap amateur radio transceivers, the Quansheng UV-K5 can’t be beaten for hackability. But pretty much every hack we’ve seen so far focuses on the firmware. What about the hardware?

To answer that question, [mentalDetector] enlisted the help of a few compatriots and vivisected a UV-K5 to find out what makes it tick. The result is a complete hardware description of the radio, including schematics, PCB design files, and 3D renders. The radio was a malfunctioning unit that was donated by collaborator [Manuel], who desoldered all the components and measured which ones he could to determine specific values. The parts that resisted his investigations got bundled up along with the stripped PCB to [mentalDetector], who used a NanoVNA to characterize them as well as possible. Documentation was up to collaborator [Ludwich], who also made tweaks to the schematic as it developed.

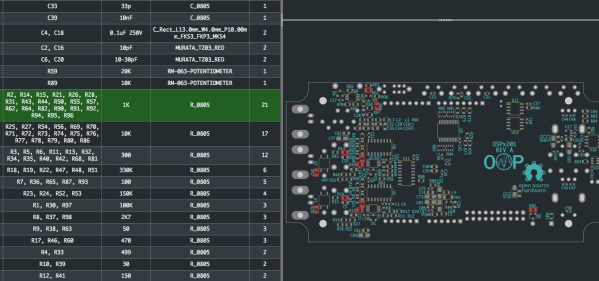
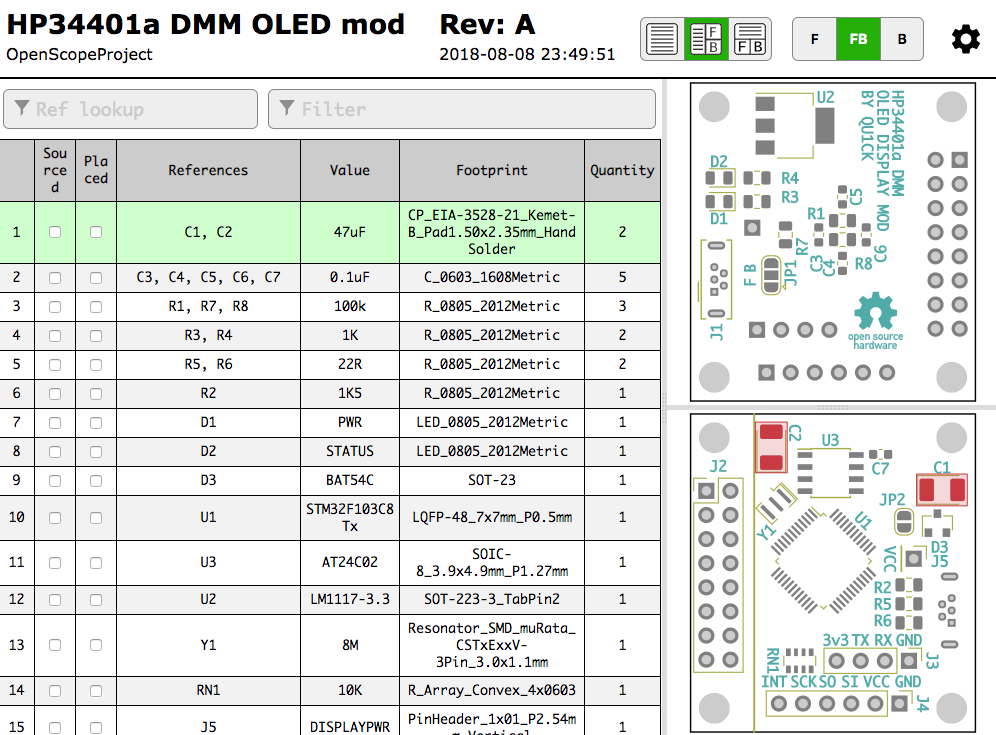
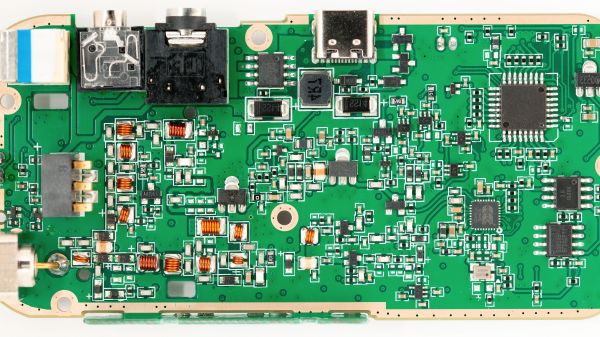
PCB reverse engineering was pretty intense. The front and back of the PCB — rev 1.4, for those playing along at home — were carefully photographed before getting the sandpaper treatment to reveal the inner two layers. The result was a series of high-resolution photos that were aligned to show which traces connected to which components or vias, which led to the finished schematics. There are still a few unknown components, The schematic has a few components crossed out, mostly capacitors by the look of it, representing unpopulated pads on the PCB.

Hats off to the team for the work here, which should make hardware hacks on the radio much easier. We’re looking forward to what’ll come from this effort. If you want to check out some of the firmware exploits that have already been accomplished on this radio, check out the Trojan Pong upgrade, or the possibilities of band expansion. We’ve also seen a mixed hardware-firmware upgrade that really shines.

EcoEDA Integrates Your Junk Bin Into Your Designs

If you’re like us, there’s a creeping feeling that comes over you when you’re placing an order for parts for your latest project: Don’t I already have most of this stuff? With the well-stocked junk bins most of us sport and the stacks of defunct electronics that are almost always within arm’s length, chances are pretty good you do. And yet, we always seem to just click the button and place a new order anyway; it’s just easier.

But what if mining the treasure in your junk bin was easier? If you knew right at design time that you had something in your stash you could slot into your build, that would be something, right? That’s the idea behind ecoEDA, a Python-based KiCAD plugin by [Jasmine Lu], [Beza Desta], and [Joyce Passananti]. The tool integrates right into the schematic editor of KiCAD and makes suggestions for substitutions as you work. The substitutions are based on a custom library of components you have on hand, either from salvaged gear or from previous projects. The plug-in can make pin-for-pin substitutions, suggest replacements with similar specs but different pinouts, or even build up the equivalent of an integrated circuit from available discrete components. The video below gives an overview of the tool and how it integrates into the design workflow; there’s also a paper (PDF) with much more detail.

This seems like an absolutely fantastic idea. Granted, developing the library of parts inside all the stuff in a typical junk bin is likely the biggest barrier to entry for something like this, and may be too daunting for some of us. But there’s gold in all that junk, both literally and figuratively, and putting it to use instead of dumping it in a landfill just makes good financial and environmental sense. We’re already awash in e-waste, and anything we can do to make that even just a little bit better is probably worth a little extra effort. Continue reading “EcoEDA Integrates Your Junk Bin Into Your Designs”

The Price Of Domestic Just In Time Manufacturing

Hardware is hard, manufacturing only happens in China, accurate pricing is a dark art. Facts which are Known To Be True. And all things which can be hard to conquer as an independent hardware company, especially if you want to subvert the tropes. You may have heard of [Spencer Wright] via his superb mailing list The Prepared, but he has also been selling an unusual FM radio as Centerline Labs for a few years. Two years ago they relaunched their product, and last year the price was bumped up by a third. Why? Well, the answer involves more than just a hand wave about tariffs.

The Public Radio is a single-station FM radio in a mason jar. It’s a seemingly simple single purpose hardware product. No big mechanical assemblies, no complex packaging, not even any tangential accessories to include. In some sense it’s an archetypically atomic hardware product. So what changed? A normal product is manufactured in bulk, tested and packaged, then stored in a warehouse ready to ship. But TPR is factory programmed to a specific radio station, so unless Centerline wanted one SKU for each possible radio station (there are 300) this doesn’t work. The solution was domestic (US) just in time manufacturing. When a customer hits the buy button, a unit is programmed, tested, packed, and shipped.

As with any business, there is a lot more to things than that! The post gives the reader a fascinating look at all the math related to Centerline Labs’ pricing and expenses; in other words, what makes the business tick (or not) including discussion of the pricing tradeoffs between manufacturing different components in Asia. I won’t spoil the logical path that led to the pricing change, go check out the post for more detail on every part. 

We love hearing about the cottage hardware world. Got any stories? Drop them in the comments!

Interactive KiCAD BOMs Make Hand Assembly A Breeze

We’ve all been there; you finally get the last DigiKey box and now your desk is covered in parts to stuff into a shiny new PCB you’ve been working on. First stop? Passive town, population endless waves of 1uF capacitors. The first one goes in the upper left, then a little below that, then… once you get to C157 it’s getting pretty hard to remember exactly which parts go where. Enter the literally named InteractiveHtmlBom (IHB) to smooth this process out.

IHB makes the frustrating task of mapping lines in a BOM to a physical position on a board easy. The classic method is of course, to look at the BOM, then search the board for that designator and place the component. (You left the designators in the silk, right?) Or to look at the BOM, ask your CAD package to search for that part in the layout, then place. IHB generates a document that does this automagically.

A sample file from a familiar project

Run the tool, either standalone or as a plugin for KiCAD 5.0, and you get a folder with the new interactive BOM in it. There are a few view options but generally it presents a view of the BOM with designators and value in one pane and a wonderful render of the top and/or bottom of the board in another pane. When you hover over a BOM line it highlights the relevant parts in the board view! There are toggles for filtering by top and bottom of board, marking which parts have been placed, light and dark mode, etc. Plus the ability to filter and sort by designator and value. We would have been impressed if it was just a generator/viewer for those slick scrollable/pannable board renders!

Check out a very long GIF demo after the break, or explore one of many pre-created demo BOMs here. We’re partial to the OSPx201.

Thanks [GregDavill] for the tip!

Continue reading “Interactive KiCAD BOMs Make Hand Assembly A Breeze”

Partsbox.io Wants To Organize Your Junk Box

There are many ways to divide the hacker community into groups. Tubes vs transistors. Emacs vs VI, microcontroller vs discrete component designers. However, one of the more fundamental divisions in the community is how you organize your parts. We’ve seen giant warehouses with carefully organized bins and cabinets full of components, and we’ve seen storage crates with tangles of wires and bits of electron-bending components scattered among the wires.

dbIf you are in the former camp, you’d probably enjoy partsbox.io (see image, right). If you are in the latter group, you probably need to check it out even more than the other people. The idea is simple: an online place to keep an inventory of your electronic parts. The implementation is not as simple, though. The web application will work on a mobile device or just about anywhere. You can view your components by type, by location (the shoe box under the bed vs the parts bin in the closet), or by a project’s bill of materials. You can use “known” parts or create private parts for things no one else has (for example, your custom PC boards, or those 3D printed brackets you made to hold a microswitch). If you add data for a component you can make it available to other users.

Continue reading “Partsbox.io Wants To Organize Your Junk Box”

Fitness Tracker Teardown Is A Lesson In Design For Manufacture

If the trends are anything to go on, after the success of Fitbit we are nearing a sort of fitness tracker singularity. Soon there will be more fitness trackers on wrists and ankles then there will be stars in the sky. We will have entire generations who will grow up not knowing what life is like without the ever-present hug of a heart monitor strapped across their chest. Until then though, we can learn a bit of design for manufacture from this excellent teardown of a watch shaped fitness tracker.

This tracker has a nice round e-paper screen, which could be a welcome part in a project if they start washing up on the shores of eBay. The rest of the watch is a basic Bluetooth low energy module and the accessory electronics wrapped in a squishy plastic casing.

There’s a lot of nice engineering inside the watch. As far as the electronics go, it’s very low power. On top of that is plenty of clever cost optimization; from a swath of test points to reduce quality issues in the hands of consumers to the clever stamped and formed battery tabs which touch the CR2032 that powers it.

The teardown covers more details: the switch, what may be hiding behind the epoxy globs, the plastics, and more. One thing that may be of interest to those that have been following Jenny’s excellent series is the BOM cost of the device. All in all a very educational read.

KiCAD BOM Management

KiCAD remains a popular tool for designing PCBs and other circuits, and with good reason: it’s versatile and it’s got pretty much everything needed to build any type of circuit board you’d want. It also comes with a pretty steep learning curve, though, and [Jeff] was especially frustrated with the bill of materials (BOM) features in KiCAD. After applying some Python and Kivy, [Jeff] now has a BOM manager that makes up for some of KiCAD’s shortcomings.

Currently, the tool handles schematic import, like-component consolidation, and a user-managed parts database that can be used to store and retrieve commonly used parts for the future. All of the changes can be saved back to the original schematic. [Jeff] hopes that his tool will save some time for anyone who makes more than one PCB a year and has to deal with the lack of BOM features native to KiCAD.

[Jeff] still has some features he’d like to add such as unit tests, a user guide, and a cleaner user interface. What other features are you anxious to see added to KiCAD?

This script is a great tool for anyone who has had similar frustrations. KiCAD is popular to modify and expand, too: there have been tools for mechanical CAD export, a parts-generator and cost-tracker, and an Eagle to KiCAD converter if you’re thinking of making the switch.