Capstan Winch Central To This All-Band Adjustable Dipole Antenna

The perfect antenna is the holy grail of amateur radio. But antenna tuning is a game of inches, and since the optimum length of an antenna depends on the frequency it’s used on, the mere act of spinning the dial means that every antenna design is a compromise. Or perhaps not, if you build this infinitely adjustable capstan-winch dipole antenna.

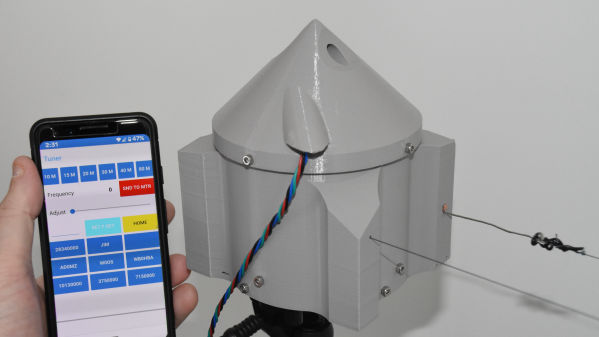
Dipoles are generally built to resonate around the center frequency of one band, and with allocations ranging almost from “DC to daylight”, hams often end up with a forest of dipoles. [AD0MZ]’s adjustable dipole solves that problem, making the antenna usable from the 80-meter band down to 10 meters. To accomplish this feat it uses something familiar to any sailor: a capstan winch.

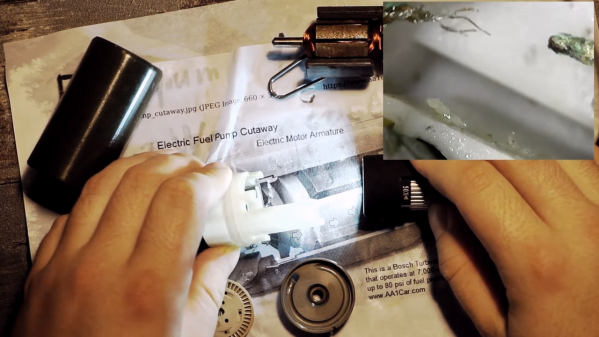
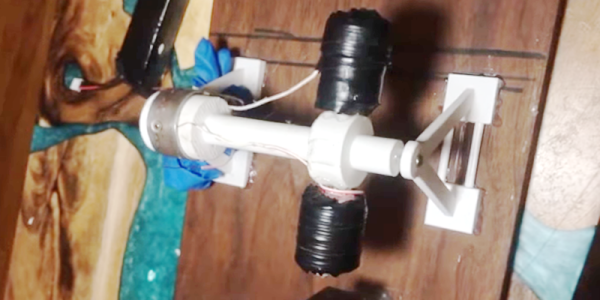
The feedpoint of the antenna contains a pair of 3D-printed drums, each wound with a loop of tinned 18-gauge antenna wire attached to some Dacron cord. These make up the adjustable-length elements of the antenna, which are strung through pulleys suspended in trees about 40 meters apart. Inside the feedpoint enclosure are brushes from an electric drill to connect the elements to a 1:1 balun and a stepper motor to run the winch. As the wire pays out of one spool, the Dacron cord is taken up by the other; the same thing happens on the other side of the antenna, resulting in a balanced configuration.

We think this is a really clever design that should make many a ham happy across the bands. We even see how this could be adapted to other antenna configurations, like the end-fed halfwave we recently featured in our “$50 Ham” series.

Fail Of The Week: How Not To Watercool A PC

To those who choose to overclock their PCs, it’s often a “no expense spared” deal. Fancy heat sinks, complicated liquid cooling setups, and cool clear cases to show off all the expensive guts are all part of the charm. But not everyone’s pockets are deep enough for off-the-shelf parts, so experimentation with cheaper, alternatives, like using an automotive fuel pump to move the cooling liquid, seems like a good idea. In practice — not so much.

The first thing we thought of when we saw the title of [BoltzBrain]’s video was a long-ago warning from a mechanic to never run out of gas in a fuel-injected car. It turns out that the gasoline acts as a coolant and lubricant for the electric pump, and running the tank dry with the power still applied to the pump quickly burns it out. So while [BoltzBrain] expected to see corrosion on the brushes from his use of water as a working fluid, we expected to see seized bearings as the root cause failure. Looks like we were wrong: at about the 6:30 mark, you can see clear signs of corrosion on the copper wires connecting to the brushes. It almost looks like the Dremel tool cut the wire, but that green copper oxide is the giveaway. We suspect the bearings aren’t in great shape, either, but that’s probably secondary to the wires corroding.

Whatever the root cause, it’s an interesting tour inside a common part, and the level of engineering needed to build a brushed motor that runs bathed in a highly flammable fluid is pretty impressive. We liked the axial arrangement of the brushes and commutator especially. We wonder if fuel pumps could still serve as a PC cooler — perhaps changing to a dielectric fluid would do the trick.

Continue reading “Fail Of The Week: How Not To Watercool A PC”

3D Printed Brushed Motor Is Easy To Visualize

A motor — or a generator — requires some normal magnets and some electromagnets. The usual arrangement is to have a brushed commutator that both powers the electromagnets and switches their polarity as the motor spins. Permanent magnets don’t rotate and attract or repel the electromagnets as they swing by. That can be a little hard to visualize, but if you 3D Print [Miller’s Planet’s] working model — or just watch the video below — you can see how it all works.

We imagine the hardest part of this is winding the large electromagnets. Getting the axle — a nail — centered is hard too, but from the video, it looks like it isn’t that critical. There was a problem with the link to the 3D model files, but it looks like this one works.

Continue reading “3D Printed Brushed Motor Is Easy To Visualize”

A Bright Way To Cycle

[youtube=http://www.youtube.com/watch?v=FQrNmnU8kJk]

Want to be visible when cycling at night? [Neon Dean] came up with this possible solution, which he cruised on at Nuit Blanche. Its a bicycle with neon lights mounted on every surface possible. [Dean], who gave a similar treatment to his car, explained how it worked. All of the tubes take their power from a 12VDC battery he carries in a fanny pack. 12V is a far too low voltage to power the tubes, so a step up transformer is used to bring that number way up. [Dean] also decided to install a neon tube on each wheel. In order to deliver power to them, he mounted a rotor on each wheel, with two conductive tracks running close to the edge of each rotor. Two strips of steel act as brushes (in a manner similar to those on slot cars), and deliver the stepped-up power to the tubes. One creative, but perhaps not so bright, idea is [Dean]’s neon tube helmet.

NeonDeanBrushes12Vfanny transformer copy

Hands Free Point Of View Camera

handsfree

Here’s an odd little footnote we found while perusing the Comic Tools blog. [Matt Bernier]’s blog is dedicated to drawing and inking tutorials for comic artists. He uses a lot of example photographs that involve both hands. This week, at the bottom of his post on cleaning brushes, he included a photo to illustrate how he takes all of these point of view shots. The camera is strapped securely to his head using an old lanyard. He can see the display and access the controls on the back. After composing his shot, he just sets the timer, and you get a picture of what the process looks like from his perspective. Sure, it looks silly from this angle, but it really helps out the posts.