Here’s How The Precursor Protects Your Privacy

At some point, you will find yourself asking – is my device actually running the code I expect it to? [bunnie] aka [Andrew Huang] is passionate about making devices you can fundamentally, deeply trust, and his latest passion project is the Precursor communicator.

At the heart of it is an FPGA, and Precursor’s CPU is created out of the gates of that FPGA. This and a myriad of other design decisions make the Precursor fundamentally hard to backdoor, and you don’t have to take [bunnie]’s word for it — he’s made an entire video going through the architecture, boot protections and guarantees of the Precursor, teaching us what goes into a secure device that’s also practical to use.

Screenshot from the video, showing a diagram of how precursor's software and hardware components relate to each other 
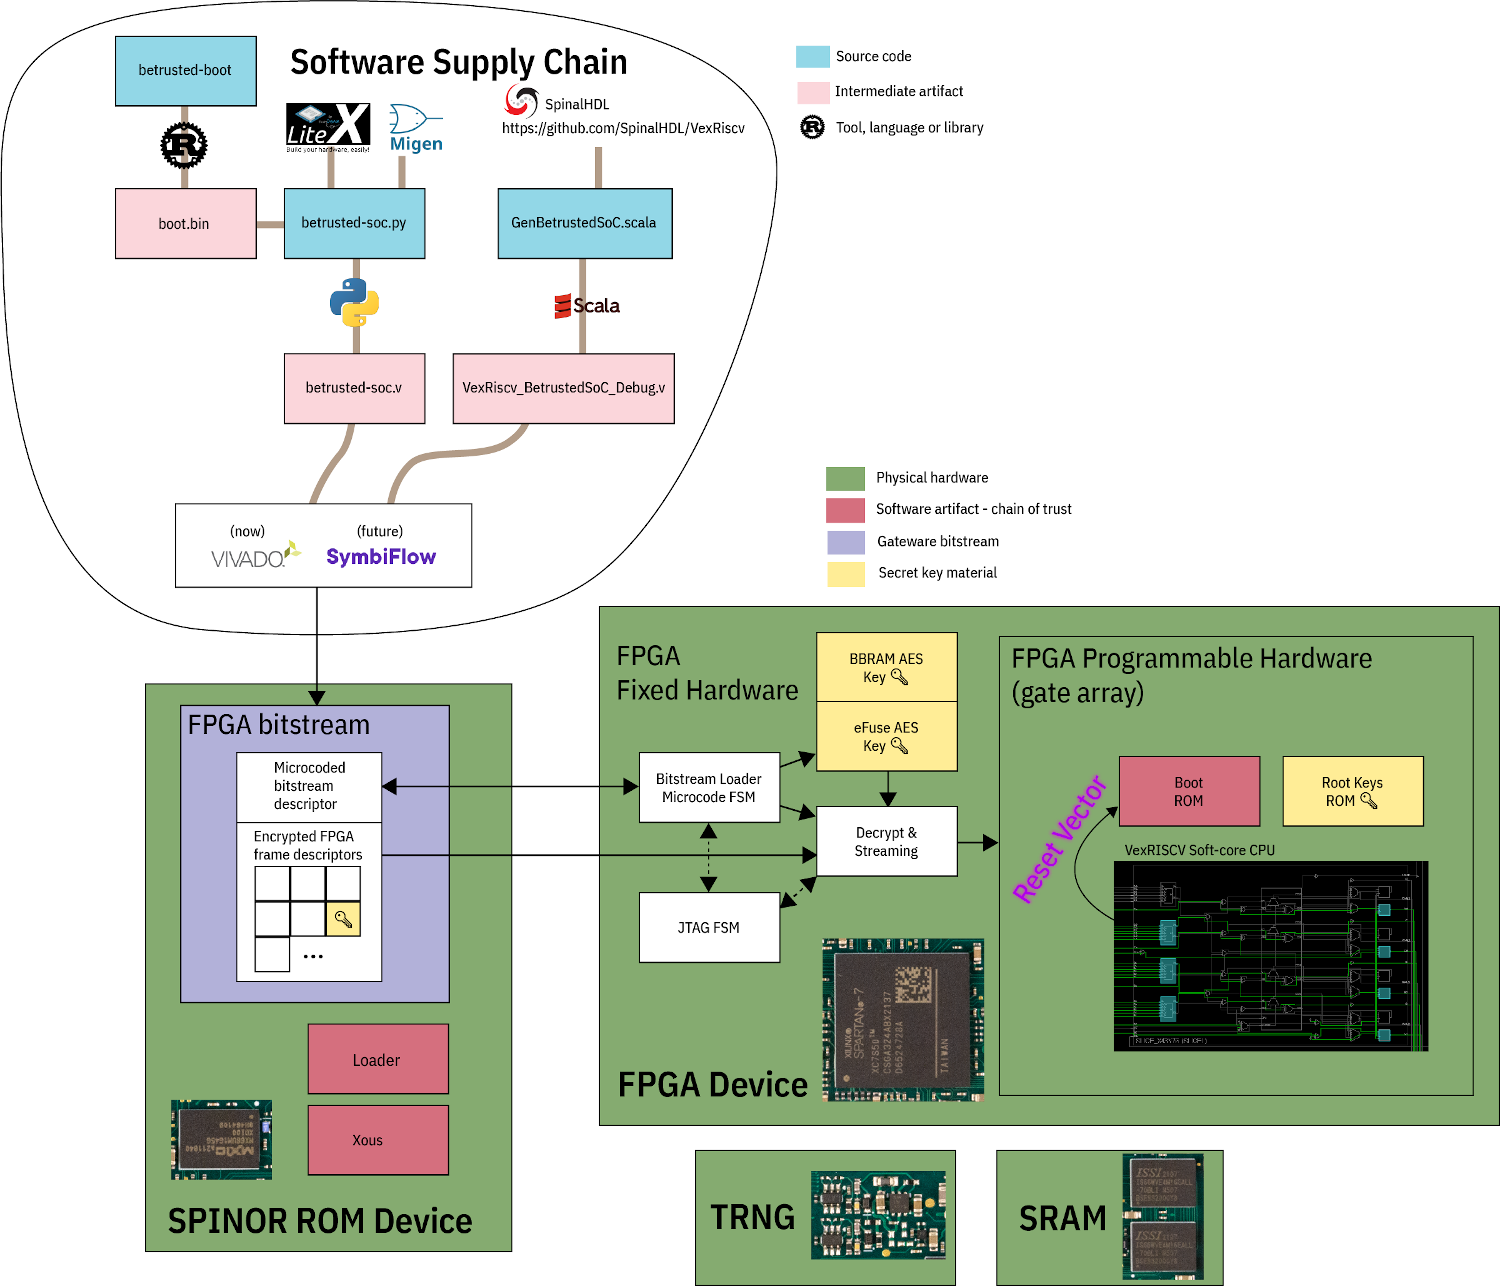
If you can’t understand how your device works, your trust in it might be misplaced. In the hour long video, [bunnie] explains the entire stack, from the lower levels of hardware to root keys used to sign and verify the integrity of your OS, along the way demonstrating how you can verify that things haven’t gone wrong.

He makes sure to point out aspects you’d want to be cautious of, from physical security limitations to toolchain nuances. If you’re not up for a video, you can always check out the Precursor wiki, which has a treasure trove of information on the device’s security model.

As you might’ve already learned, it’s not enough for hardware to be open-source in order to be trustworthy. While open-source silicon designs are undoubtedly the future, their security guarantees only go so far.

Whether it’s esoteric hard drive firmware backdoors, weekend projects turning your WiFi card into a keylogger, or rootkits you can get on store-bought Lenovo laptops, hell, even our latest This Week In Security installment has two fun malware examples – there’s never a shortage of parties interested in collecting as much data as possible.

Form 3 SLA Printer Teardown, Bunnie Style

[Bunnie Huang] has shared with all of us his utterly detailed teardown on the Form 3 SLA printer from Formlabs (on the left in the image above) and in it he says one of the first things he noticed when he opened it to look inside was a big empty space where he expected to see mirrors and optics. [Bunnie] had avoided any spoilers about the printer design and how it worked, so he was definitely intrigued.

The view inside the Form 3.

Not only does the teardown reveal the kind of thoughtful design and construction that [Bunnie] has come to expect of Formlabs, but it reveals that the Form 3 has gone in an entirely new direction with how it works. Instead of a pair of galvanometers steering a laser beam across a build surface (as seen in the Form 1 and Form 2 printers) the new machine is now built around what Formlabs calls an LPU, or Light Processing Unit, which works in conjunction with a new build tank and flexible build surface. In short, the laser and optics are now housed in a skinny, enviromentally-sealed unit that slides left and right within the printer. A single galvo within steers the laser vertically, as the LPU itself moves horizontally. Payoffs from this method include things such as better laser resolution, the fact that the entire optical system is no longer required to sit directly underneath a vat of liquid resin, and that build sizes can be bigger. In addition, any peeling forces that a model is subjected to are lower thanks to the way the LPU works.

Details about exactly how the Form 3 works are available on Formlabs’ site and you can also see it in action from a practical perspective on Adam Savage’s Tested (video link), but the real joy here is the deeply interesting look at the components and assembly through the eyes of someone with [Bunnie]’s engineering experience. He offers insights from the perspective of function, supply, manufacture, and even points out a bit of NASA humor to be found inside the guts of the LPU.

[Bunnie] knows his hardware and he’s certainly no stranger to Formlabs’ work. His earlier Form 2 teardown was equally detailed as was his Form 1 teardown before that. His takeaway is that the Form 3 and how it works represents an evolutionary change from the earlier designs, one he admits he certainly didn’t see coming.

Your Masterclass In Product Design: Hackaday Prize Mentor Sessions

New to this year’s Hackaday Prize is a set of live mentor sessions and you’re invited! Being at the center of a successful product design project means having an intuitive sense in many, many areas; from industrial design and product packaging, to manufacturing and marketing. This is your chance to learn from those experts who have already been there and want to make your experience better and easier.

We want you to get involved by entering your own project into the Hackaday Prize; now is the time to tell us you’re ready to demo your project with a mentor. Hackaday Prize Mentor Sessions are happening every two weeks throughout the summer. In these video chats we’re inviting some promising Hackaday Prize entries to start off with a “demo day” type of presentation, followed by an interactive session with the mentor hosting each event.

It’s also important that this incredible resource be available to all, so these videos will be published once the mentor session wraps up. This is a master class format where the advice and shared experience have a beneficial effect far beyond the groups sharing their projects.

The 2019 Hackaday Prize focuses on product development. Show your path from an idea to a product design ready for manufacturing and you’ll be on target to share in more than $200,000 in cash prizes!

Meet Some of Our Mentors:

Below you will find just a taste of the mentor sessions in the works. These are the first three mentor session videos that will be published, but make sure you browse the full set of incredible mentors and get excited for what is to come!

Bunnie Huang

Co-founder, Chibitronics


Bunnie is best known for his work hacking the Microsoft Xbox, as well as
his efforts in designing and manufacturing open source hardware. His past projects include the chumby (app-playing alarm clock), Chibitronics (peel-and-stick electronics for crafting), and the Novena (DIY laptop). He currently lives in Singapore where he runs a private product design studio, Kosagi, and actively mentors several startups and students of the MIT Media Lab.

Mattias Gunneras & Andrew Zolty

Co-founders, BREAKFAST NY


Zolty and Mattias founded BREAKFAST in 2009. This studio of multidisciplinary artists and engineers conceives, designs, and fabricates high-tech contemporary art installations and sculptures. BREAKFAST has over 15 large-scale pieces that can be found in various museums, arenas, and lobby spaces throughout the world.

Giovanni Salinas

Product Development Engineer, DesignLab


Giovanni is the Product Development Engineer at Supplyframe DesignLab. He has designed and developed hundreds of products, including consumer electronics, kitchenware, and urban furniture for the North American, European, Chinese and Latin American markets. Through his experience he has honed his expertise in rapid prototyping and DFM in plastics, wood, and metals.

We Want You To Demo Your Product!

Mentor sessions will continue throughout the summer with these and other mentors! Sign up to demo your 2019 Hackaday Prize entry!

IQ Makes Smarter Motors

We think of motors typically as pretty dumb devices. Depending on the kind, you send them some current or some pulses, and they turn. No problem. Even an RC servo, which has some smarts on board, doesn’t have a lot of capability. However, there is a new generation of smart motors out that combine the mechanical motor mechanism with a built-in controller. [Bunnie] looks at one that isn’t even called a motor. It is the IQ position module.

Despite the name, these devices are just a brushless DC motor (BLDC) with a controller and an API. There’s no gearing, so backdriving the motor is permissible and it can even double as a motion sensor. The video below shows [Bunnie] making one module track the other using just a little bit of code.

Continue reading “IQ Makes Smarter Motors”

Extremely Thorough Formlabs Form 2 Teardown By Bunnie

[Bunnie Huang] recently had the opportunity to do a thorough teardown of the new Formlabs Form 2 printer. It’s a long read, so just head over there and immerse yourself in every detail. If you want the cliff notes, though, read this but still go look at all the pretty pictures.

First, it’s a major upgrade with pretty much every component. The CPU is a huge step up, the interface went from monochrome to full color touch screen, the connectivity has been upgraded with WiFi and Ethernet, the optics are much better and safer, the power supply is integrated, there are lots of little improvements that handle things like bed leveling, calibration, resin stirring, pausing jobs, and resin refilling during a print. Bunnie practically gushes at all the features and impressive engineering that went into the Form 2.

You can compare the teardown of the Form 2 to [Bunnie’s] teardown of the Form 1 printer back in 2013.

Judge Spotlight: Andrew “Bunnie” Huang

judge-spotlight-bunnie

This week’s Judge Spotlight focuses on [Andrew “Bunnie” Huang]. If you haven’t heard of him you need to pay more attention. His hacker cred goes way back to the original Xbox, which he reverse engineered and laid bare its security flaws. Maintaining his hacker spirit he went on to design and hack the Chumby. More recently he took on the challenge of developing and Open laptop called Novena. All of this while continuing to explore and experiment with all kinds of electronics, posting about his adventures for those of us that care about an electronics ecosystem that doesn’t shut out the user from tinkering with the hardware. Join us after the break for our conversation with The Hackaday Prize judge [Bunnie Huang].

Continue reading “Judge Spotlight: Andrew “Bunnie” Huang”

Name That Ware


Last month we mentioned [bunnie]’s Name that Ware competition where participants try to guess the functionality of a random bit of hardware. We thought you might want to see another example; pictured above is the June 2008 ware provided by [xobs]. You can see a high res version here and an image of the daughter card as well. Be forewarned that someone has already posted the solution in the comments. At first glance there are quite a few interesting bits: board is copyright 1991, the 8-bit ISA connector doesn’t have any data lines connected, just power, and it’s got a lot of analog circuitry. Take a guess and then check out the comments on [bunnie]’s site to see the solution.