The hairclip-embedded tool being used on a Tiger 99x game console, clipped onto a spot where the plastic ribbon meets the LCD panel itself, heating it up

World’s Smallest Hair Straightener For Fixing Old LCD Ribbons

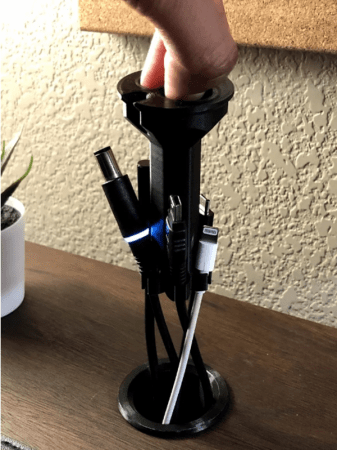
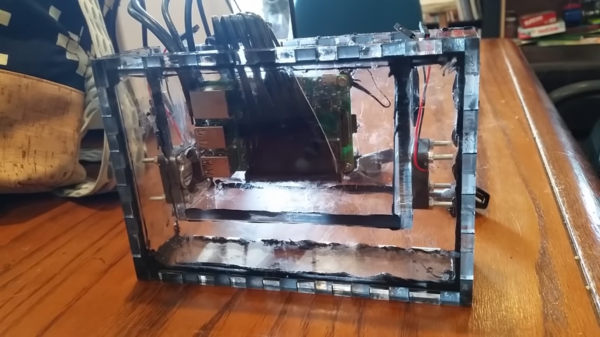
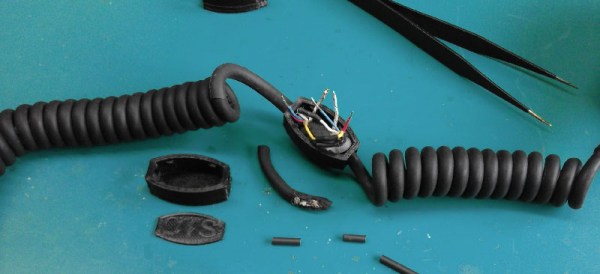
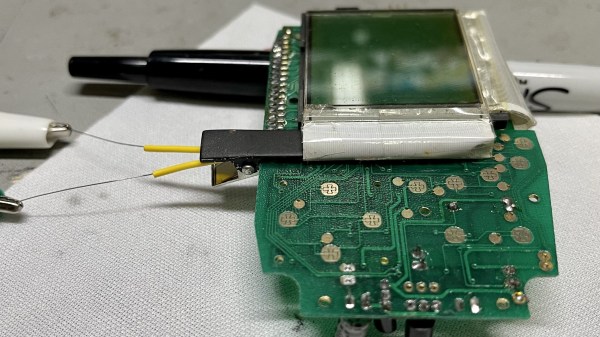
[Stephen] writes to us about an LCD repair tool he has created. We’ve all seen old devices with monochrome LCDs connected by thin film, where connections between the PCB and the LCD have deteriorated and the LCD would no longer show parts of the picture. This is a connection heating gadget, that [Stephen] affectionately dubs as World’s Smallest Hair Straightener, made specifically to bring cool old tech back to life.

A resin-printed mold houses a coil of Kanthal wire, easy to source and simple to make. He reuses a hair clip as a housing for the heating element, which also provides pressure needed to squish the film-printed conductive traces into the LCD as the adhesive melts. High-temperature epoxy brings the two together, and with a variable power supply, this tool successfully brought an old Tiger 99x handheld back to life.

This hack was made possible, in part, because of [JohnDevin Duncan] in Hackaday comment section sharing his experience on repairing LCD ribbons back in 2015, giving valuable insights on the problem that we initially thought would be solve-able with a soldering iron. The knowledge shared was distilled by [Stephen] into a tool that we all can now use when we encounter a device we really, really want to revive.

Last time we covered this topic, quite a few hackers popped up with their stories and suggestions. Old game console fix stories are a staple here on Hackaday, a few pop to mind – this high-effort trace repair of a water-damaged GameBoy cartridge, a badly designed NES cartridge socket reinvention, and this GameBoy LCD sunburn damage restoration guide.

Cable Modem Turned Spectrum Analyzer

Hopefully by now most of us know better than to rent a modem from an internet service provider. Buying your own and using it is almost always an easy way to save some money, but even then these pieces of equipment won’t last forever. If you’re sitting on an older cable modem and thinking about tossing it in the garbage, there might be a way to repurpose it before it goes to the great workbench in the sky. [kc9umr] has a way of turning these devices into capable spectrum analyzers.

The spectrum analyzer feature is a crucial component of cable modems to help take advantage of the wide piece of spectrum that is available to them on the cable lines. With some of them it’s possible to access this feature directly by pointing a browser at it, but apparently some of them have a patch from the cable companies to limit access. By finding one that hasn’t had this patch applied it’s possible to access the spectrum analyzer, and once [kc9umr] attached some adapters and an antenna to his cable modem he was able to demonstrate it to great effect.

While it’s somewhat down to luck as to whether or not any given modem will grant access to this feature, for the ones that do it seems like a powerful and cheap tool. It’s agnostic to platform, so any computer on the network can access it easily, and compared to an RTL-SDR it has a wider range. There are some limitations, but for the price it can’t be beat which will cost under $50 in parts unless you happen to need two inputs like this analyzer .

Thanks to [Ezra] for the tip!

Charger Caddy Shows What 3D Printers Were Meant For

As computers became more popular in the late 80s and into the 90s, they vastly changed their environments. Of course the technological changes were obvious, but plenty of other things changed to accommodate this new technology as well. For example, furniture started to include design elements to accommodate the desktop computer, with pass-through ports in the back of the desks to facilitate cable management. While these are less common features now there are plenty of desks still have them, this 3D printed design modernizes them in a simple yet revolutionary way.

While these ports may have originally hosted thick VGA cables, parallel printer cables (if they would fit), and other now-obsolete wiring, modern technology uses simpler, smaller solutions. This doesn’t mean that they aren’t any less in need of management, though. This print was designed to hold these smaller wires such as laptop chargers, phone chargers, and other USB cables inside the port. A cap on the top of the print keeps everything hidden until it is lifted by hand, where a cable can be selected and pulled up to the top of the desk.

While it might seem like a simple project at first, the elegance of this solution demonstrates excellent use of design principles and a knack for integrating slightly older design decisions with modern technology. If you have a 3D printer and a cable management port on your desk, the print is available on Thingiverse. Not every project needs a complicated solution to solve a problem, like this automatic solar tracker we recently saw which uses no complicated electronics or algorithms to reliably point itself at the sun.

Arduino Cable Tracer Helps Diagnose Broken USB Cables

We’ve all found ourselves swimming amongst too many similar-looking USB cables over the years. Some have all the conductors and functionality, some are weird power-only oddballs, and some charge our phones quickly while others don’t. It’s a huge headache and one that [TechKiwiGadgets] hopes to solve with the Arduino Cable Tracer.

The tracer works with USB-A, Mini-USB, Micro-USB, and USB-C cables to determine whether connections are broken or not and also to identify wiring configurations. It’s built around the Arduino Mega 2560, which is ideal for providing a huge amount of GPIO pins that are perfect for such a purpose. Probing results are displayed upon the 2.8″ TFT LCD display that makes it easy to figure out which cables do what.

It’s a tidy build, and one that we could imagine would be very useful for getting a quick go/no-go status on any cables dug out of a junk box somewhere. Just remember to WIDLARIZE any bad cables you find so they never trouble you again. Video after the break.

Continue reading “Arduino Cable Tracer Helps Diagnose Broken USB Cables”

Cable Mechanism Maths: Designing Against The Capstan Equation

I fell in love with cable driven mechanisms a few years ago and put together some of my first mechanical tentacles to celebrate. But only after playing with them did I start to understand the principles that made them work. Today I want to share one of the most important equations to keep in mind when designing any device that involves cables, the capstan equation. Let some caffeine kick in and stick with me over the next few minutes to get a sense of how it works, how it affects the overall friction in your system, and how you can put it to work for you in special cases.

A Quick Refresher: Push-Pull Cable Driven Mechanisms

But first: just what exactly are cable driven mechanisms? It turns out that this term refers to a huge class of mechanisms, so we’ll limit our scope just to push-pull cable actuation systems.

These are devices where cables are used as actuators. By sending these cables through a flexible conduit, they serve a similar function to the tendons in our body that actuate our fingers. When designing these, we generally assume that the cables are both flexible and do not stretch when put in tension. Continue reading “Cable Mechanism Maths: Designing Against The Capstan Equation”

Extreme Pi Overclocking With Mineral Oil

Liquid cooling is a popular way to get a bit of extra performance out of your computer. Usually this is done in desktops, where a special heat sink with copper tubing is glued to the CPU, and the copper tubes are plumbed to a radiator. If you want dive deeper into the world of liquid cooling, you can alternatively submerge your entire computer in a bath of mineral oil like [Timm] has done.

The computer in question here is a Raspberry Pi, and it’s being housed in a purpose-built laser cut acrylic case full of mineral oil. As a SoC, it’s easier to submerge the entire computer than it is to get a tiny liquid-cooled heat sink for the processor. While we’ve seen other builds like this before, [Timm] has taken a different approach to accessing the GPIO, USB, and other connectors through the oil bath. The ports are desoldered from the board and a purpose-built header is soldered on. From there, the wires can be routed out of the liquid and sealed off.

One other detail used here that  we haven’t seen in builds like this before was the practice of “rounding” the flat ribbon cable typically used for GPIO. Back in the days of IDE cables, it was common to cut the individual wires apart and re-bundle them into a cylindrical shape. Now that SATA is more popular this practice has been largely forgotten, but in this build [Timm] uses it to improve the mineral oil circulation and make the build easier to manage.

Continue reading “Extreme Pi Overclocking With Mineral Oil”

Repairs You Can Print: Better Cable Splicing With 3D Printed Parts

A while back, [Marius] was faced with a problem. A friend of his lives in the middle of a rainforest, and a microphone was attacked by a dirty, greasy rat. The cable was gnawed in half, and with it went a vital means of communication with the outside world. The usual way of fixing a five- or six-conductor cable is with heat shrink, lineman’s splices, insulating tape, and luck. [Marius] needed something better than that, so he turned to his 3D printer and crafted his own wire splice enclosure.

The microphone in question is a fancy Jenal jobbie with a half-dozen or so conductors in the cable. A junction box was the obvious solution to this problem, and a few prototypes, ranging from rectangular to fancy oval boxes embossed with a logo were spat out on a 3D printer. These junction boxes have holes on either end, and when the cable ends are threaded through these holes, the wires can be spliced, soldered, and insulated from each other.

This microphone had to hold up to the rigors of the rainforest and rats, so [Marius] had to include some provisions for waterproofing. This came in the form of a hot glue gun; just fill the junction box with melted hot glue, pop the cover on, and just wait for it to cool. Like all good repairs, it works, and by the time this repair finally gives out, something else in the microphone is sure to go bad.

It’s a great repair, and an excellent example of how a 3D printer can make repairs easy, simple, cheap, and almost as good as the stock part. You can check out a few videos of the repair below.

Continue reading “Repairs You Can Print: Better Cable Splicing With 3D Printed Parts”